THE MEASURES.
Reading edition
The greatest possible care should be taken in measuring to obtain correct lengths and widths, as only right measures will enable us, in drafting, to define the size and position or attitude of the form measured.
We must, therefore, take the measures from and to accurately located points.
The height of the neck can be easily and correctly located by the eye, and the front and bottom of the arm by the use of a small square; but the waist line, which is a measuring station of the greatest importance, must be defined as follows:
Place an elastic band around the waist, just above the hips, and adjust it so that it is perfectly level.
Whether the waist is to be long or short, the band must be placed as directed; the actual waist length can then be increased or diminished according to style or taste.
As the measures that terminate at the belt govern the balance of the garment and indicate attitude, the importance of adjusting it accurately and always over the same part of the waist will be apparent.
Having adjusted the belt, proceed as follows:
THE BACK LENGTH.
Apply the measuring tape to the socket bone at the neck as marked by A, Figure 1, and measure down to the lower edge of the belt, which gives the actual length of the back.
Should we desire to make the waist longer or make it appear so, because taste or style requires it, take what extra length may be suggested before removing the tape from the neck.
For a jacket we continue down to the point where the bottom should be, and for a long ulster, to the floor, as to D and E.
FRONT LENGTH.
Placing the tape to the same point at neck, carry it along the neck, and let it fall over the shoulder past the front of the arm. It should not be drawn down close against the arm but should pass from 1 to 1½ inch in front of it, but not over the bust, straight down to the bottom of the belt at the side, as shown on Figure 2, where the point is marked N.
THE FRONT OF ARM.
This is also called the “Blade Measure.” For this we use a small square with a short tape measure attached.
This square is placed under the arm, against which, as it hangs straight down, it presses firmly.
The tape is then drawn smoothly across to the center of the back, at B, as shown on Figure 1, and the measure noted.
9
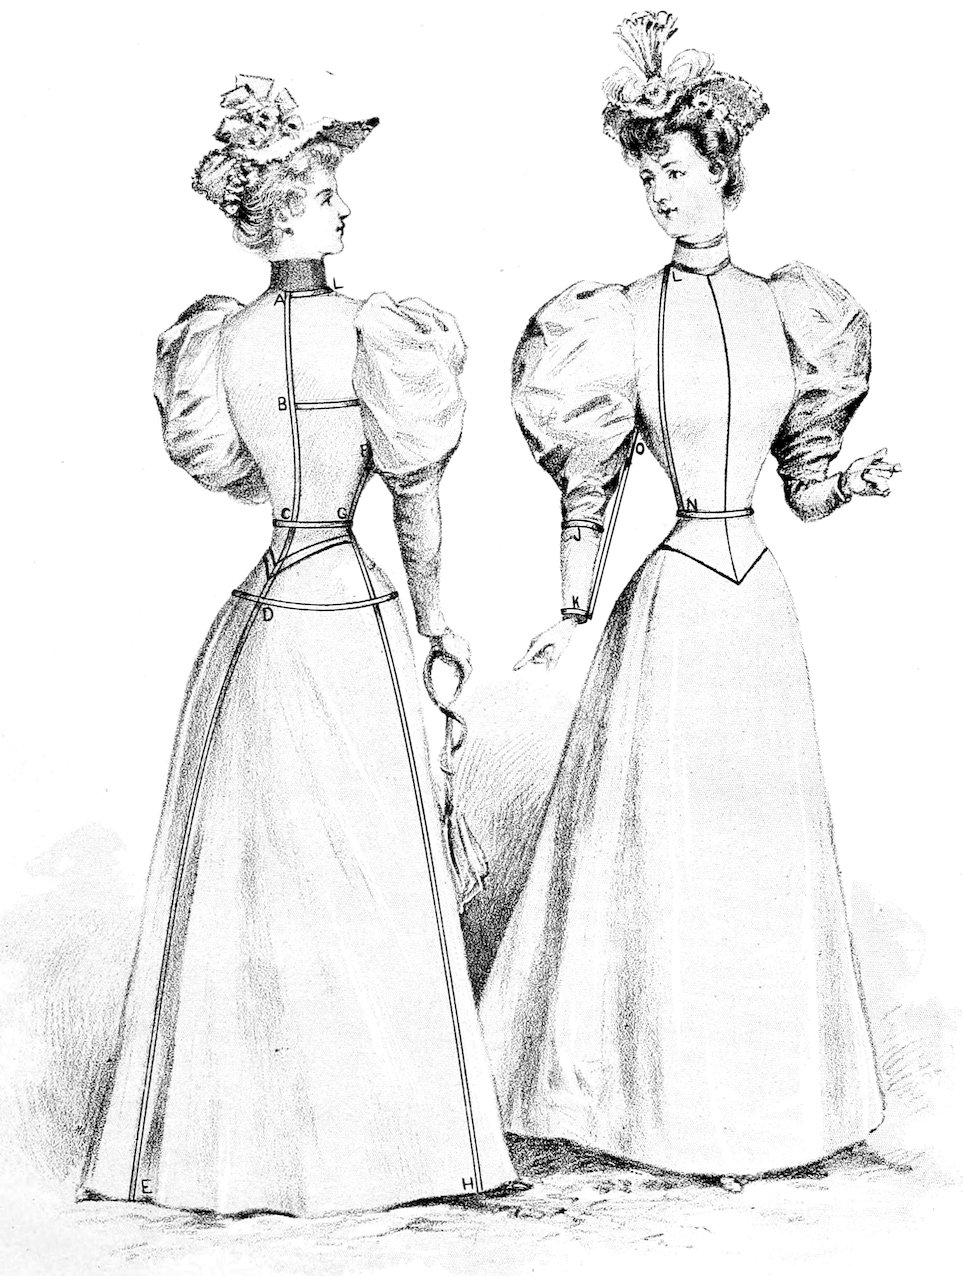
FIGURE 1. FIGURE 2.
10
THE HEIGHT UNDER ARM.
Without removing the square draw the tape downward, being careful not to disturb or lower the square, and measure to the bottom of the belt at G.
Should the square have changed its position, replace it close up to the arm again.
THE LENGTH OF SLEEVE.
While the square is in position draw the tape down straight to the wrist at K, or to the point desired for the length of the sleeve.
This ends the usefulness of the square.
THE BREAST MEASURE.
Standing behind the figure we place the tape across the fullest part of breast and carry it under the arms and across the back, being careful that it adheres over the surface closely, and call off the measure. This should be smoothly taken, neither too close nor too easy.
THE WAIST MEASURE.
Remove the elastic belt, and place the tape around the waist and draw it tight. Should a belt be worn it had better be removed, especially when measuring for a dress-waist. In the latter case take the size very close.
THE HIP MEASURE.
Is taken 6 inches below the natural waist, always easy, and smoothly around. No measure is required below the hips.
THE ELBOW.
The elbow measure is taken close to obtain the size of arm. Any width can easily be added over this for easy sleeves.
THE WRIST.
Around the cuff of dress or wrist, also taken close to obtain the right size, any extra size needed is added.
On button-up dresses take a close neck measure.
11