Chapter XV · MECHANICAL DISPLAYS.
Reading edition
Mechanical window dressing has made great strides during the past few years, and has become an important factor in successful displays. When you hear a decorator sneer at mechanical features you may be sure he has himself no mechanical genius or he would not endeavor to belittle so genuine an attraction. Not that mechanical displays are suitable for all occasions, but there are times in every decorator’s experience when a “motion window” is really a necessity, and many other times when mechanism is a desirable adjunct to a display that otherwise would be commonplace. People are naturally curious. They will always stop to examine anything that moves, and will enjoy studying out the mechanism or wondering how the effect has been obtained. Any decorator is capable of figuring out for himself diverse attractive mechanical displays, but for the benefit of those who may require preliminary instructions, or need on occasion a device already planned, I shall describe several effects that have been used by prominent decorators during the past few months, as well as the staple mechanical appliances. One of the simplest centerpieces is the
REVOLVING STAND.
To make this fixture use four solid wheels five and one-half, four and one-half, three 88and one-half and two and one-half feet in diameter. Fasten them three feet apart to a 3 × 3 in. post extending from the floor to the ceiling; the post to have bearings at each end. The largest wheel to be attached at the bottom 6 in. from the floor. Under this wheel, and fastened to the post, a large pulley is used.
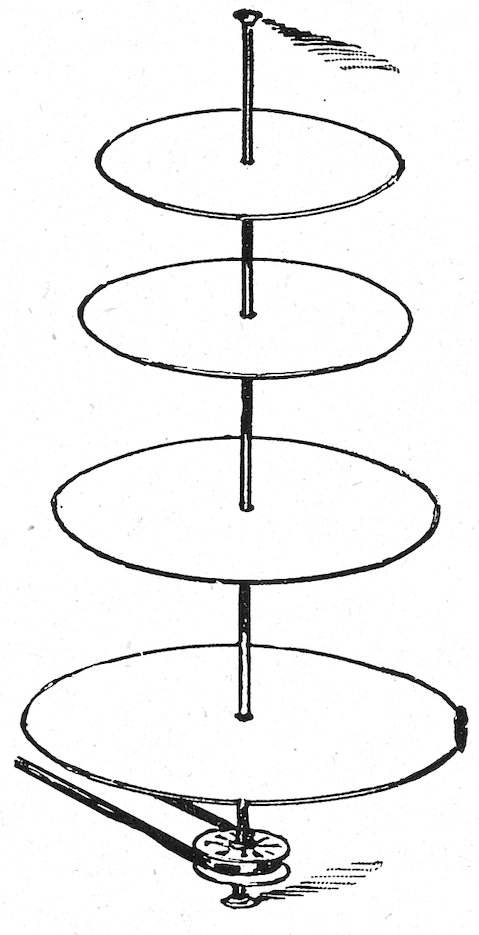
Make the turn in the belt by the use of small pulleys attached to the motor. Regulate the speed to about one revolution a minute, and you have a window that no man need be ashamed of.
CONTRA-REVOLVING PILLARS.
The following mechanical fixture will serve to display almost any class of merchandise:
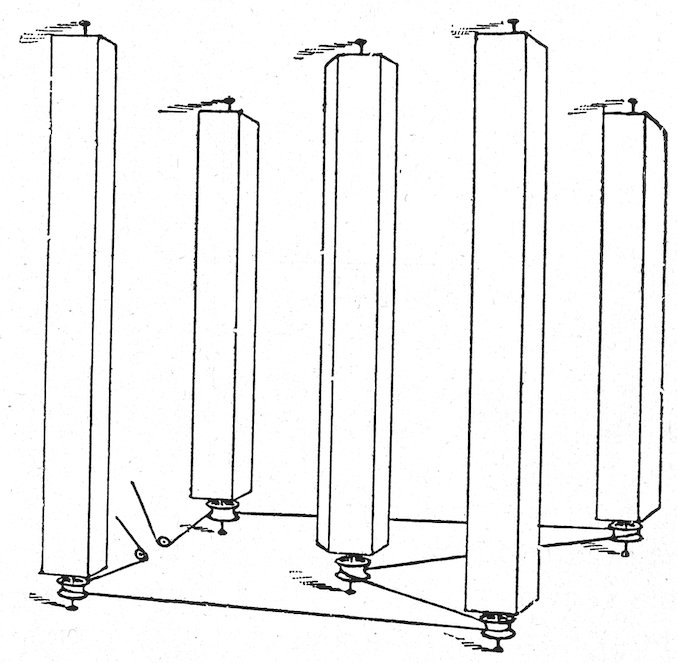
Make four boxes, ten inches square and seven and one-half feet long, by using 1-in. boards 10 in. square for the ends and 1-inch strips for the corners. Cover all four sides with pasteboard, it being puffed with cheesecloth. Then make a hexagonal box the same length, ten inches on a side. Treat this the same as the others. Now fasten across the window, eight feet from the floor, three two-inch strips. Place the first one 18 inches from the glass, making them as far apart as the window will admit of, the distance being equal, and the last one being at least ten inches from the back of the window. On the underside of the two end strips fasten a curtain fixture 12 inches from each end, and one of the same kind in the center of middle strip; on one end of each box fasten a curtain fixture to fit those on the strips. On the other end of each box fasten a 10-inch wood pulley; the pulley to be 2 inches from the end of the box and 3 inches from the floor. Make the connection from the floor to the end of the box with a 2-inch square post; fit curtain fixtures in the floor and to the end of the posts; then place the belt around the pulleys and attach to the motor; then trim the posts. Place a false bottom in the window just above the pulleys, cover with cloth, and the window is ready. Start your motor and the entire display is in motion.
REVOLVING STAR.
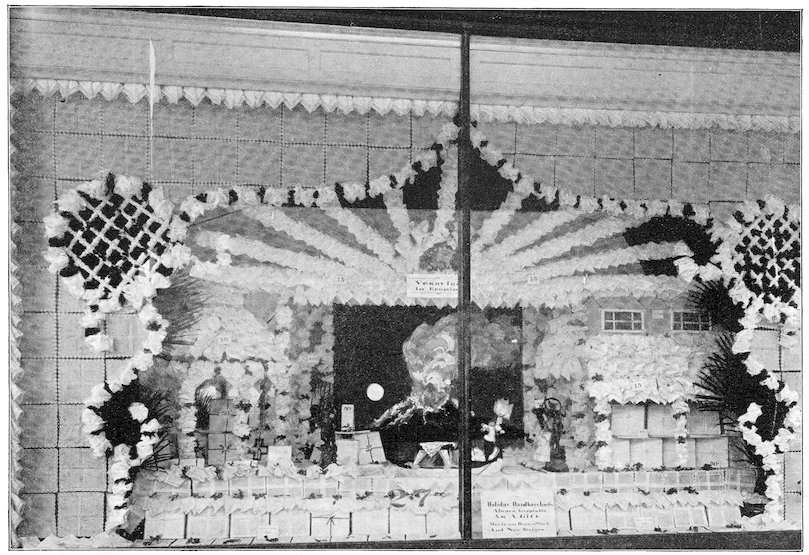
In the picture is shown a mechanical window which was very simple, very attractive and which sold a great many goods. The center star, which revolved slowly, was ten feet across, or from tip to pit, and had a green incandescent light placed in the center, which flashed three times to each revolution. 89The half-stars on the sides each contained a red incandescent light which burned continuously. This display, while very simple, was one of the most attractive windows I have seen, it being almost impossible for a person to pass on either side of the street without it attracting their attention. The goods shown were French ginghams arranged in regard to their respective colors. The power used to move the star was a small fan motor geared to gain power at the expense of speed.
A SKIRT SALE.
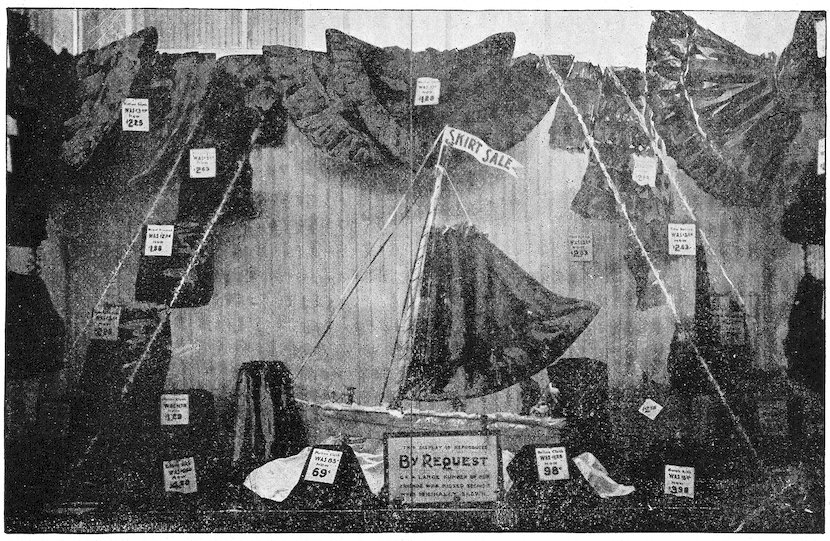
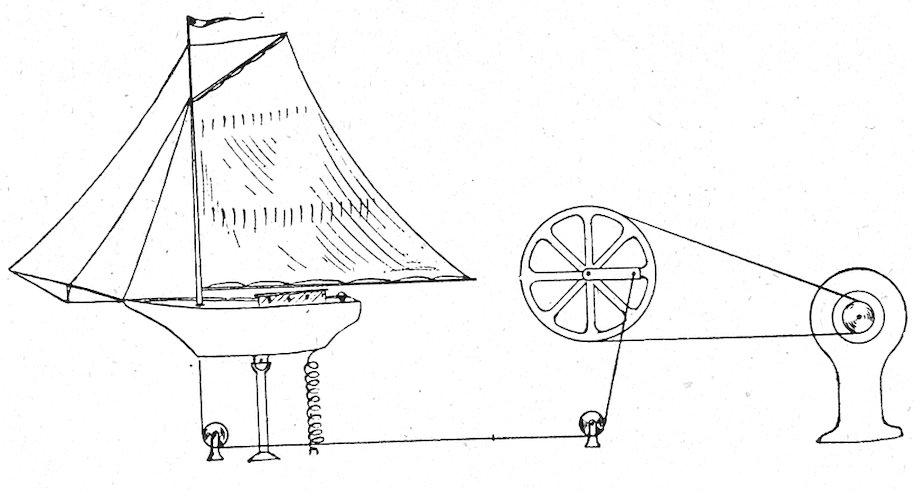
Here is a very pretty idea of a skirt sale, which the designer has transposed to a “skirt sail.” The illustration will give you a fair idea of the window. The background and floor were of pink colored material, the boat being covered with white crepe paper and trimmed with red, white and blue ribbon. The sail itself was a handsome skirt of illuminated silk, thrown into stronger relief by having all the other skirts black. Water, of course, was represented by light blue goods, and ladder effects with rope covered with 3-inch strips of fringed crepe paper. The boat was given a rocking motion by means of a simple device which we 90illustrate, attached to a ⅛-horse power electric motor, geared down to a 5-inch crank. A rope is run through a small pulley on the floor to another pulley under the boat, and then attached to the end of the boat. A roller shade spring is fastened to the other end, the boat being hinged in the middle.
MECHANICAL SHIPS.
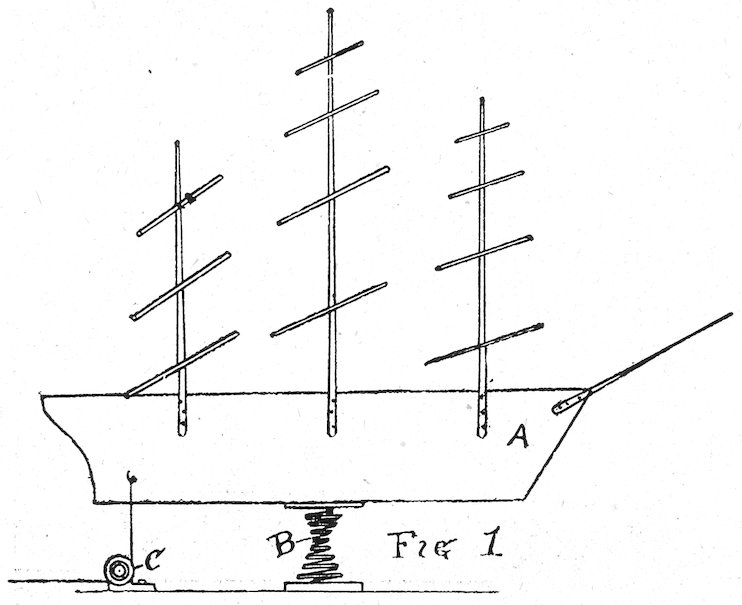
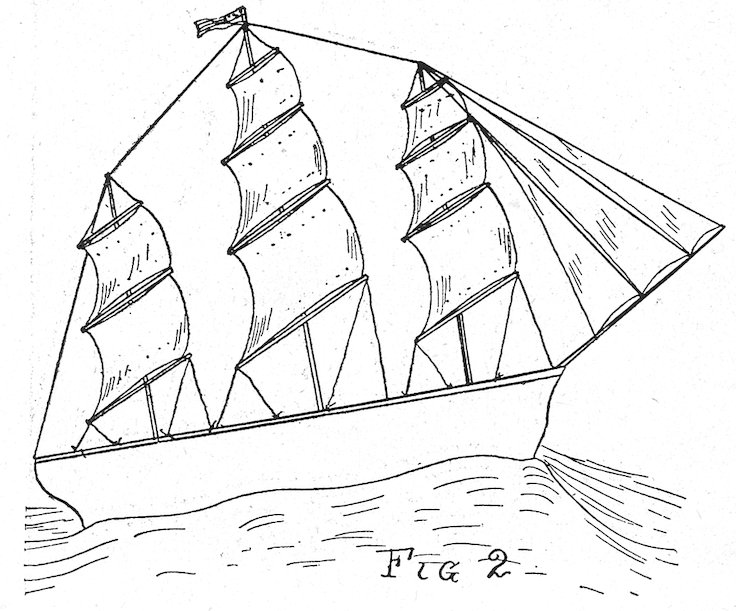
Another method of imitating a ship riding the waves is shown herewith. The hull, A, is a plain piece of board, and the masts are strips of wood nailed to this. Purchase a common bed spring and attach it to the center of the keel, as at B, and attach the lower part of the spring to a piece of wood on the window floor. If the balance is right it will be simply necessary to tip the ship a little to set it rocking to and fro in imitation of riding the waves. A little wheel can be set at C, and a cord put under it and connected with the hull. The cord can run to a point inside the store, where it can be pulled occasionally by hand, thus setting the ship to rocking. Or this cord can be connected to a door or to an electric motor. Next, the ship is trimmed. The hull, railing, mast, etc., are covered or wound with white or colored stuff, and the sails are made of lace or any desired fabric. The surface of the sea is represented with appropriate cloth. A slit should be cut, into which to put the hull, and the edges are tacked to the wood several inches below the ship’s rail. The cloth will then follow the motion of the ship, and closely represent waves.
A WINDMILL.
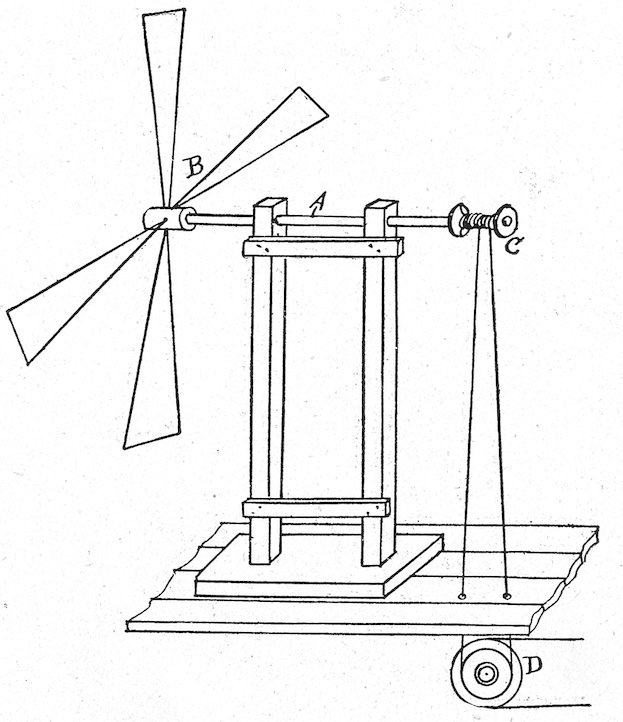
A cheap windmill frame and wheel can be made as in the accompanying drawing. The stand is wood, and the two upright pieces are bored out at the top for the broom handle shaft A. A hub of wood, B, is attached to one end, and four blades cut from thin wood are inserted. A large spool, C, is put on the other end of the shaft, and a cord run over this to a wheel, D, below. 91The frame, shaft and wheel should be trimmed with appropriate material, and a pasteboard front put up in representation of the old-fashioned grinding mill. The pasteboard should be painted in imitation of stone work.
ANOTHER WINDMILL.
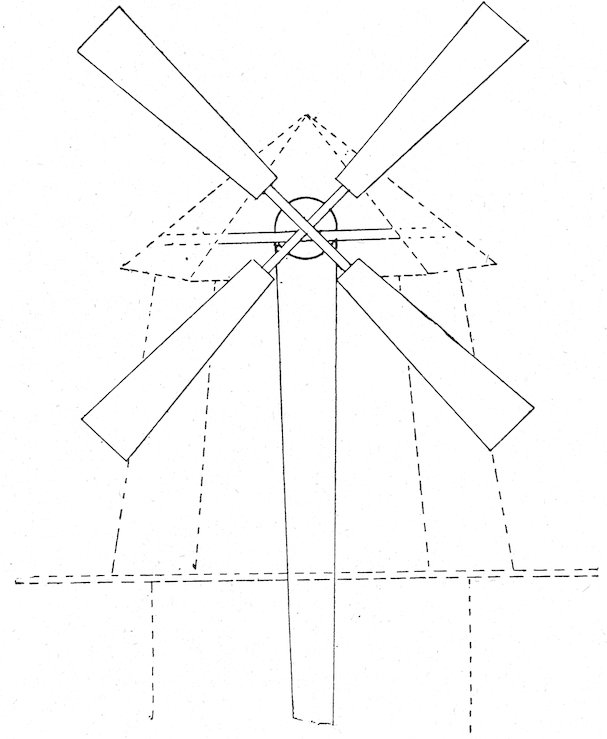
Another style of windmill can be made in this way: Place on the floor in the middle of the window a box 24 in. square, 4 ft. high. On top of this box fasten a wheel 5 ft. in diameter. On top of this wheel fasten an octagonal box 3½ ft. across at the bottom and 2 ft. at the top, 3 ft. high. On the top of this box fasten bearings for a shaft 3 ft. long. On the end of this shaft fasten four arms to measure 24 in. from shaft; also fasten a large pulley to this shaft in the center of the box. Over this pulley the belt is run to the motor below. Over the top of the box construct a roof; then at the back of the box that rests on the floor build a frame as wide as the box and 3 ft. high, this to extend to back of the window. Over this make a roof so that the apex is just a little above the large wheel. Cover all the wood with cloth, then with any kind of goods you may desire. Start your motor and you will have an old-fashioned windmill in operation.
MECHANICAL SKIRT WINDOW.
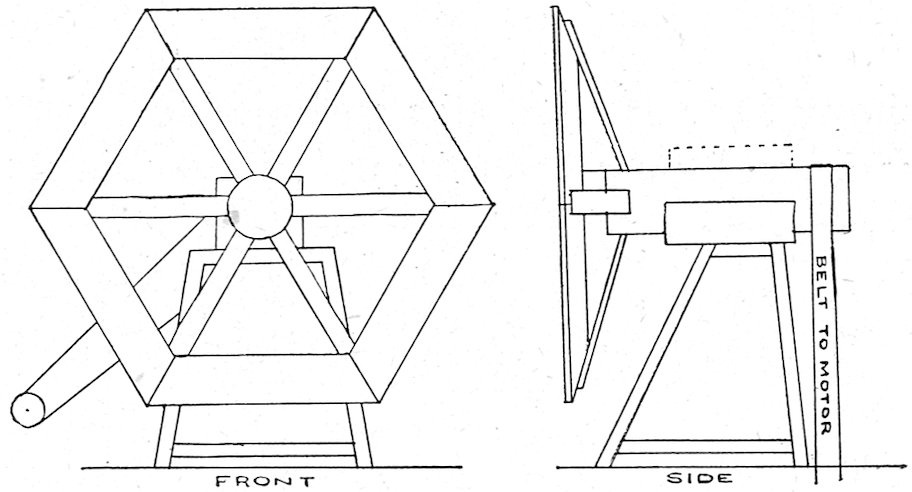
I show herewith drawings for the construction of a wheel upon which skirts may be displayed. The face of the wheel concaves, or slopes in toward the center. White skirts, under which colored paper has been placed, may be fastened around the outside, either in the form of a circle or a hexagon, the bottoms of the skirts being at the side of the wheel. Then, almost at the center, arrange four more skirts the same as the others. Then cover the tops of the last skirts with a large, round ticket, fastened to the wheel with a hat pin, and weighted, so that the ticket will remain stationary while the wheel revolves. The wheel may be of any size, to suit your window, and should be constructed of pine or other light material. It is extremely simple, and may be constructed by any one, while, as may be seen at a glance, it is sure to be a very attractive display.
THE FOLDING STAR.
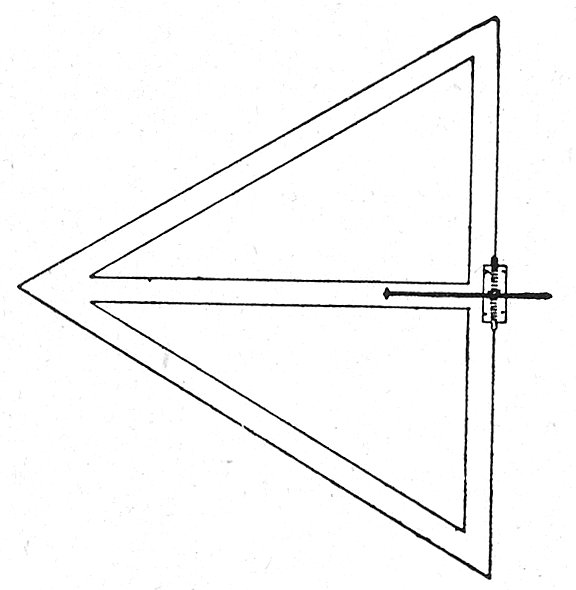
The design is a background, to be used in connection with any line of goods. When the star is closed all that fronts the spectator is a mass of white puffing. It slowly opens and reveals a recess in which is a display of goods strongly lighted by hidden incandescents. The effect is beautiful and is sure to attract attention. The back of the points, which form the star when it is opened, are puffed in yellow or some other 92color harmonizing with your display. Upon each point, the framework of which is shown here, is fastened a spring hinge, such as is used on screen doors. These hinges operate to close the points. Strong picture wire is used to draw back the points, and this must be fastened as near the hinges as possible in order that it may be concealed by the puffing, as it is on the face of the display, pulling the points out. By covering the hinges and wire with stiff paper, and puffing over that, a space will be left for the wire to run in and render it invisible. The pulleys at the three corners of the framework, as shown in the drawing, should be double, the wires running over them being spliced a few inches beyond the pulleys. The large drive wheel shown in the basement should be set up with one standard to allow the wires to make a complete revolution.
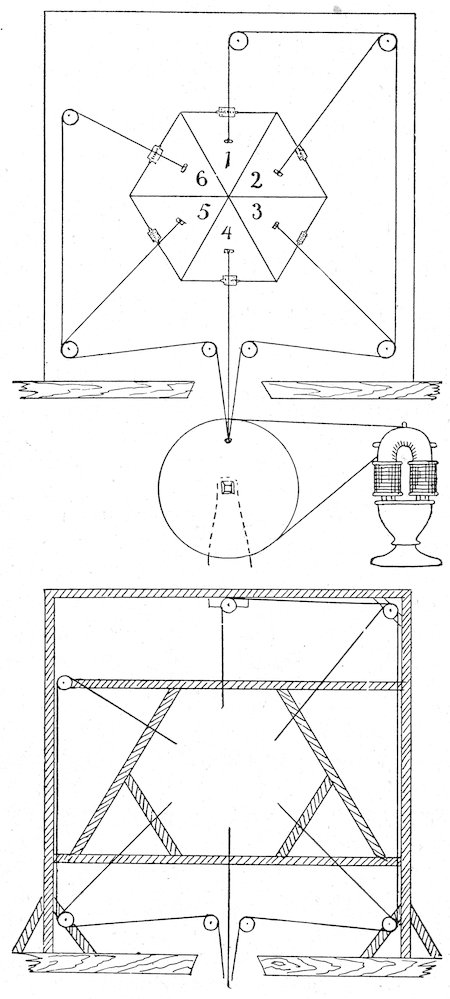
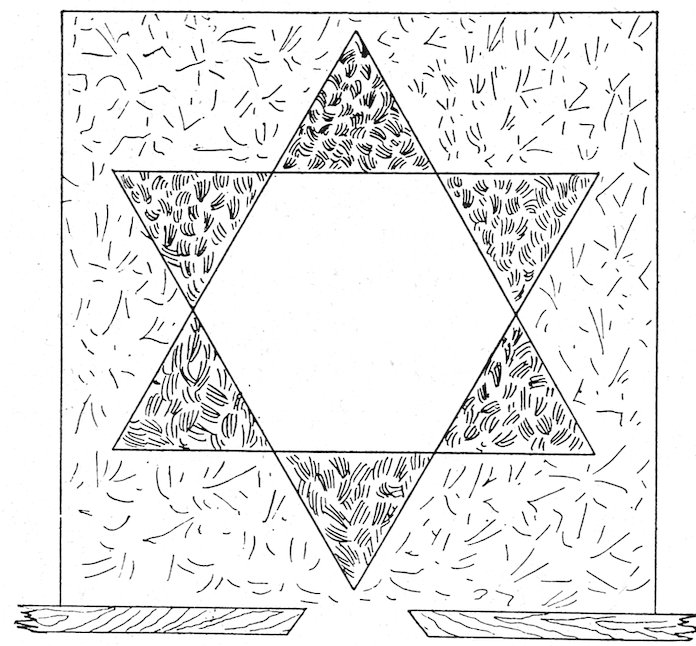
If you have mirrors, and can set them on each side of the star at an angle of about 45 degrees, they will by reflection give your display the effect of three stars.
Where this idea is used for a millinery window the face of the display could be covered by white flowers instead of puffing, and the points of the stars with bunches of violets.
THE MECHANICAL STAR.
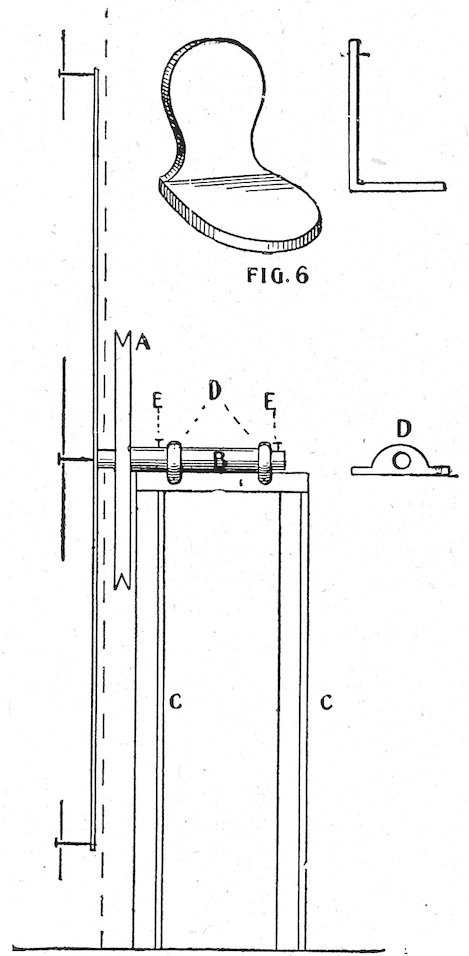
First build a large star, six, eight or ten points, according to number of articles to be displayed, which can be twice as many as the number of points on large star. To the center of this star fasten a round shaft 93or axle, allowing it to extend on back of star only, and be flush with front of star (see B, fig. 2). On this shaft, and about 3 inches from the star fasten a wheel with a groove in edge to receive a round belt (A, fig. 2). Then build upright (C, figs. 2 and 3). On top of this upright fasten two bearings (D, figs. 2 and 3). Through these bearings pass the shaft (B) and fasten in place with pins (E, E, fig. 2), these to prevent shaft pan coming out when in motion.
Next make twice as many small 5-pointed stars as points on large star. On back, and exactly in center of these, glue some small pieces of heavy cardboard, about the size of a penny, and in center of back of same star, at bottom, fasten some lead or other weights. See fig. 1.
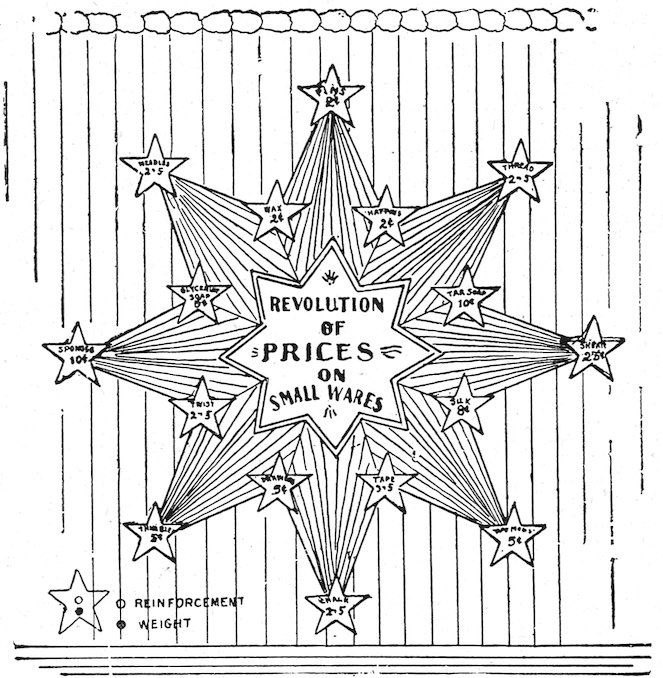
Next decorate face of large star by pleating the points in cheesecloth, or any other way desired, and after having lettered the face of each of the small stars pass a large pin through the re-enforcement in center of them and fasten one to each of the points of the large star, as shown in fig. 1. The large star, shown in center of fig. 1 should be treated the same as the small ones. If you take hold of the grooved wheel or shaft and turn it now, it should cause the large star to revolve carrying the small ones with it; but the small weights on back of small stars will cause them to remain right side up, as will also the star in center, and if not run too fast will produce a very pretty effect.
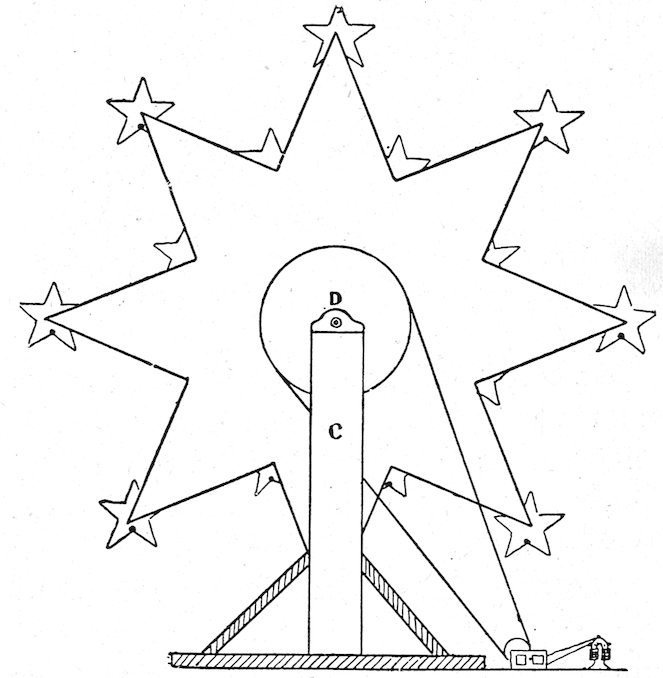
Figure 3 shows rear view and fig. 2 side view.
94The dotted line shown in fig. 2 shows the background of window, which should pass immediately in back of large star, and front of grooved wheel, thereby concealing all other mechanism.
This design may be varied by removing the small stars and in their place substituting small swinging shelves.
Should these shelves be used instead of stars, almost any kind of articles (not too heavy or large) can be displayed, as could also slippers or shoes hung in the same manner. In fact, this contrivance can be used in many ways.
Now that the effect is all ready it becomes necessary to cause it to revolve and it is imperative to in some way reduce the speed of the motor.
A practical speed reducer is shown in fig. 4. It is made as follows:
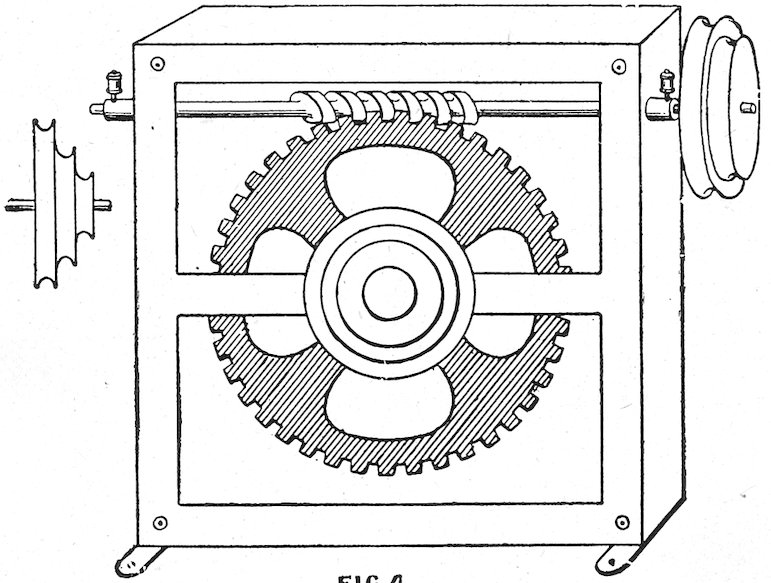
Two cast iron side frames, between which I run a worm gear. Against this gear is run a worm. On the end of the worm shaft I have a pulley with two different sized grooves in the edge. To this pulley I run my motor belt, on the shaft which runs through the worm gear and is allowed to extend outside of frames. I fasten another pulley wheel with different size grooves in edge and by running my power belt from this wheel to my display I get whatever speed I desire, depending on which groove I run the belt from. I do not expect many window dressers will be able to construct these gears themselves, but any good machinist can make it and once secured it will always be ready for use, take up very little room in window and pay for itself many times over.
REVOLVING WHEEL.
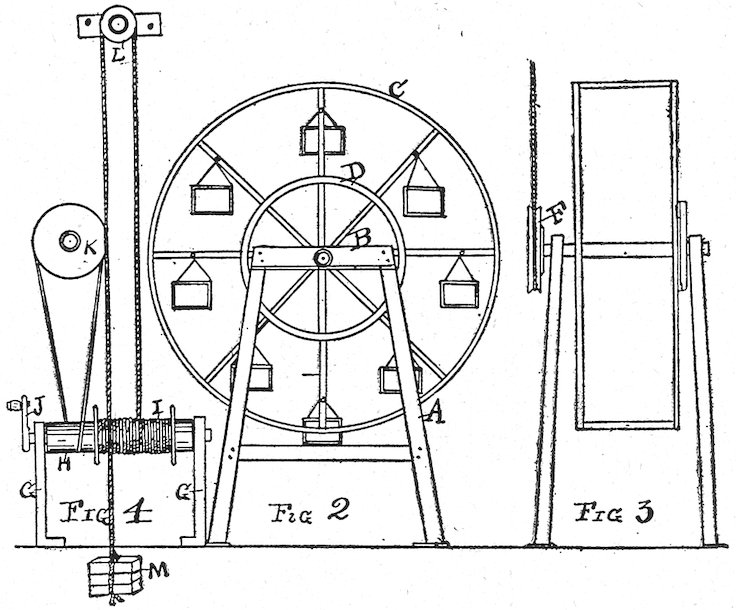
Figs. 2 to 4 illustrate how to make a revolving wheel for showing goods. The stand is made of four pieces of 1 × 1½ pine, A, three feet high, and the top joined with cross pieces, B, of the same stock. Bore an inch hole for the wheel shaft on each side. The wheel is three and a half feet in diameter. Hooping will do for the rims, C, and these are nailed to wood spokes and the latter wired to a hub made from a block of wood, and bored out for the inch shaft on which the wheel is to turn. The wheel is strengthened by nailing on a second hoop at D. The whole affair should be covered with cloth, and swinging boxes attached to the rims, in which to put goods. The view 3 shows the width of the wheel and a wood grooved pulley fastened to the wheel shaft at F. Fig. 4 shows how to make the wheel turn about four times per minute. After the wheel and frame are set up in the window, make a stand of wood pieces, C C, and put a 2-inch diameter round piece of wood, H, in holes cut for same and arrange for turning by means of the crank, J. Put up a grooved wood pulley at L, and run a cord over this. One end of the cord is 95weighted with a few bricks, M. The pulley, K, is the same as pulley, F, in fig. 3. Another cord encircles this and also the round piece, H. The crank, J, is turned, and thirty or forty turns of the cord taken on the round piece H. Then the device is left alone, and the weight of the bricks steadily pulls on the cord, gradually unwinding it, causing the round piece, H, to turn and slowly revolve the big wheel. After an hour or so the cord is unwound and is rewound by turning the crank again.
HALF REVOLVING BUSTS.
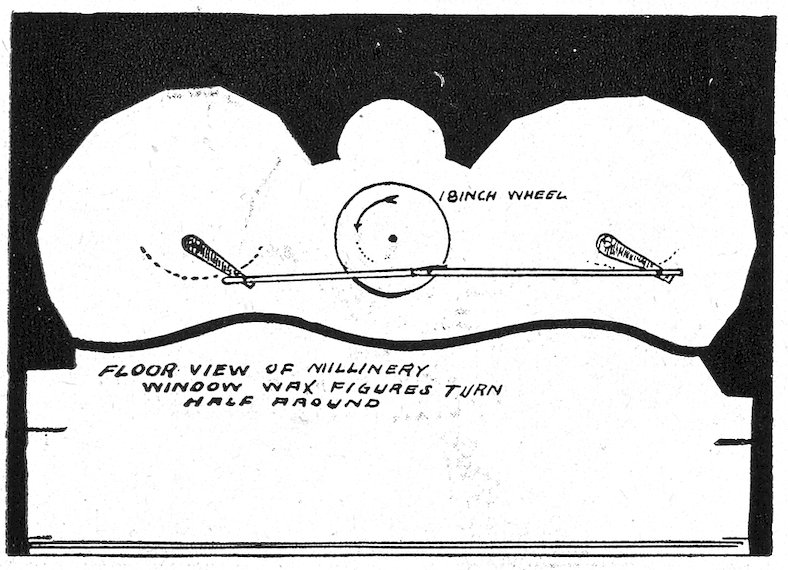
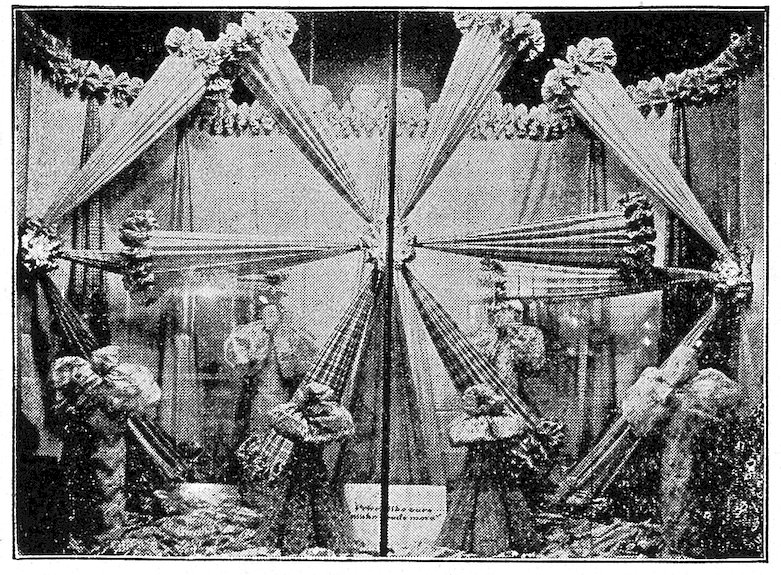
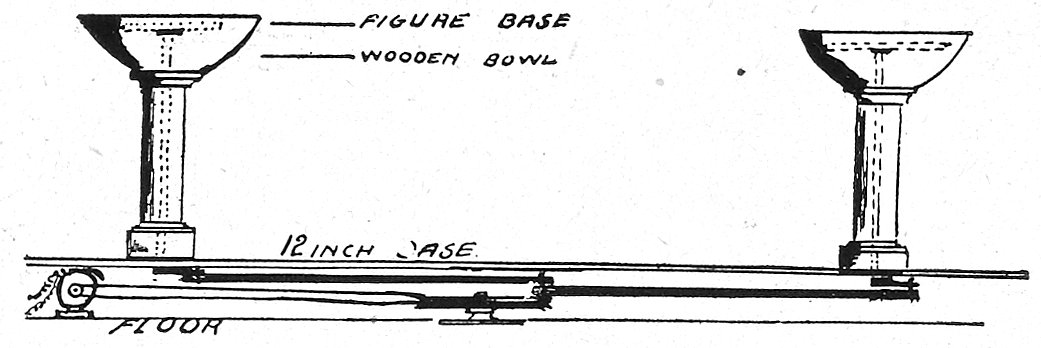
For a millinery display, or any other attraction of a like character, two bust forms may be made to turn half way around, in opposite directions, then pause, and turn back to their original positions. This is accomplished by means of a large wheel to which two eccentrics are attached, each eccentric being connected with a standard holding a bust. Our diagram shows the floor plan of the mechanism, the large 18-inch wheel, which is run by means of an electric motor, turning the eccentrics as indicated. The standards supporting the wax figures run through the centers of the side pillars. The bowls at the top remain stationary, while the busts turn.
STRAW HAT MACHINE.
A novel mechanical display of straw hats is arranged as follows:
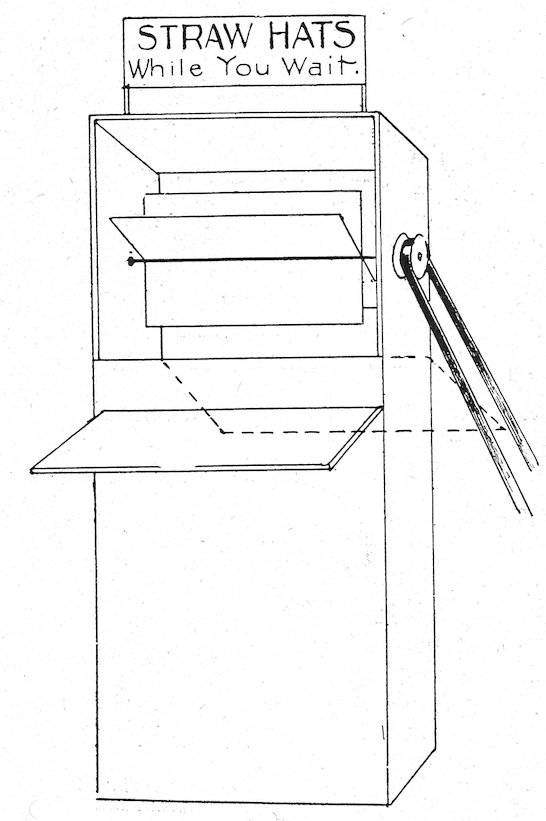
Make a box 4½ ft. high and 18 in. wide; open two sides 15 in. from the top; set this box on end, the open side to the top. The open side also to face the glass and to be about half way back and to one side of the window. Make a little platform 12 × 18, about 6 in. below the opening in front; a like platform, only to be longer and even with the opening in the back. Now bore a hole in each side of the box about the center of the opening and insert a shaft. On this shaft inside the box nail four light boards, 6 in. wide and 15 in. long; then fasten a 4-in. pulley to the end of the shaft and connect with the motor. Now fill the back of the window up 3 or 4 ft. with straw, letting it slope down toward the glass. Cover the entire floor with straw, and also the platform in the back. Then place hats on stands on the floor and suspend hats from rods above them. Place three or four hats on the stand in front, and make a sign which reads, “Straw hats while you wait.” Start your motor and you have a window that will sell hats.
96
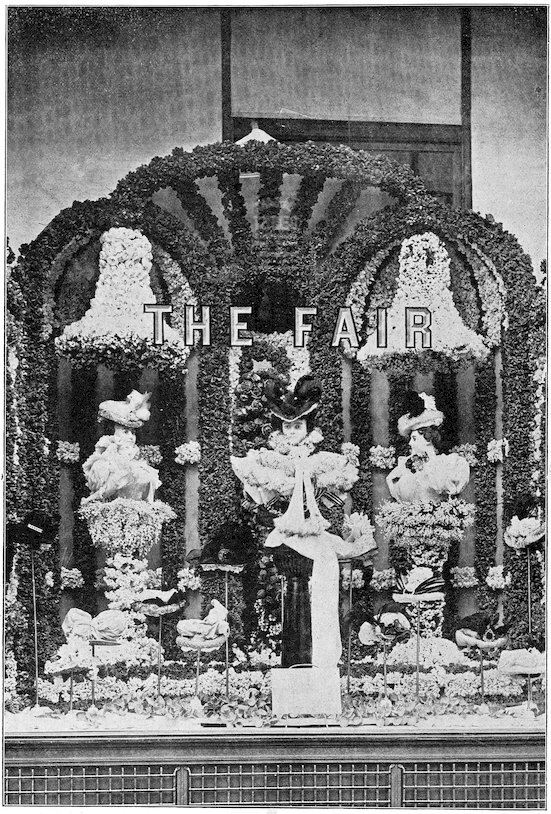
EXAMPLE OF DISPLAY WITH HALF REVOLVING BUSTS.—McFaddin.
97
“AN ERUPTION OF VESUVIUS.”
The designer describes this effect as follows:
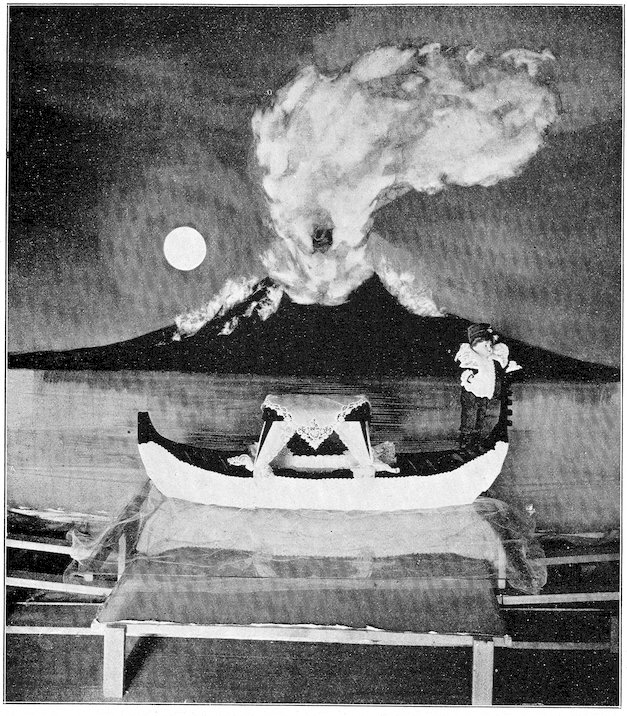
“In describing the window as seen through the plate glass, one can easily imagine he is looking at a bit of nature, only in a miniature form. In the foreground, moored to a dock, is seen a gondola, majestically rising and falling upon an effect that looks precisely like a deep, clear body of water, with a slow, even motion so perfect that it is impossible to determine when it begins or stops. In the distance old Vesuvius is belching fire and lava, which looks so real it is hard to believe it is only an illusion.”
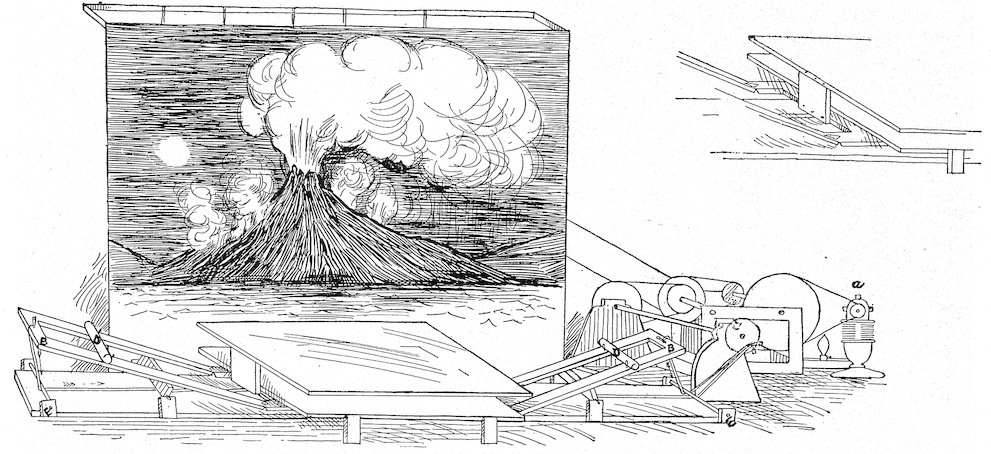
The drawing will at a glance give a fair idea of the mechanical contrivance used to obtain these effects.
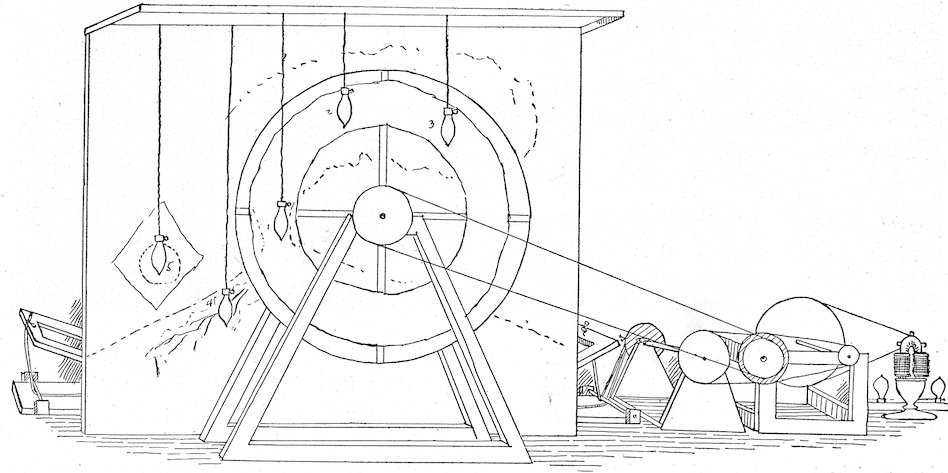
DIAGRAM SHOWING MECHANISM OF THE VOLCANO AND MOON EFFECTS’.
The rising and falling motion to the water effect was made on the plan of scale beams, as can be seen in drawing. Cords were fastened to ends of levers marked ‘B’ and passing them under rollers ‘E’ and hooking 98the other ends to crank-wheel ‘C.’ As wheel ‘C’ would revolve it pulled levers down, causing center, containing water effect, on which was placed the gondola, to rise, and in turn the weight of the gondola would cause the center to fall when levers were released by wheel. I used window weights to balance it, allowing center to be heavy enough to sink of its own weight.
99
DESIGN SHOWING THE “ERUPTION OF VESUVIUS.”—Shogran.
100The water effect was obtained by placing a piece of double strength window glass, 3 ft. × 3 ft. 6 in. on the frame, the detail of which you will find illustrated. Underneath it I placed a canvas frame painted near the same shade as the water in the foreground of my canvas representing Vesuvius. On the top of said frame I puffed loosely very fine veiling. I also puffed the veiling on top glass. The painted canvas frame gave me the water color, the glass, the realistic reflection, and the veiling mystified the whole. Hence a perfect water illusion, well worth trying. The fire and lava belching from the crater of mountain I obtained in the following manner: I first covered the entire canvas on back with heavy paper, making it perfectly opaque, then I tore a hole, beginning at the top or crater of mountain, about 5 inches wide, widening gradually as I went upwards, and to one side. Then I cut several openings large enough to admit little streaks of light on the left slope of mountain to represent lava running down the side, above which I cut a round hole for the moon; all which can be plainly seen in the picture. Back of opening representing lava I pasted different shades of red paper (tissue paper) and back of moon yellow. Back of the large opening at the top of mountain I placed a large wheel made of two layers of red tissue paper with little tufts of grey wadding between. Back of this wheel, exactly opposite the opening representing the crater, I placed a lamp. When set in motion I had the most beautiful representation of real, burning fire. As the different thicknesses of the wheel would pass the lamp they were illuminated, and as they passed on up they would cool off and finally die, disappearing in the smoke and steam, which was represented by carefully tufted white and grey cotton on the front of canvas. Two lamps higher up illuminated the smoke and steam in the sky; another to light up streaks of lava seen on the left slope; and the fifth lamp for the moon, which threw its yellow glow in beautiful contrast to the ever raging, burning flames from the crater of Vesuvius. In conclusion, I wish to say that I know my attempt at describing these effects is a failure, compared to seeing them in reality.
Mr. Shogran won a gold medal for inventing this fine effect.
A STUDY IN ASTRONOMY.
One of the most remarkable mechanical displays yet conceived is that designed by M. M. Mohnkern, called “A Study in Astronomy.” It is not theoretical, but has been made and exhibited by Mr. Mohnkern and has attracted and delighted thousands. It is, to be sure, rather complicated in construction, and requires a mechanic to build it, so that it will work smoothly; but it is thoroughly practical, and so very novel and beautiful when completed that it will repay the labor expended to produce it.
The device is intended as a background for any display of goods, and may be utilized by any merchant who has a show window, the expense being very little aside from labor.
In his description Mr. Mohnkern says: “In looking at this display through the show window one can easily imagine he has been transferred to some other planet and is looking at the solar system, where old mother earth revolves slowly around the sun. In the distance the moon is changing, first in the dark of the moon to the first quarter, then to the half, the third quarter and the full moon, decreasing again in the same way. The stars twinkle as naturally as they do in the heavens; the whole display is grand and awe inspiring.” We can well believe this.
Fig. 1 is the front view of the window, showing the sun, moon, earth and stars, and the orbit of the earth where it revolves around the sun. A strip of lumber was bent into a large circle, almost the full size of the window. Black cambric was stretched from this to the four sides of the window, and openings cut in the corners for the stars and moon, as represented, C C C being the stars, and D the moon. Back of each of the three stars in each corner small wheels were placed (see F F F, Fig. 2). These wheels were twice as large as the stars, and placed so that the center of each wheel was directly opposite a point of a star. Then half of each wheel was covered with black cambric and the other half with bright red. As the wheels revolved very fast, it made them twinkle like real stars. The moon 101was a large round hole cut in the cambric with yellow tissue paper pasted back of it, and an electric light suspended behind the opening. A disk is made, a little larger than the opening, as shown in Figs. 5 and 6. A, Fig. 5, is the opening of the cambric; B is the disk; C is where the disk is connected with the axle. This disk is covered with black cambric and placed between the cambric background and the window pane. Thus it will be seen that as the disk slowly swung around, the changes of the moon would occur.
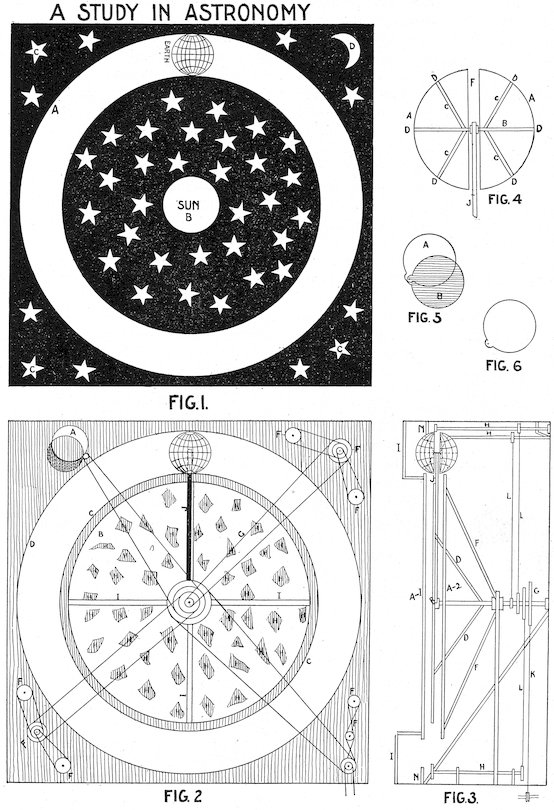
102Two more strips of lumber were now bent into circles, about eighteen to twenty inches smaller in diameter than the first circle. One of these was placed flush with the first circle and held in position by means of braces I I. This circle was then covered by stretching black cambric snugly over it, and an opening was cut in the center to represent the sun (B, Fig. 1). Yellow tissue paper was pasted over this, and an electric light suspended directly back of it.
Star-shaped openings were now cut in this cambric, as shown by the stars in the central portion of Fig. 1.
The second circle was placed about six inches back of this (see Fig. 3, A 1 and A 2). It was held in position by braces F F, Fig. 3. These two circles formed a track on which the earth slowly revolved. Another circle was next formed, similar to the first one, except that this had four spokes, I I I and J, Fig. 2. The spoke marked J was long enough to reach the center of the globe and connect to an axle, as seen in Fig. 3. This circle was also covered with black cambric, and irregular holes cut in it (H H H, Fig. 2), over which pieces of red tissue paper were pasted. These are represented by the irregular patches in Fig. 2. This rear disk was fastened to a pivot (Fig. 3) and placed three inches back of the front disk in which the stars and sun were cut. As it slowly revolved it carried the globe around with it, and the irregular tissue paper opening coming opposite each star caused the stars to twinkle like those in the corners.
The earth was constructed as follows: Two bushel baskets were procured, the handles cut off, and a brace nailed across the center of each. Holes were bored in the middle of these braces, and an axle inserted (B, Fig. 4) and made fast to the bottom of the basket. Then the spoke J, Fig. 4, which has a hole in the end, is slipped over the axle and the other basket placed in position and fastened opposite the first. The baskets were left far enough apart to allow them to revolve. In Fig. 4, A A, are the baskets, B is the axle, c c c c braces, J the spoke, corresponding with J in Figs. 2 and 3.
The profile drawing in Fig. 3 will enable you to see the mechanism at a glance. A1 and A2 are the circles on which the globe representing the earth revolves; B is the disk with the long spoke, J, placed between these two circles; C is the pivot which causes disk B to revolve. D D are the braces holding disk B in position. F F and I I are the braces holding A1 and A2 in position; G is the pulley on pivot C that run the different parts; K is the main belt leading from the basement; L L L are belts running to pivots H H H. All framework liable to show should be made black; also have the cords you use for belts black.
REVOLVING CYLINDER.
This is a simple but very effective mechanical contrivance, and may be constructed by any amateur:
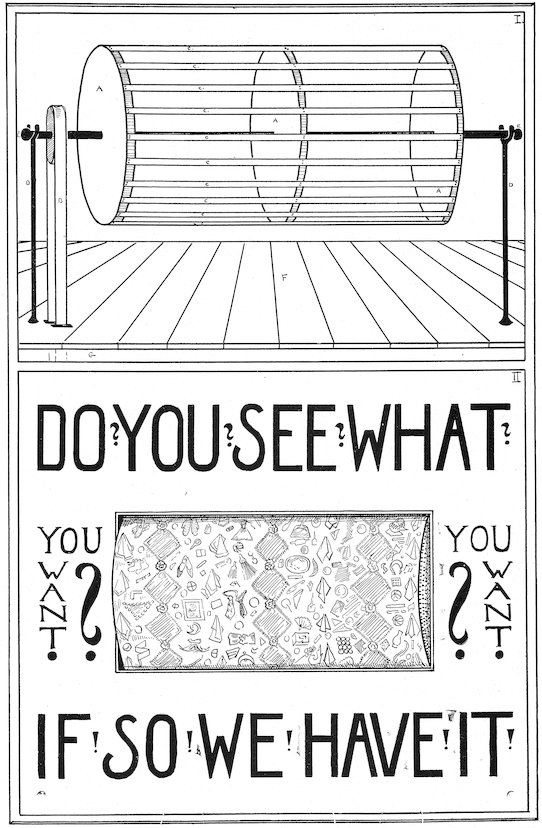
Make three circular pieces from one-inch planed boards, A A A. Through the exact centers of these run a rod, EE. Nail two-inch strips, c c c, placed a little distance apart, over the discs, one of which is placed at either end, and the third in the center. This forms the barrel, AAA, with the rod, EE, as pivot. This pivot rests on crotches, DD, allowing the barrel to revolve when the motive power below (at G) causes the fly-wheel, which is securely fastened to E, to turn by means of the circular band, B. The crotches, DD, should be high enough to bring the barrel to the center and middle of the window.
103
THE READING CYLINDER.
104Cover the barrel with cloth—a dark material is best—and upon this pin or tack the articles to be displayed. Almost any articles, not too large, may be shown, and they should be so arranged as to present variety as the wheel revolves. Suspend a screen in your window that will cover the mechanical apparatus, only allowing the front section of the barrel to show. Thus, as the barrel slowly revolves, a panorama of merchandise is shown the observer, and the constant change will undoubtedly attract much attention. You may letter the screen in any manner that suits your fancy, and this arrangement will not prevent your placing other goods in the window before your screen, as the revolving barrel will be high enough not to interfere with anything shown on the window floor.
WIND POWER.
One good use to which the wind force obtained from a fan motor can be put is shown in Figs. 1 and 2. In Fig. 1 is a section of a water tank, which tank should sit in the show window, filled with water.
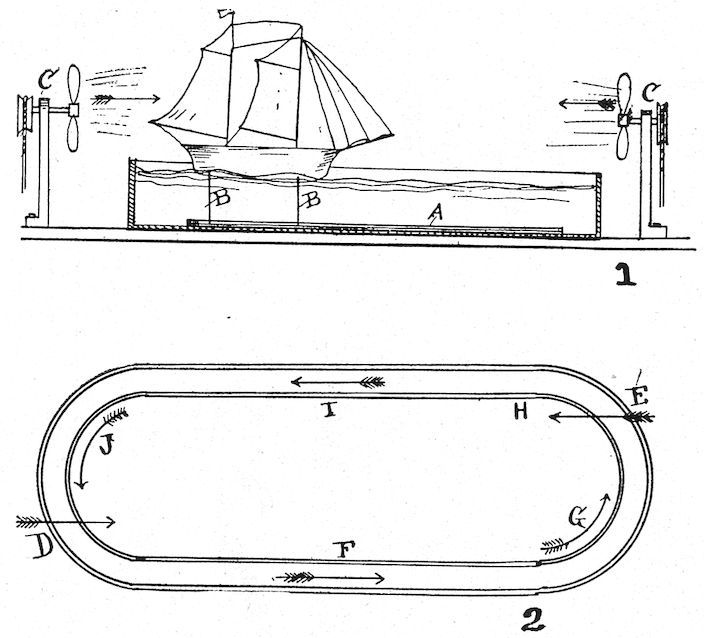
A toy ship is on the water and is guided in a track, A, which track is attached to bottom of tank. Guide wires, B, B, extend from the ship to grooves in the track. Fans, C, C, are set up at each end and are covered with window trimmings in front so that they are not in view. The fans are run by means of cords from the motor. The arrangement of the fans is as shown in the top view of the tank in Fig. 2. The fan at the left is at D, and the wind it produces sends the ship across the tank at opposite side, on line with the arrow. The grooved track holds the guide wires B, B, of the ship, and steers the ship around G, and the momentum carries the ship to H, where the blast of air from the fan at E sends the ship along course I to J, and thence opposite D again, where the course is commenced over again.
PERPETUAL MOTION.
A perpetual motion wheel never fails to attract attention in a show window. There is one form of perpetual wheel device which can be made very easily, as it consists of a simple mechanism such as is shown here.
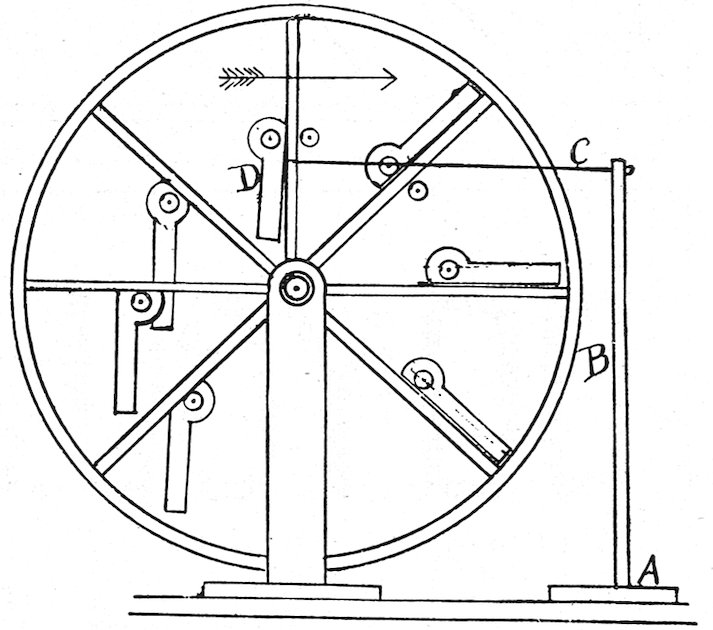
The wheel is three feet in diameter, of light wood and crude construction, provided with eight arms disposed radially so as to be separated by angles of 45 degrees, as shown. The axle is supported in bearings of wood. Each arm is provided with a movable weight of five pounds, being movable on a pivot or hinge on the arms so as to transfer the weight from the axis to the periphery, whereby, as it appears to the eye, the wheel is continually overweighted on one side, and revolves slowly. Attached to the base, A, is an upright piece of wood, B, and a spring hooked wire, G, extends from 105the top of this to the point D. Here the hook part tips up the weights as they come around in turn, causing each to drop over on its arm, thus placing the weight further from the center, and making the wheel turn. The center of gravity of the wheel varies from a point on the left of the center to a point at an equal distance on the right, according to the location of the arms at the particular point in the rotation of the wheel. The wheel can be draped with light goods and made attractive. The notice “Perpetual Motion” should be attached on a card.
MECHANICAL HANDKERCHIEF DISPLAY.
We show a picture of a mechanical handkerchief display in which the central figure is a girl in a canoe, who works the paddle by a simple device.
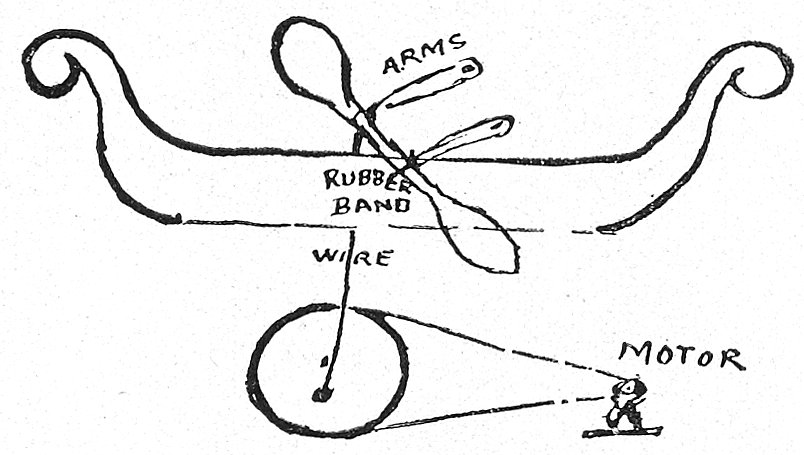
A stiff wire attached to one side of center of paddle, passing through bottom of canoe, fixed on a wooden wheel under the fixture. A rubber band is fixed on one side of paddle to canoe. As the wheel revolves it sets the paddle in motion. It is worked by a small motor. The entire display is made outside in sections and is rapidly fixed together in the window. The canoe is of heavy paper.
MECHANICAL PANELS.
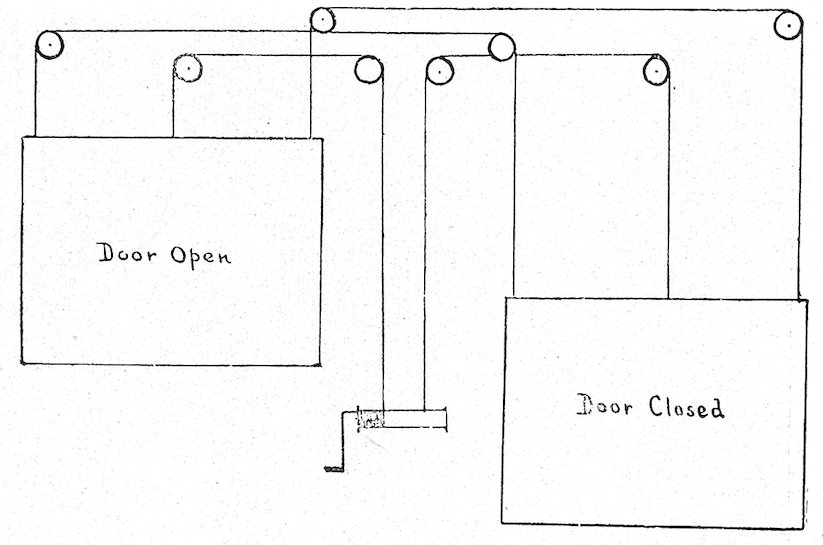
To make a double mechanical panel, that will open and close alternately, follow the device shown in the below diagram.
Cover the faces of the panels, or “doors” with cloth or puffing, and arrange them so as to cover two alcoves on opposite sides of the window. One cord is wound around the barrel and the other is unwound. When the barrel is turned, either by hand or by a motor, one door is raised while the other drops of its own weight, the doors being balanced by each other. The motion is reversed by reversing the barrel, or cylinder.