MACHINERY USED FOR HARVESTING THE SEED CROP.
Reading edition
No machine thus far manufactured has given entire satisfaction for cutting the sweet-clover seed crop. On account of the ease with which the pods shatter, it is a question whether any machine can be devised which will handle this crop without the loss of some seed. It is possible and practicable, however, for farmers at a small cost to equip their binders with pans and guards, so as to save most of the seed which otherwise would be lost.
THE ORDINARY MOWER.
The ordinary mowing machine is one of the most unsatisfactory devices used for harvesting this crop, as the subsequent handling necessary to place the plants in windrows or cocks causes much of the seed to shatter. The use of this machine for this purpose should be avoided whenever possible.
THE SELF-RAKE REAPER.
The self-rake reaper is one of the most efficient machines employed to cut sweet clover for seed. (Fig. 1.) This machine deposits the newly cut plants with the tops all turned one way in gavels or bunches at the side, so that the horses do not trample them on the next round. A high stubble also may be left, thereby reducing the weight and bulk of the plants which must be hauled to the thrashing machine.
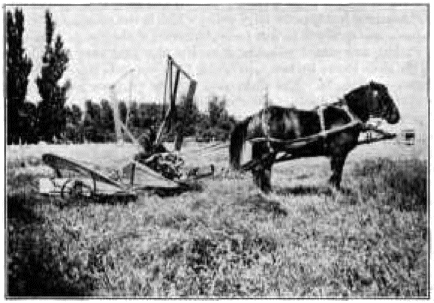
Fig. 1.—A self-rake reaper used in some sections of the country for cutting the sweet-clover seed crop.
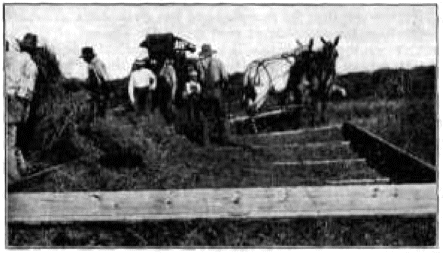
Fig. 2.—A sled used in western Kansas for hauling sweet clover from the field to the thrashing machine.
It is the custom in some localities to leave the gavels to cure as dropped by the reaper on the ground, while in other sections they are placed in cocks that weigh about 300 pounds each when cured. If the gavels are to be placed in cocks, this should be done immediately after cutting, as the plants will be somewhat green and tough at this time and fewer pods will shatter than when the plants are permitted to dry before handling. When the crop is to be hauled to the thrashing machine on wagons it is best to permit the gavels to cure as dropped by the reaper, as it will then be possible to pitch them on the wagon with a large 4-tined fork. If the crop is to be hauled to the thrashing machine on large sleds, which is the practice in western Kansas, less seed will be lost from shattering if the gavels at the time of cutting are placed in cocks of such a size that they may be put on the sleds entire by two men lifting from opposite sides of the cock with 4-tined forks. The sleds used for this purpose usually are 12 by 20 foot in size, made of matched flooring and with 6 to 12 inch sides. (Fig. 2.) Matched or tight floors are necessary, so that all seed which shatters may be saved. These would not be so essential, however, if the sleds were covered with a tarpaulin or canvas. From the standpoint of saving shattered seed, this method of hauling the crop from the field to the thrashing machine is possibly the most economical thus far used. It is estimated that at times as much as one-third of the seed yield is collected from the floors of the sleds. It would be a good plan to replace the runners of the sleds with very low trucks, as this would lighten the draft considerably.
When sweet clover is cut with a self-rake reaper the crop is thrashed directly from the field. From 7 to 10 days of good haying weather in sufficient to cure the plants in the gavel or cock. Thrashing should be done as soon as possible, much seed is shattered by rains and winds. While a self-rake reaper is used to some extent in different sections of the country, it is used most extensively in the western North-Central States, and especially in western Kansas.
THE GRAIN BINDER.
A grain binder is employed extensively for cutting the sweet-clover seed crop. (Fig. 3.) The general use of this machine in many sections of the country is due to the fact that it is found on most farms and therefore causes no outlay of money, rather than because of its efficient work. It is not so efficient as the self-rake reaper unless it is equipped with pans and guards to save the seed which shatters.
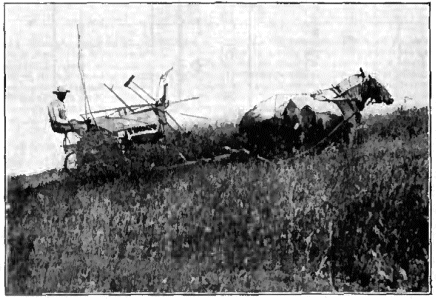
Fig. 3.—Cutting sweet clover for seed with a grain binder.
It is possible to equip the grain binder with pans and extensions to the rear elevator plate and binder deck, so that at least 95 per cent of the seed which shatters when the crop is cut may be saved. Those pans and extensions may be made out of ordinary galvanized metal and strap iron. The galvanized metal may be purchased at any tin shop or hardware store, and if sufficient strips of iron can not be found around the farm for this purpose strap iron may be purchased at any blacksmith shop. The material for those pans and extensions should not cost more than $4.50 or $5, and it should be possible to have them made complete for $8 or $10, including material. Unless there are a forge and drill on the farm it will be necessary to have the braces and supports for the pans made at a blacksmith shop. The strap iron used in connection with the pans may vary in size, but for the most part it need not be heavier than one-eighth inch in thickness, and seven-eighths inch in width. The supports for the pan under the binder deck preferably should be one-quarter inch thick, as this pan will have much more strain on it than the pans under the elevators. Where bolts are to be used, ordinary stove bolts will suffice.
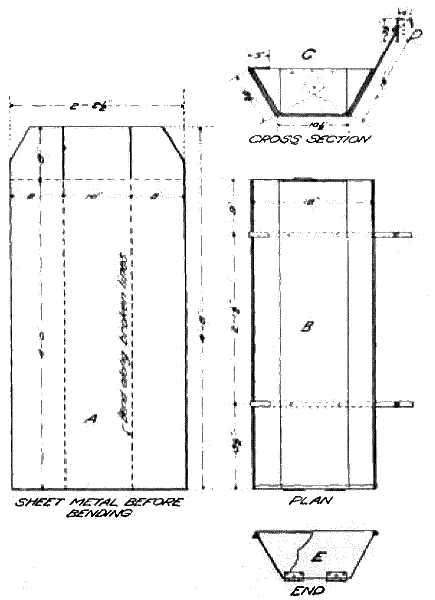
Fig. 4.—Plans for a pan to be placed under the opening between the platform and lower elevator of a grain binder in order to save the sweet-clover seed which falls on the platform and on the extension to the rear elevator plate. A, size and shape of the metal before bending; B, general plan of the pan when completed, as viewed from the top; C, cross section of the pan and outline of the support which holds it in position; D, stirrup which hooks over the inside and to which the support is fastened; E, door.
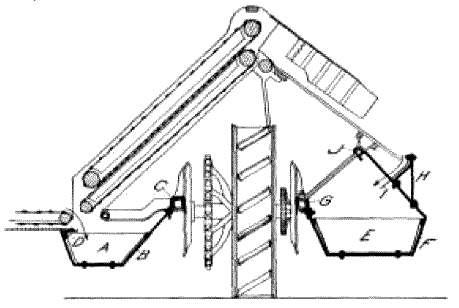
Fig. 5.—Rear view of a grain binder, showing a cross section of the pans and supports and the parts of the machine to which they are attached. A, Pan under the opening between the platform and lower elevator; B, support of the pan; C, stirrup which fits over the inside sill and to which the support is bolted; D, angle iron under the end of the platform and over which one end of the support is hooked; E, cross section of pan under the binder deck; F, support of the pan; G, stirrup which hooks over the outside sill and to which the support is bolted; H, angle iron which supports the guard at the end of the deck; I, guard which directs the seed that falls on the binder deck into the pan below; J, binder pipe over which one end of the support is hooked.
The plans for making the pan which should be placed under the opening between the platform and the lower elevator are illustrated in figure 4. The material to be used for this pan should be cut to conform to the size and shape shown in figure 4, A; the sides should then be bent upright along the dotted lines, so that the pan will be 18 inches wide at the top. One end, which should be solid, may be made so by bending the center portion upright and then bending the sides against it. The side and center pieces should be riveted together. (Fig. 4, C.) Any suitable door which will prevent seed from falling out of the pan will suffice for the other end. A door is highly desirable, so that the seed may be removed more easily when the pan is full. A convenient type is shown in figure 4, E. A top view of the pan when completed is given in figure 4, B. It will be necessary to brace the pan, and this may be done by riveting strips of strap iron, preferably one-eighth inch thick and one-half inch wide, on the outer edges of the sides.
This pan is held in position by two supports made of strap iron, preferably seven-eighths inch wide and one-eighth inch thick, which have been bent to conform to the outside of a cross section of the pan. (Figs. 4, C, and 5, B.) The ends of these supports which fasten under the platform should be bent to a sharp angle and the tip of each slightly flattened, so that they may be pushed between the angle bar at the end of the platform and the bottom of the platform. The other end of each support should have a hole drilled in it, so that it may be bolted to the stirrups, which should be made to hook over the inside sill. (Figs. 4, C, and 5.) These supports should be placed about 6 inches from the ends of the pan and riveted or bolted to it. This will serve to brace the pan and to hold it in place. The pan may be attached to the machine by hooking the supports over the angle iron on the bottom of the platform and by bolting them to the stirrups on the sill. By supporting the pan in this manner it may be easily and quickly attached or removed.
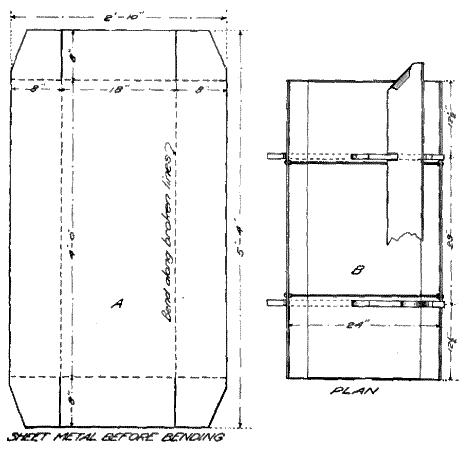
Fig. 6.—Plans for the pan to be placed under the binder deck of the grain binder. A, Size and shape the metal should be cut before bending; B, general plan of the pan when completed, as viewed from the top.
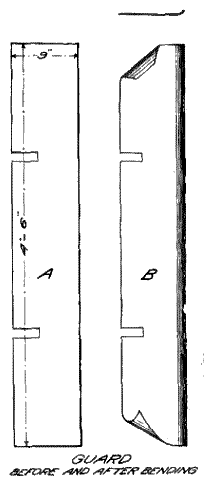
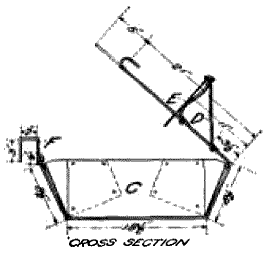
Fig. 7.—Plans for the guard to be placed at the end of the binder deck of the grain binder and cross section of the pan and supports illustrated in figure 6. A, Size and shape of the metal for the guard; B, shape of the guard when completed; C, cross section of the pan and support to which this guard is attached; D, angle iron which supports the guard at the end of the deck; E, guard bolted in position; F, stirrup which hooks over the outside sill and to which the support is belted.
The pan to be placed under the deck of the machine will serve to collect the seed which is shattered on the deck and the extension to the deck. The plans for making this pan are shown in detail in figure 6. The material should be cut along the solid lines and of the size designated in figure 6, A. The sides of the pan should be bent upward on the dotted lines, so that the pan will be 24 inches wide at the top. The ends should then be made in the manner described for the pan which is placed under the opening of the platform and lower elevator. A door may be put in the rear end of this pan if desired; but this is not necessary, as no trouble will be experienced in removing the seed. Figure 6, B, gives a top view of the pan when completed and also a portion, of the guard which serves to direct into this pan the seed which shatters on the deck. This guard is shown in detail in figure 7. As this pan is larger and heavier than that placed under the lower elevator, not only should it have strips of iron riveted to the outer edges of the sides, but two cross braces also should be employed. Those may be fastened to the strips of iron supporting the sides of the pan and should be about 12 inches from the ends of it. This pan is supported by two strips of strap iron bent to conform to the outside of a cross section of it and hook over the binder pipe under the deck and bolt to stirrups placed on the outer sill of the frame. Each support may be made from one strip of strap iron. It may be necessary to bend the ends of the supports which hook over the binder pipe in opposite directions. Both ends of the supports which hook over the binder pipe may hook outward, as shown in figure 7, C, or the rear support may hook inward, as illustrated in figure 5. It is not absolutely necessary that those supports of the pan hook in opposite directions on the binder pipe, yet when this is done it will make the pan more rigid. The pan may be attached by first hooking the supports over the binder pipe underneath the deck and then bolting the other end of the supports to the stirrups on the outer sill. The pan should be fastened to the supports. A cross section of this pan, the supports for it, and the stirrups which hook over the sill are shown in figure 7, C.
If this pan extends beyond the deck so that the seed which is shattered on the deck will drop directly into it, the bundles when released from the packers will strike the pan. For this reason it is necessary to place a guard at the end of the deck, so that the seed which falls on the deck will be directed into the pan. This guard, as shown in figures 5 and 7, consists of a piece of galvanized metal, to the upper side of which has been riveted a strip of iron. The upper side of this guard should be bent slightly inward at the lower edge of the strip of iron and placed in such a position that it will be approximately 1½ inches beyond the lower end of the binder deck and extend from 1 to 1½ inches above the deck. If it is placed at right angles to the deck and no higher than 1½ inches above it, it will not interfere with the bundles as they are released from the packers. This guard should be supported by two angles of strap iron, as shown in figure 7, D. Those braces are bolted to the supports of the pan, and the guard is bolted to the braces. As this guard should extend a little below the supports of the pan, so as to prevent the wind from blowing the seed over it, it is necessary to cut slots in the guard so it will fit over the supports. The ends of this guard should be rolled slightly inward, so that the seed falling close to them will be directed into the pan. When the extension to the binder deck is placed in the proper position, the seed collected by it will be directed against the guard and then into the pan below.
The extension to the elevator should be bolted to the rear elevator plate. This extension should be so wide that the tops of the plants will not reach beyond it. The details for this extension are shown in figure 8. The outer edge and lower end of this extension should be bent upward and slightly inward, so that the seed which falls upon it will be directed to the opening between the platform and lower elevator, where it will fall into the pan beneath. The curved edge of the lower part of this extension should be flattened as much as possible, so that it will not interfere with the upper portions of the plants as they pass from the platform to the elevators. The opening must be sufficiently large, however, to permit small branches and racemos which fall upon the extension to pass into the pan. The angle of the lower portion of it must be large enough to permit the seed to run directly into the pan below. If this portion is sloped from the seat pipe to the opening between the platform and the lower elevator no trouble will be experienced. This extension may be bolted to the machine by drilling holes in it to coincide with those in the elevator plate.
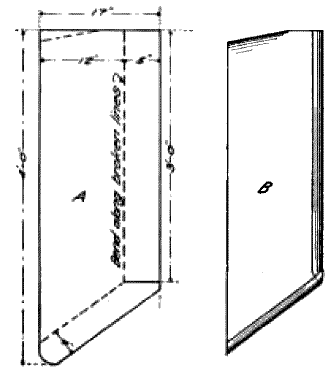
Fig. 8.—Plan of the extension which is bolted to the rear elevator plate of the grain binder. A, Size and shape of the metal to be used for this extension; B, extension when completed.
It is necessary to widen the binder deck, so as to save the seed which is shattered from those portions of the plants which extend beyond it. This may be done by bolting to the rear end of this deck an extension, as shown in detail in figure 9. This extension may be made from one piece of galvanized iron, which should be cut along the solid lines and of the size shown in figure 9, A. It should be bent upward and slightly inward at the dotted lines shown in this figure. The extended strips, as shown in figure 9, B, should be riveted to the main part of the extension. When this is done a trough will be formed along the side and lower end of it, so that all seed which shatters upon it will be directed into the pan below the deck. The object in riveting the extended strips at the end of the extension to the main part is to prevent the tops of the plants from catching in the trough when the bundles leave the packers. It may be necessary to fasten a brace to the bottom of the deck to support this extension. This can be done, however, by using a strip of strap iron or wood. The upper end of this extension should be bent to fit under the upper end of the one attached to the elevator plate, so that the plants will not be hindered in passing from one to the other. Both extensions may be braced strongly at the top by fastening them to a right angle of iron or wood.
A grain, binder equipped with the pans and extensions herein outlined is shown in figure 10.
Binders equipped in the manner described have been tested carefully in different sections and have proved beyond doubt that they offer an economical device for harvesting sweet clover for seed. This equipment has been used most extensively in Livingston County, Ill., where farmers have saved with it from $6 to $10 worth of seed per acre. When this equipment is used the plants may be permitted to become somewhat more mature before cutting, as the seed which is shattered will be saved by the pans.
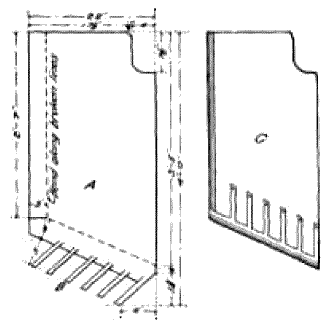
Fig. 9.—Extension to the binder deck of the grain binder. A, size and shape of the metal before bending; B, extended points which are to be bolted to the main portion of the metal; C, extension when completed.
As the pans and extensions described have been designed for one type of binder, it may be necessary to modify them slightly for use on other types of machines. Before making a set of these pans and extensions for any machine, the plans shown should be compared carefully with the binder to be equipped, in order that any changes which will need to be made may be noted. The pans and extensions at least maybe made on the farm, and then it will be an easy matter to check up the measurements for the supports, which may be made at a blacksmith shop.
Difficulty may be experienced in cutting sweet clover with a binder when the first crop has been permitted to mature, as the plants may be so tall that the machine will not handle them properly. This difficulty may be overcome entirely in most sections of the country by pasturing the field until the first part of June or by cutting the first crop for hay. It is recommended that the stubble be left as high as possible when cutting sweet clover for seed. Not only will this greatly facilitate harvesting but it will leave many of the woody, unpalatable portions of the plants on the ground, where they will decay quickly, and help to increase the humus content of the soil. (See the illustration on the title-page.)
When the seed crop is cut with a binder it is best to shock the bundles as soon as possible, so as to avoid unnecessary shattering. Conditions should determine whether the bundles be placed in long narrow shocks or in round shocks. The plants will cure somewhat faster in long narrow shocks, and this form should be preferred when grasshoppers are not troublesome. Sweet-clover shocks should not be capped, as capping will cause some seed pods to shatter.
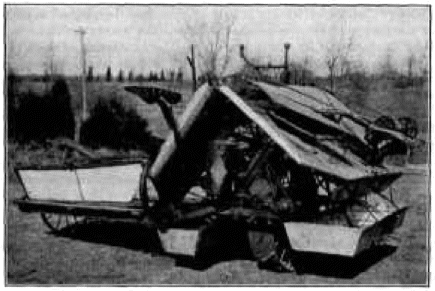
Fig. 10.—A grain binder equipped with pans and extensions to the rear elevator plate and binder deck to save the sweet-clover seed which is shattered while cutting the crop.
THE GRAIN HEADER.
Grain headers have been used successfully for harvesting the sweet-clover seed crop in several sections of the United States, especially in western Kansas. The principal advantages in using this machine are that a larger acreage may be cut in a given time than with either a grain binder or a self-rake reaper and that a high stubble may be left. The greater acreage which may be cut with a header is important when large acreages are to be harvested, as much seed is lost by shattering if the crop is not cut at the proper stage for harvesting, while the high stubble which may be left when cutting the seed crop with a grain header is a decided advantage, as it not only reduces greatly the weight and bulb of the plants which must be thrashed, but it also leaves the hard, woody portions on the ground, where they will decay and be of some value as a fertilizer. It is best to remove only those portions of the plants which contain sufficient seed to thrash, but this is not always possible, even with a header, unless the field contains a fairly thin stand and the plants are not more than 4½ to 5 feet high. When the seed crop is to be cut with a grain header, it usually is permitted to stand somewhat longer than when other machines are used.
A tin pan or some other receptacle should be placed at the lower end of the header elevator in order to save the seed which otherwise would be lost at that place.
The plants are carried into header wagons or barges in the same way as grain. When a heavy crop is cut it will be necessary to have two men in the barge to handle the plants. The floor of the header wagon should be made perfectly tight, or it should be covered with a canvas or tarpaulin, so as to save the seed pods which shatter.
When the crop is cut at the proper stage it may be placed directly in stacks or ricks without danger of heating or molding, provided the ricks are covered or topped with some material which will shed water and are built upon a foundation, so that air may circulate under them. Native grass or green sweet-clover plants of the first year's crop will serve very nicely for topping the stacks.
It is the custom of some people to place the barge loads close together in individual stacks so located that they may be hauled quickly and easily to the thrashing machine. On other farms enough barge loads are placed together to make a rick approximately 10 by 10 by 40 feet in size. When each barge load is placed in a separate stack it is necessary to load the plants again, so as to haul them to the thrashing machine. The shattering of seed pods and the extra labor caused by reloading and by hauling the plants may be avoided for the most part by placing the crop in ricks large enough for a day's thrashing. It is good practice to place such ricks in pairs sufficiently close together for both to be pitched directly to the feeder of the machine. When this method is employed two days' thrashing may be done without moving the machine.
The header binder, consisting of an attachment placed upon the header to bind the cut plants, has been used successfully in cutting the sweet-clover seed crop.
THE CORN HARVESTER.
Corn harvesters are proving to be efficient machines for cutting sweet clover which has made a growth too large to be cut with a grain binder. Even when the field has been seeded broadcast a 3-foot swath may be cut with the corn harvester, provided the gathering or divider points are extended to collect the plants. This may be done by fastening to each point a piece of wood or iron about 18 inches long. When a corn binder is used no more seed is lost from shattering than when an ordinary grain harvester is employed, unless the later is equipped with special pans and extensions, for the reason, primarily, that the portions of the plants which produce most of the seed extend above the gathering or divider boards and are not crushed. When a 5-foot or larger growth is cut with a corn binder, the plants are tied below the seed-bearing branches.
In the semiarid sections of the country a limited quantity of sweet clover is planted in rows for both forage and seed production. In such a case the seed may be harvested with a corn binder. (Fig. 11.)
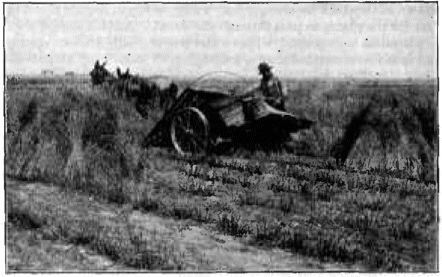
Fig. 11.—Cutting sweet clover for seed with a corn harvester. This field had been seeded in 30-inch rows.