PART I STAIR-BUILDING
Reading edition
Introductory.
In the following instructions in the art of Stair-building, it is the intention to adhere closely to the practical phases of the subject, and to present only such matter as will directly aid the student in acquiring a practical mastery of the art.
Stair-building, though one of the most important subjects connected with the art of building, is probably the subject least understood by designers and by workmen generally. In but few of the plans that leave the offices of Architects, are the stairs properly laid down; and many of the books that have been sent out for the purpose of giving instruction in the art of building, have this common defect—that the body of the stairs is laid down imperfectly, and therefore presents great difficulties in the construction of the rail.
The stairs are an important feature of a building. On entering a house they are usually the first object to meet the eye and claim the attention. If one sees an ugly staircase, it will, in a measure, condemn the whole house, for the first impression produced will seldom be totally eradicated by commendable features that may be noted elsewhere. It is extremely important, therefore, that both designer and workman shall see that staircases are properly laid out.
Stairways should be commodious to ascend—inviting people, as it were, to go up. When winders are used, they should extend past the spring line of the cylinder, so as to give proper width at the narrow end (see Fig. 72) and bring the rail there as nearly as possible to the same pitch or slant as the rail over the square steps. When the hall is of sufficient width, the stairway should not be less than four feet wide, so that two people can conveniently pass each other thereon. The height of riser and width of tread are governed by the staircase, which is the space allowed for the stairway; but, as a general rule, the tread should not be less than nine inches wide, and the riser should not be over eight inches high. Seven-inch riser and eleven-inch tread will make an easy stepping stairway. If you increase the width of the tread, you must reduce the height of the riser. The tread and riser together should not be over eighteen inches, and not less than seventeen inches. These dimensions, however, cannot always be adhered to, as conditions will often compel a deviation from the rule; for instance, in large buildings, such as hotels, railway depots, or other public buildings, treads are often made 18 inches wide, having risers of from 2½ inches to 5 inches depth.
Definitions.
Before proceeding further with the subject, it is essential that the student make himself familiar with a few of the terms used in stair-building.
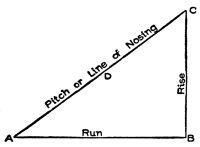
Fig. 1. Illustrating Rise, Run, and Pitch.
The term rise and run is often used, and indicates certain dimensions of the stairway. Fig. 1 will illustrate exactly what is meant; the line A B shows the run, or the length over the floor the stairs will occupy. From B to C is the rise, or the total height from top of lower floor to top of upper floor.[A] The line D is the pitch or line of nosings, showing the angle of inclination of the stairs. On the three lines shown—the run, the rise, and the pitch—depends the whole system of stair-building.
The body or staircase is the room or space in which the stairway is contained. This may be a space including the width and length of the stairway only, in which case it is called a close stairway, no rail or baluster being necessary. Or the stairway may be in a large apartment, such as a passage or hall, or even in a large room, openings being left in the upper floors so as to allow road room for persons on the stairway, and to furnish communication between the stairways and the different stories of the building. In such cases we have what are known as open stairways, from the fact that they are not closed on both sides, the steps showing their ends at one side, while on the other side they are generally placed against the wall.
Sometimes stairways are left open on both sides, a practice not uncommon in hotels, public halls, and steamships. When such stairs are employed, the openings in the upper floor should be well trimmed with joists or beams somewhat stronger than the ordinary joists used in the same floor, as will be explained further on.
Tread. This is the horizontal, upper surface of the step, upon which the foot is placed. In other words, it is the piece of material that forms the step, and is generally from 1¼ to 3 inches thick, and made of a width and length to suit the position for which it is intended. In small houses, the treads are usually made of ⅞-inch stuff.
Riser. This is the vertical height of the step. The riser is generally made of thinner stuff than the tread, and, as a rule, is not so heavy. Its duty is to connect the treads together, and to give the stairs strength and solidity.
Rise and Run. This term, as already explained, is used to indicate the horizontal and vertical dimensions of the stairway, the rise meaning the height from the top of the lower floor to the top of the second floor; and the run meaning the horizontal distance from the face of the first riser to the face of the last or top riser, or, in other words, the distance between the face of the first riser and the point where a plumb line from the face of the top riser would strike the floor. It is, in fact, simply the distance that the treads would make if put side by side and measured together—without, of course, taking in the nosings.
Suppose there are fifteen treads, each being 11 inches wide; this would make a run of 15 × 11 = 165 inches = 13 feet 9 inches. Sometimes this distance is called the going of the stair; this, however, is an English term, seldom used in America, and when used, refers as frequently to the length of the single tread as it does to the run of the stairway.
String-Board. This is the board forming the side of the stairway, connecting with, and supporting the ends of the steps. Where the steps are housed, or grooved into the board, it is known by the term housed string; and when it is cut through for the tread to rest upon, and is mitered to the riser, it is known by the term cut and mitered string. The dimensions of the lumber generally used for the purpose in practical work, are 9½ inches width and ⅞-inch thickness. In the first-class stairways the thickness is usually 1⅛ inches, for both front and wall strings.
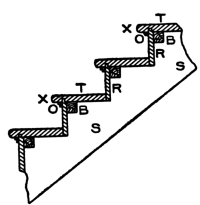
Fig. 2. Common Method of Joining Risers and Treads.
Fig. 2 shows the manner in which most stair-builders put their risers and treads together. T and T show the treads; R and R, the risers; S and S, the string; O and O, the cove mouldings under the nosings X and X. B and B show the blocks that hold the treads and risers together; these blocks should be from 4 to 6 inches long, and made of very dry wood; their section may be from 1 to 2 inches square. On a tread 3 feet long, three of these blocks should be used at about equal distances apart, putting the two outside ones about 6 inches from the strings. They are glued up tight into the angle. First warm the blocks; next coat two adjoining sides with good, strong glue; then put them in position, and nail them firmly to both tread and riser. It will be noticed that the riser has a lip on the upper edge, which enters into a groove in the tread. This lip is generally about ⅜-inch long, and may be ⅜-inch or ½-inch in thickness. Care must be taken in getting out the risers, that they shall not be made too narrow, as allowance must be made for the lip.
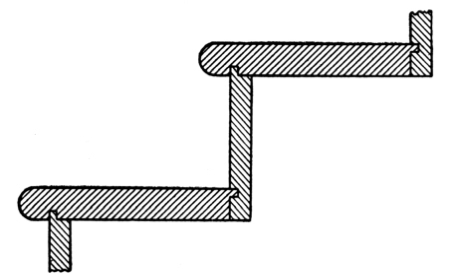
Fig.3 Vertical Section of Stair Steps.
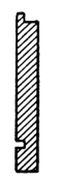
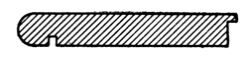
Fig. 4. End Section of Riser. Fig. 5. End Section of Tread.
If the riser is a little too wide, this will do no harm, as the over-width may hang down below the tread; but it must be cut the exact width where it rests on the string. The treads must be made the exact width required, before they are grooved or have the nosing worked on the outer edge. The lip or tongue on the riser should fit snugly in the groove, and should bottom. By following these last instructions and seeing that the blocks are well glued in, a good solid job will be the result.
Fig. 3 is a vertical section of stair steps in which the risers are shown tongued into the under side of the tread, as in Fig. 2, and also the tread tongued into the face of the riser. This last method is in general use throughout the country. The stair-builder, when he has steps of this kind to construct, needs to be very careful to secure the exact width for tread and riser, including the tongue on each. The usual method, in getting the parts prepared, is to make a pattern showing the end section of each. The millman, with these patterns to guide him, will be able to run the material through the machine without any danger of leaving it either too wide or too narrow; while, if he is left to himself without patterns, he is liable to make mistakes. These patterns are illustrated in Figs. 4 and 5 respectively, and, as shown, are merely end sections of riser and tread.
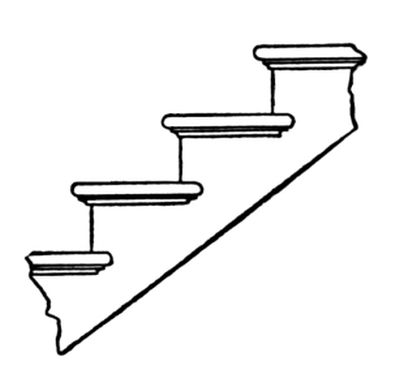
Fig. 6. Side Elevation of Finished Steps with Return Nosings and Cove Moulding.
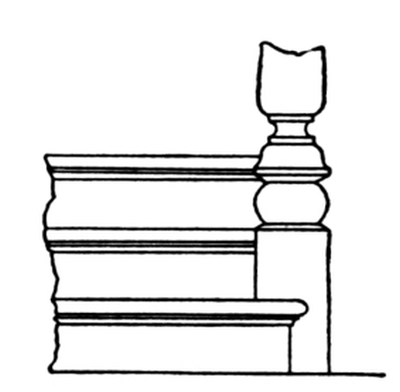
Fig. 7. Front Elevation of Finished Steps.
Fig. 6 is a side elevation of the steps as finished, with return nosings and cove moulding complete.
A front elevation of the finished step is shown in Fig. 7, the nosing and riser returning against the base of the newel post. Often the newel post projects past the riser, in front; and when such is the case, the riser and nosing are cut square against the base of the newel.
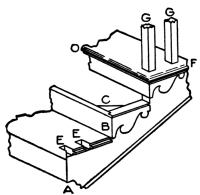
Fig. 8. Portion of a Cut and Mitered String, Showing Method of Constructing Stairs.
Fig. 8 shows a portion of a cut and mitered string, which will give an excellent idea of the method of construction. The letter O shows the nosing, F the return nosing with a bracket terminating against it. These brackets are about 5⁄16-inch thick, and are planted (nailed) on the string; the brackets miter with the ends of the risers; the ends of the brackets which miter with the risers, are to be the same height as the riser. The lower ends of two balusters are shown at G G; and the dovetails or mortises to receive these are shown at E E. Generally two balusters are placed on each tread, as shown; but there are sometimes instances in which three are used, while in others only one baluster is made use of.
An end portion of a cut and mitered string is shown in Fig. 9, with part of the string taken away, showing the carriage—a rough piece of lumber to which the finished string is nailed or otherwise fastened. At C is shown the return nosing, and the manner in which the work is finished. A rough bracket is sometimes nailed on the carriage, as shown at D, to support the tread. The balusters are shown dovetailed into the ends of the treads, and are either glued or nailed in place, or both. On the lower edge of string, at B, is a return bead or moulding. It will be noticed that the rough carriage is cut in snugly against the floor joist.
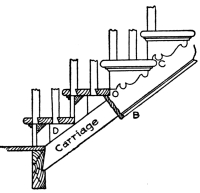
Fig. 9. End Portion of Cut and Mitered String, with Part Removed to Show Carriage.
Fig. 10 is a plan of the portion of a stairway shown in Fig. 9. Here the position of the string, bracket, riser, and tread can be seen. At the lower step is shown how to miter the riser to the string; and at the second step is shown how to miter it to the bracket.
Fig. 11 shows a quick method of marking the ends of the treads for the dovetails for balusters. The templet A is made of some thin material, preferably zinc or hardwood. The dovetails are outlined as shown, and the intervening portions of the material are cut away, leaving the dovetail portions solid. The templet is then nailed or screwed to a gauge-block E, when the whole is ready for use. The method of using is clearly indicated in the illustration.
Strings. There are two main kinds of stair strings—wall strings and cut strings. These are divided, again, under other names, as housed strings, notched strings, staved strings, and rough strings.
Wall strings are the supporters of the ends of the treads and risers that are against the wall; these strings may be at both ends of the treads and risers, or they may be at one end only. They may be housed (grooved) or left solid. When housed, the treads and risers are keyed into them, and glued and blocked. When left solid, they have a rough string or carriage spiked or screwed to them, to lend additional support to the ends of risers and treads. Stairs made after this fashion are generally of a rough, strong kind, and are especially adapted for use in factories, shops, and warehouses, where strength and rigidity are of more importance than mere external appearance.
Open strings are outside strings or supports, and are cut to the proper angles for receiving the ends of the treads and risers. It is over a string of this sort that the rail and balusters range; it is also on such a string that all nosings return; hence, in some localities, an open string is known as a return string.
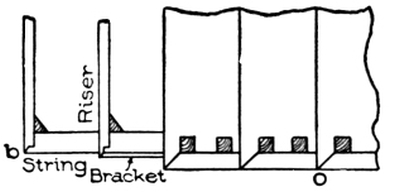
Fig. 10. Plan of Portion of Stair.
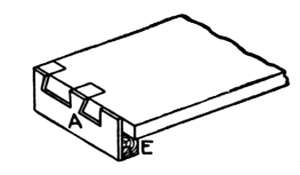
Fig. 11. Templet Used to Mark Dovetail Cuts for Balusters.
Housed strings are those that have grooves cut in them to receive the ends of treads and risers. As a general thing, wall strings are housed. The housings are made from ⅝ to ¾ inch deep, and the lines at top of tread and face of riser are made to correspond with the lines of riser and tread when in position. The back lines of the housings are so located that a taper wedge may be driven in so as to force the tread and riser close to the face shoulders, thus making a tight joint.
Rough strings are cut from undressed plank, and are used for strengthening the stairs. Sometimes a combination of rough-cut strings is used for circular or geometrical stairs, and, when framed together, forms the support or carriage of the stairs.
Staved strings are built up strings, and are composed of narrow pieces glued, nailed, or bolted together so as to form a portion of a cylinder. These are sometimes used for circular stairs, though in ordinary practice the circular part of a string is a part of the main string bent around a cylinder to give it the right curve.
Notched strings are strings that carry only treads. They are generally somewhat narrower than the treads, and are housed across their entire width. A sample of this kind of string is the side of a common step-ladder. Strings of this sort are used chiefly in cellars, or for steps intended for similar purposes.
Setting Out Stairs.
In setting out stairs, the first thing to do is to ascertain the locations of the first and last risers, with the height of the story wherein the stair is to be placed. These points should be marked out, and the distance between them divided off equally, giving the number of steps or treads required. Suppose we have between these two points 15 feet, or 180 inches. If we make our treads 10 inches wide, we shall have 18 treads. It must be remembered that the number of risers is always one more than the number of treads, so that in the case before us there will be 19 risers.
The height of the story is next to be exactly determined, being taken on a rod. Then, assuming a height of riser suitable to the place, we ascertain, by division, how often this height of riser is contained in the height of the story; the quotient, if there is no remainder, will be the number of risers in the story. Should there be a remainder on the first division, the operation is reversed, the number of inches in the height being made the dividend, and the before-found quotient, the divisor. The resulting quotient will indicate an amount to be added to the former assumed height of riser for a new trial height. The remainder will now be less than in the former division; and if necessary, the operation of reduction by division is repeated, until the height of the riser is obtained to the thirty-second part of an inch. These heights are then set off on the story rod as exactly as possible.
The story rod is simply a dressed or planed pole, cut to a length exactly corresponding to the height from the top of the lower floor to the top of the next floor. Let us suppose this height to be 11 feet 1 inch, or 133 inches. Now, we have 19 risers to place in this space, to enable us to get upstairs; therefore, if we divide 133 by 19, we get 7 without any remainder. Seven inches will therefore be the width or height of the riser. Without figuring this out, the workman may find the exact width of the riser by dividing his story rod, by means of pointers, into 19 equal parts, any one part being the proper width. It may be well, at this point, to remember that the first riser must always be narrower than the others, because the thickness of the first tread must be taken off.
The width of treads may also be found without figuring, by pointing off the run of the stairs into the required number of parts; though, where the student is qualified, it is always better to obtain the width, both of treads and of risers, by the simple arithmetical rules.
Having determined the width of treads and risers, a pitch-board should be formed, showing the angle of inclination. This is done by cutting a piece of thin board or metal in the shape of a right-angled triangle, with its base exactly equal to the run of the step, and its perpendicular equal to the height of the riser. It is a general maxim, that the greater the breadth of a step or tread, the less should be the height of the riser; and, conversely, the less the breadth of a step, the greater should be the height of the riser. The proper relative dimensions of treads and risers may be illustrated graphically, as in Fig. 12.
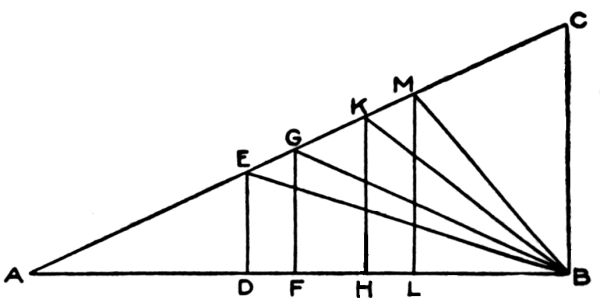
Fig. 12. Graphic Illustration of Proportional Dimensions of Treads and Risers.
In the right-angle triangle A B C, make A B equal to 24 inches, and B C equal to 11 inches—the standard proportion. Now, to find the riser corresponding to a given width of tread, from B, set off on A B the width of the tread, as B D; and from D, erect a perpendicular D E, meeting the hypotenuse in E; then D E is the height of the riser; and if we join B and E, the angle D B E is the angle of inclination, showing the slope of the ascent. In like manner, where B F is the width of the tread, F G is the riser, and B G the slope of the stair. A width of tread B H gives a riser of the height of H K; and a width of tread equal to B L gives a riser equal to L M.
In the opinion of many builders, however, a better scheme of proportions for treads and risers is obtained by the following method:
Set down two sets of numbers, each in arithmetical progression—the first set showing widths of tread, increasing by inches; the other showing heights of riser, decreasing by half-inches.
Treads, Inches Risers, Inches
5 9
6 8½
7 8
8 7½
9 7
10 6½
11 6
12 5½
13 5
14 4½
15 4
16 3½
17 3
18 2½
It will readily be seen that each pair of treads and risers thus obtained is suitably proportioned as to dimensions.
It is seldom, however, that the proportions of treads and risers are entirely a matter of choice. The space allotted to the stairs usually determines this proportion; but the above will be found a useful standard, to which it is desirable to approximate.
In the better class of buildings, the number of steps is considered in the plan, which it is the business of the Architect to arrange; and in such cases, the height of the story rod is simply divided into the number required.
Pitch-Board.
It will now be in order to describe a pitch-board and the manner of using it; no stairs can be properly built without the use of a pitch-board in some form or other. Properly speaking, a pitch-board, as already explained, is a thin piece of material, generally pine or sheet metal, and is a right-angled triangle in outline. One of its sides is made the exact height of the rise; at right angles with this line of rise, the exact width of the tread is measured off; and the material is cut along the hypotenuse of the right-angled triangle thus formed.
The simplest method of making a pitch-board is by using a steel square, which, of course, every carpenter in this country is supposed to possess. By means of this invaluable tool, also, a stair string can be laid out, the square being applied to the string as shown in Fig. 13. In the instance here illustrated, the square shows 10 inches for the tread and 7 inches for the rise.
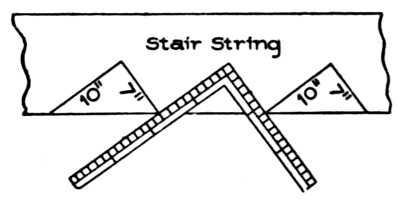
Fig. 13. Steel Square used as a Pitch-Board in Laying Out Stair String.
To cut a pitch-board, after the tread and rise have been determined, proceed as follows: Take a piece of thin, clear material, and lay the square on the face edge, as shown in Fig. 13. Mark out the pitch-board with a sharp knife; then cut out with a fine saw, and dress to the knife marks; nail a piece on the largest edge of the pitch-board for a gauge or fence, and it is ready for use.
Fig. 14 shows the pitch-board pure and simple; it may be half an inch thick, or, if of hardwood, may be from a quarter-inch to a half-inch thick.
Fig. 15 shows the pitch-board after the gauge or fence is nailed on. This fence or gauge may be about 1½ inches wide and from ⅜ to ¾ inch thick.
Fig. 16 shows a sectional view of the pitch-board with a fence nailed on.
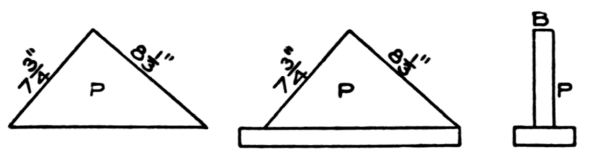
Fig. 14. Fig. 15. Fig. 16.
Showing How a Pitch-Board is Made. Fig. 15 shows gauge fastened to long edge; Fig. 16 is a sectional elevation of completed board.
In Fig. 17 the manner of applying the pitch-board is shown. R R R is the string, and the line A shows the jointed or straight edge of the string. The pitch-board P is shown in position, the line 8⅓ represents the step or tread, and the line 7¾ shows the line of the riser. These two lines are of course at right angles, or, as the carpenter would say; they are square. This string shows four complete cuts, and part of a fifth cut for treads, and five complete cuts for risers. The bottom of the string at W is cut off at the line of the floor on which it is supposed to rest. The line C is the line of the first riser. This riser is cut lower than any of the other risers, because, as above explained, the thickness of the first tread is always taken off it; thus, if the tread is 1½ inches thick, the riser in this case would only require to be 6¼ inches wide, as 7¾-1½ = 6¼.
The string must be cut so that the line at W will be only 6¼ inches from the line at 8⅓, and these two lines must be parallel. The first riser and tread having been satisfactorily dealt with, the rest can easily be marked off by simply sliding the pitch-board along the line A until the outer end of the line 8⅓ on the pitch-board strikes the outer end of the line 7¾ on the string, when another tread and another riser are to be marked off. The remaining risers and treads are marked off in the same manner.
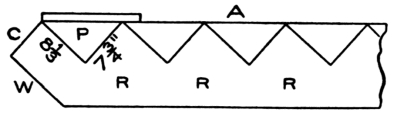
Fig. 17. Showing Method of Using Pitch-Board.
Sometimes there may be a little difficulty at the top of the stairs, in fitting the string to the trimmer or joists; but, as it is necessary first to become expert with the pitch-board, the method of trimming the well or attaching the cylinder to the string will be left until other matters have been discussed.
Fig. 18 shows a portion of the stairs in position. S and S show the strings, which in this case are cut square; that is, the part of the string to which the riser is joined is cut square across, and the butt or end wood of the riser is seen. In this case, also, the end of the tread is cut square off, and flush with the string and riser. Both strings in this instance are open strings. Usually, in stairs of this kind, the ends of the treads are rounded off similarly to the front of the tread, and the ends project over the strings the same distance that the front edge projects over the riser. If a moulding or cove is used under the nosing in front, it should be carried round on the string to the back edge of the tread and cut off square, for in this case the back edge of the tread will be square. A riser is shown at R, and it will be noticed that it runs down behind the tread on the back edge, and is either nailed or screwed to the tread. This is the American practice, though in England the riser usually rests on the tread, which extends clear back to string as shown at the top tread in the diagram. It is much better, however, for general purposes, that the riser go behind the tread, as this tends to make the whole stairway much stronger.
Housed strings are those which carry the treads and risers without their ends being seen. In an open stair, the wall string only is housed, the other ends of the treads and risers resting on a cut string, and the nosings and mouldings being returned as before described.
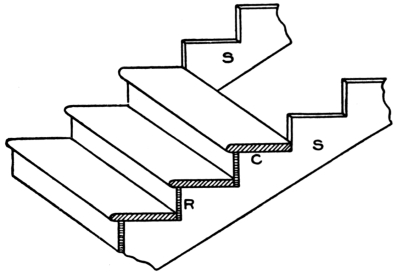
Fig. 18. Portion of Stair in Position.
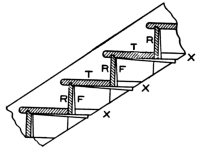
Fig. 19. Showing Method of Housing Treads and Risers.
The manner of housing is shown in Fig. 19, in which the treads T T and the risers R R are shown in position, secured in place respectively by means of wedges X X and F F, which should be well covered with good glue before insertion in the groove. The housings are generally made from ½ to ⅝ inch deep, space for the wedge being cut to suit.
In some closed stairs in which there is a housed string between the newels, the string is double-tenoned into the shanks of both newels, as shown in Fig. 20. The string in this example is made 12¾ inches wide, which is a very good width for a string of this kind; but the thickness should never be less than 1½ inches. The upper newel is made about 5 feet 4 inches long from drop to top of cap. These strings are generally capped with a subrail of some kind, on which the baluster, if any, is cut-mitered in. Generally a groove, the width of the square of the balusters, is worked on the top of the subrail, and the balusters are worked out to fit into this groove; then pieces of this material, made the width of the groove and a little thicker than the groove is deep, are cut so as to fit in snugly between the ends of the balusters resting in the groove. This makes a solid job; and the pieces between the balusters may be made of any shape on top, either beveled, rounded, or moulded, in which case much is added to the appearance of the stairs.
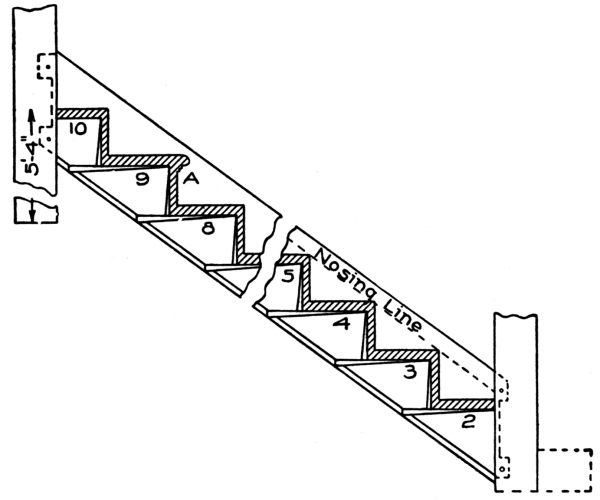
Fig. 20. Showing Method of Connecting Housed String to Newels.
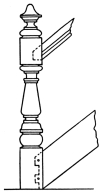
Fig. 21. Method of Connecting Rail and String to Bottom Newel.
Fig. 21 exhibits the method of attaching the rail and string to the bottom newel. The dotted lines indicate the form of the tenons cut to fit the mortises made in the newel to receive them.
Fig. 22 shows how the string fits against the newel at the top; also the trimmer E, to which the newel post is fastened. The string in this case is tenoned into the upper newel post the same way as into the lower one.
The open string shown in Fig. 23 is a portion of a finished string, showing nosings and cove returned and finishing against the face of the string. Along the lower edge of the string is shown a bead or moulding, where the plaster is finished.
A portion of a stair of the better class is shown in Fig. 24. This is an open, bracketed string, with returned nosings and coves and scroll brackets. These brackets are made about ⅜ inch thick, and may be in any desirable pattern. The end next the riser should be mitered to suit; this will require the riser to be ⅜ inch longer than the face of the string. The upper part of the bracket should run under the cove moulding; and the tread should project over the string the full ⅜ inch, so as to cover the bracket and make the face even for the nosing and the cove moulding to fit snugly against the end of the tread and the face of the bracket. Great care must be taken about this point, or endless trouble will follow. In a bracketed stair of this kind, care must be taken in placing the newel posts, and provision must be made for the extra ⅜ inch due to the bracket. The newel post must be set out from the string ⅜ inch, and it will then align with the baluster.
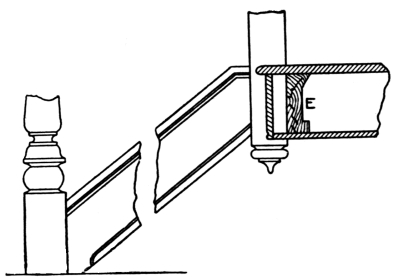
Fig. 22. Connections of String and Trimmer at Upper Newel Post.
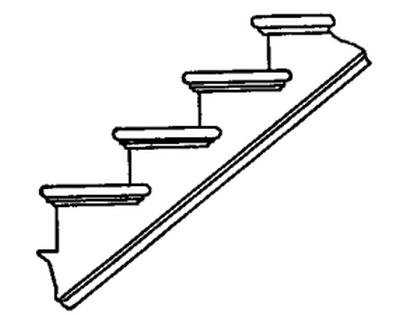
Fig. 23. Portion of Finished String, Showing Returned Nosings and Coves, also Bead Moulding.
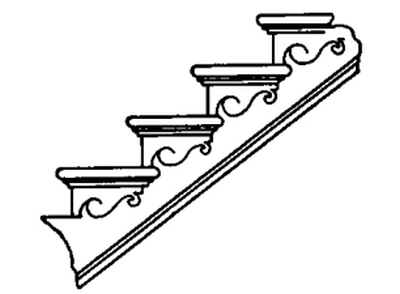
Fig. 24. Portion of Open, Bracketed String Stair, with Returned Nosings and Coves, Scroll Brackets,and Bead Moulding.
We have now described several methods of dealing with strings; but there are still a few other points connected with these members, both housed and open, that it will be necessary to explain; before the young workman can proceed to build a fair flight of stairs. The connection of the wall string to the lower and upper floors, and the manner of affixing the outer or cut string to the upper joist and to the newel, are matters that must not be overlooked. It is the intention to show how these things are accomplished, and how the stairs are made strong by the addition of rough strings or bearing carriages.
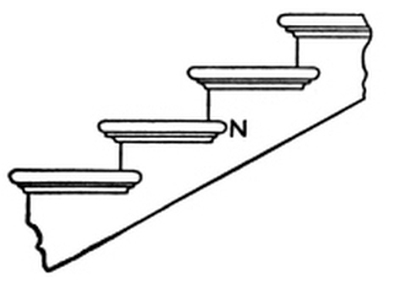
Fig. 25. Side Elevation of Part of Stair with Open, Cut and Mitered String.
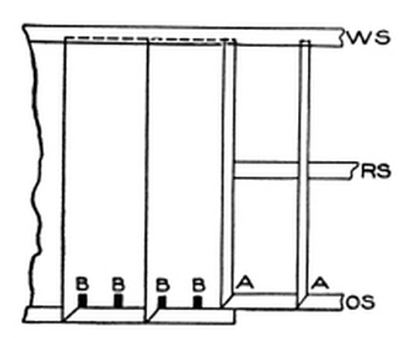
Fig. 26. Plan of Part of Stair Shown in Fig. 25.
Fig. 25 gives a side view of part of a stair of the better class, with one open, cut and mitered string. In Fig. 26, a plan of this same stairway, W S shows the wall string; R S, the rough string, placed there to give the structure strength; and O S, the outer or cut and mitered string. At A A the ends of the risers are shown, and it will be noticed that they are mitered against a vertical or riser line of the string, thus preventing the end of the riser from being seen. The other end of the riser is in the housing in the wall string. The outer end of the tread is also mitered at the nosing, and a piece of material made or worked like the nosing is mitered against or returned at the end of the tread. The end of this returned piece is again returned on itself back to the string, as shown at N in Fig. 25. The moulding, which is ⅝-inch cove in this case, is also returned on itself back to the string.
The mortises shown at B B B B (Fig. 26), are for the balusters. It is always the proper thing to saw the ends of the treads ready for the balusters before the treads are attached to the string; then, when the time arrives to put up the rail, the back ends of the mortises can be cut out, when the treads will be ready to receive the balusters. The mortises are dovetailed, and, of course, the tenons on the balusters must be made to suit. The treads are finished on the bench; and the return nosings are fitted to them and tacked on, so that they may be taken off to insert the balusters when the rail is being put in position.
Fig. 27 shows the manner in which a wall string is finished at the foot of the stairs. S shows the string, with moulding wrought on the upper edge. This moulding may be a simple ogee, or may consist of a number of members; or it may be only a bead; or, again, the edge of the string may be left quite plain; this will be regulated in great measure by the style of finish in the hall or other part of the house in which the stairs are placed. B shows a portion of a baseboard, the top edge of which has the same finish as the top edge of the string. B and A together show the junction of the string and base. F F show blocks glued in the angles of the steps to make them firm and solid.
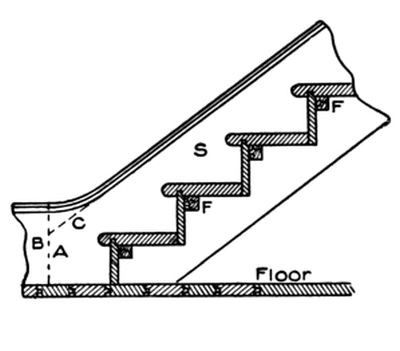
Fig. 27. Showing How Wall String is Finished at Foot of Stair.
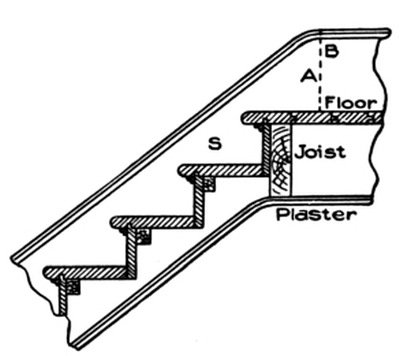
Fig. 28. Showing How Wall String is Finished at Top of Stair.
Fig. 28 shows the manner in which the wall string S is finished at the top of the stairs. It will be noticed that the moulding is worked round the ease-off at A to suit the width of the base at B. The string is cut to fit the floor and to butt against the joist. The plaster line under the stairs and on the ceiling, is also shown.
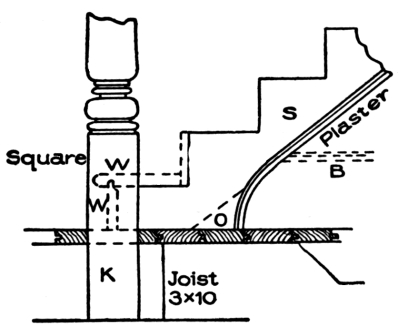
Fig. 29. Showing How a Cut or Open String is Finished at Foot of Stair.
Fig. 29 shows a cut or open string at the foot of a stairway, and the manner of dealing with it at its junction with the newel post K. The point of the string should be mortised into the newel 2 inches, 3 inches, or 4 inches, as shown by the dotted lines; and the mortise in the newel should be cut near the center, so that the center of the baluster will be directly opposite the central line of the newel post. The proper way to manage this, is to mark the central line of the baluster on the tread, and then make this line correspond with the central line of the newel post. By careful attention to this point, much trouble will be avoided where a turned cap is used to receive the lower part of the rail.
The lower riser in a stair of this kind will be somewhat shorter than the ones above it, as it must be cut to fit between the newel and the wall string. A portion of the tread, as well as of the riser, will also butt against the newel, as shown at W.
If there is no spandrel or wall under the open string, it may run down to the floor as shown by the dotted line at O. The piece O is glued to the string, and the moulding is worked on the curve. If there is a wall under the string S, then the base B, shown by the dotted lines, will finish against the string, and it should have a moulding on its upper edge, the same as that on the lower edge of the string, if any, this moulding being mitered into the one on the string. When there is a base, the piece O is of course dispensed with.
The square of the newel should run down by the side of a joist as shown, and should be firmly secured to the joist either by spiking or by some other suitable device. If the joist runs the other way, try to get the newel post against it, if possible, either by furring out the joist or by cutting a portion off the thickness of the newel. The solidity of a stair and the firmness of the rail, depend very much upon the rigidity of the newel post. The above suggestions are applicable where great strength is required, as in public buildings. In ordinary work, the usual method is to let the newel rest on the floor.
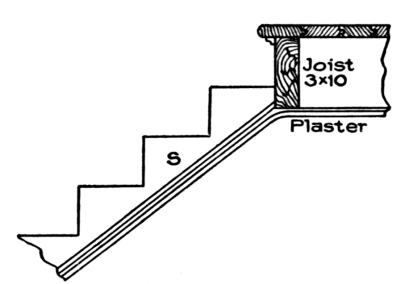
Fig. 30. Showing How a Cut or Open String is Finished at Top of Stair.
Fig. 30 shows how the cut string is finished at the top of the stairs. This illustration requires no explanation after the instructions already given.
Thus far, stairs having a newel only at the bottom have been dealt with. There are, however, many modifications of straight and return stairs which have from two to four or six newels. In such cases, the methods of treating strings at their finishing points must necessarily be somewhat different from those described; but the general principles, as shown and explained, will still hold good.
Well-Hole.
Before proceeding to describe and illustrate neweled stairs, it will be proper to say something about the well-hole, or the opening through the floors, through which the traveler on the stairs ascends or descends from one floor to another.
Fig. 31 shows a well-hole, and the manner of trimming it. In this instance the stairs are placed against the wall; but this is not necessary in all cases, as the well-hole may be placed in any part of the building.
The arrangement of the trimming varies according as the joists are at right angles to, or are parallel to, the wall against which the stairs are built. In the former case (Fig. 31, A) the joists are cut short and tusk-tenoned into the heavy trimmer T T, as shown in the cut. This trimmer is again tusk-tenoned into two heavy joists T J and T J, which form the ends of the well-hole. These heavy joists are called trimming joists; and, as they have to carry a much heavier load than other joists on the same floor, they are made much heavier. Sometimes two or three joists are placed together, side by side, being bolted or spiked together to give them the desired unity and strength. In constructions requiring great strength, the tail and header joists of a well-hole are suspended on iron brackets.
If the opening runs parallel with the joists (Fig. 31, B), the timber forming the side of the well-hole should be left a little heavier than the other joists, as it will have to carry short trimmers (T J and T J) and the joists running into them. The method here shown is more particularly adapted to brick buildings, but there is no reason why the same system may not be applied to frame buildings.
Usually in cheap, frame buildings, the trimmers T T are spiked against the ends of the joists, and the ends of the trimmers are supported by being spiked to the trimming joists T J, T J. This is not very workmanlike or very secure, and should not be done, as it is not nearly so strong or durable as the old method of framing the joists and trimmers together.
Fig. 32 shows a stair with three newels and a platform. In this example, the first tread (No. 1) stands forward of the newel post two-thirds of its width. This is not necessary in every case, but it is sometimes done to suit conditions in the hallway. The second newel is placed at the twelfth riser, and supports the upper end of the first cut string and the lower end of the second cut string. The platform (12) is supported by joists which are framed into the wall and are fastened against a trimmer running from the wall to the newel along the line 12. This is the case only when the second newel runs down to the floor.
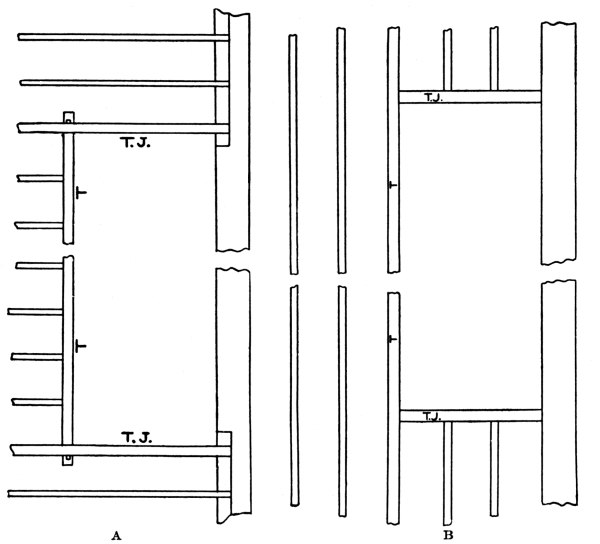
Fig. 31. Showing Ways of Trimming Well-Hole when Joists Run in Different Directions.
If the second newel does not run to the floor, the framework supporting the platform will need to be built on studding. The third newel stands at the top of the stairs, and is fastened to the joists of the second floor, or to the trimmer, somewhat after the manner of fastening shown in Fig. 29. In this example, the stairs have 16 risers and 15 treads, the platform or landing (12) making one tread. The figure 16 shows the floor in the second story.
This style of stair will require a well-hole in shape about as shown in the plan; and where strength is required, the newel at the top should run from floor to floor, and act as a support to the joists and trimmers on which the second floor is laid.
Perhaps the best way for a beginner to go about building a stairway of this type, will be to lay out the work on the lower floor in the exact place where the stairs are to be erected, making everything full size. There will be no difficulty in doing this; and if the positions of the first riser and the three newel posts are accurately defined, the building of the stairs will be an easy matter. Plumb lines can be raised from the lines on the floor, and the positions of the platform and each riser thus easily determined. Not only is it best to line out on the floor all stairs having more than one newel; but in constructing any kind of stair it will perhaps be safest for a beginner to lay out in exact position on the floor the points over which the treads and risers will stand. By adopting this rule, and seeing that the strings, risers, and treads correspond exactly with the lines on the floor, many cases of annoyance will be avoided. Many expert stair-builders, in fact, adopt this method in their practice, laying out all stairs on the floor, including even the carriage strings, and they cut out all the material from the lines obtained on the floor. By following this method, one can see exactly the requirements in each particular case, and can rectify any error without destroying valuable material.
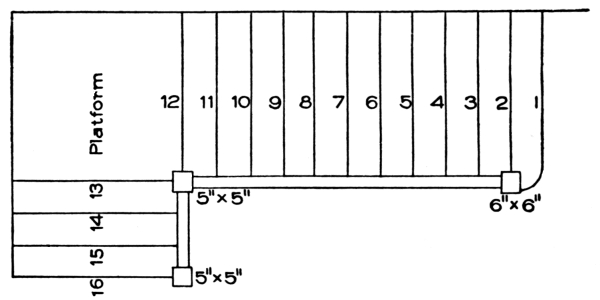
Fig. 32. Stair with Three Newels and a Platform.
Laying Out.
In order to afford the student a clear idea of what is meant by laying out on the floor, an example of a simple close-string stair is given. In Fig. 33, the letter F shows the floor line; L is the landing or platform; and W is the wall line. The stair is to be 4 feet wide over strings; the landing, 4 feet wide; the height from floor to landing, 7 feet; and the run from start to finish of the stair, 8 feet 8½ inches.
The first thing to determine is the dimensions of the treads and risers. The wider the tread, the lower must be the riser, as stated before. No definite dimensions for treads and risers can be given, as the steps have to be arranged to meet the various difficulties that may occur in the working out of the construction; but a common rule is this: Make the width of the tread, plus twice the rise, equal to 24 inches. This will give, for an 8-inch tread, an 8-inch rise; for a 9-inch tread, a 7½-inch rise; for a 10-inch tread, a 7-inch rise, and so on. Having the height (7 feet) and the run of the flight (8 feet 8½-inches), take a rod about one inch square, and mark on it the height from floor to landing (7 feet), and the length of the going or run of the flight (8 feet 8½ inches). Consider now what are the dimensions which can be given to the treads and risers, remembering that there will be one more riser than the number of treads. Mark off on the rod the landing, forming the last tread. If twelve risers are desired, divide the height (namely, 7 feet) by 12, which gives 7 inches as the rise of each step. Then divide the run (namely, 8 feet 8½ inches) by 11, and the width of the tread is found to be 9½ inches.
Great care must be taken in making the pitch-board for marking off the treads and risers on the string. The pitch-board may be made from dry hardwood about ⅜-inch thick. One end and one side must be perfectly square to each other; on the one, the width of the tread is set off, and on the other the height of the riser. Connect the two points thus obtained, and saw the wood on this line. The addition of a gauge-piece along the longest side of the triangular piece, completes the pitch-board, as was illustrated in Fig. 15.
The length of the wall and outer string can be ascertained by means of the pitch-board. One side and one edge of the wall string must be squared; but the outer string must be trued all round. On the strings, mark the positions of the treads and risers by using the pitch-board as already explained (Fig. 17). Strings are usually made 11 inches wide, but may be made 12½ inches wide if necessary for strength.
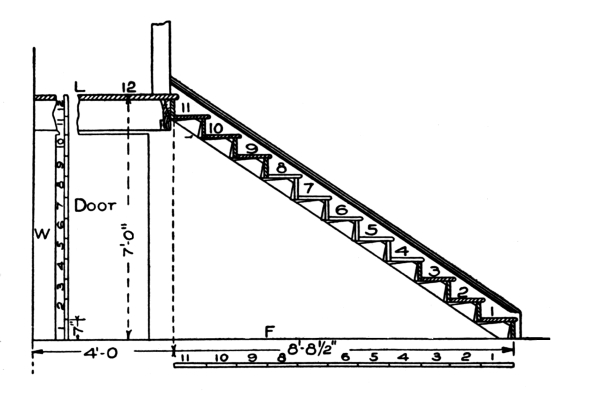
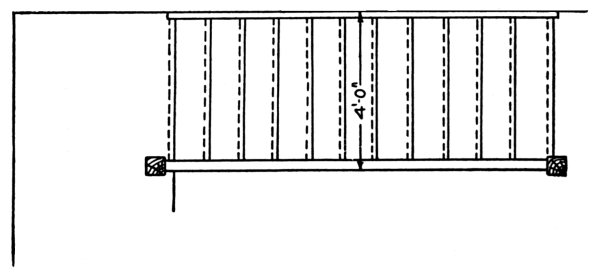
Fig. 33. Method of Laying Out a Simple, Close-String Stair.
After the widths of risers and treads have been determined, and the string is ready to lay out, apply the pitch-board, marking the first riser about 9 inches from the end; and number each step in succession. The thickness of the treads and risers can be drawn by using thin strips of hardwood made the width of the housing required. Now allow for the wedges under the treads and behind the risers, and thus find the exact width of the housing, which should be about ⅝-inch deep; the treads and risers will require to be made 1¼ inches longer than shown in the plan, to allow for the housings at both ends.
Before putting the stair together, be sure that it can be taken into the house and put in position without trouble. If for any reason it cannot be put in after being put together, then the parts must be assembled, wedged, and glued up at the spot.
It is essential in laying out a plan on the floor, that the exact positions of the first and last risers be ascertained, and the height of the story wherein the stair is to be placed. Then draw a plan of the hall or other room in which the stairs will be located, including surrounding or adjoining parts of the room to the extent of ten or twelve feet from the place assigned for the foot of the stair. All the doorways, branching passages, or windows which can possibly come in contact with the stair from its commencement to its expected termination or landing, must be noted. The sketch must necessarily include a portion of the entrance hall in one part, and of the lobby or landing in another, and on it must be laid out all the lines of the stair from the first to the last riser.
The height of the story must next be exactly determined and taken on the rod; then, assuming a height of risers suitable to the place, a trial is made by division in the manner previously explained, to ascertain how often this height is contained in the height of the story. The quotient, if there is no remainder, will be the number of risers required. Should there be a remainder on the first division, the operation is reversed, the number of inches in the height being made the dividend and the before-found quotient the divisor; and the operation of reduction by division is carried on till the height of the riser is obtained to the thirty-second part of an inch. These heights are then set off as exactly as possible on the story rod, as shown in Fig. 33.
The next operation is to show the risers on the sketch. This the workman will find no trouble in arranging, and no arbitrary rule can be given.
A part of the foregoing may appear to be repetition; but it is not, for it must be remembered that scarcely any two flights of stairs are alike in run, rise, or pitch, and any departure in any one dimension from these conditions leads to a new series of dimensions that must be dealt with independently. The principle laid down, however, applies to all straight flights of stairs; and the student who has followed closely and retained the pith of what has been said, will, if he has a fair knowledge of the use of tools, be fairly equipped for laying out and constructing a plain, straight stair with a straight rail.
Plain stairs may have one platform, or several; and they may turn to the right or to the left, or, rising from a platform or landing, may run in an opposite direction from their starting point.
When two flights are necessary for a story, it is desirable that each flight should consist of the same number of steps; but this, of course, will depend on the form of the staircase, the situation and height of doors, and other obstacles to be passed under or over, as the case may be.
In Fig. 32, a stair is shown with a single platform or landing and three newels. The first part of this stair corresponds, in number of risers, with the stair shown in Fig. 33; the second newel runs down to the floor, and helps to sustain the landing. This newel may simply be a 4 by 4-inch post, or the whole space may be inclosed with the spandrel of the stair. The second flight starts from the platform just as the first flight starts from the lower floor, and both flights may be attached to the newels in the manner shown in Fig. 29. The bottom tread in Fig. 32 is rounded off against the square of the newel post; but this cannot well be if the stairs start from the landing, as the tread would project too far onto the platform. Sometimes, in high-class stairs, provision is made for the first tread to project well onto the landing.
If there are more platforms than one, the principles of construction will be the same; so that whenever the student grasps the full conditions governing the construction of a single-platform stair, he will be prepared to lay out and construct the body of any stair having one or more landings. The method of laying out, making, and setting up a hand-rail will be described later.
Stairs formed with treads each of equal width at both ends, are named straight flights; but stairs having treads wider at one end than the other are known by various names, as winding stairs, dog-legged stairs, circular stairs, or elliptical stairs. A tread with parallel sides, having the same width at each end, is called a flyer; while one having one wide end and one narrow, is called a winder. These terms will often be made use of in what follows.
The elevation and plan of the stair shown in Fig. 34 may be called a dog-legged stair with three winders and six flyers. The flyers, however, may be extended to any number. The housed strings to receive the winders are shown. These strings show exactly the manner of construction. The shorter string, in the corner from 1 to 4, which is shown in the plan to contain the housing of the first winder and half of the second, is put up first, the treads being leveled by aid of a spirit level; and the longer upper string is put in place afterwards, butting snugly against the lower string in the corner. It is then fastened firmly to the wall. The winders are cut snugly around the newel post, and well nailed. Their risers will stand one above another on the post; and the straight string above the winders will enter the post on a line with the top edge of the uppermost winder.
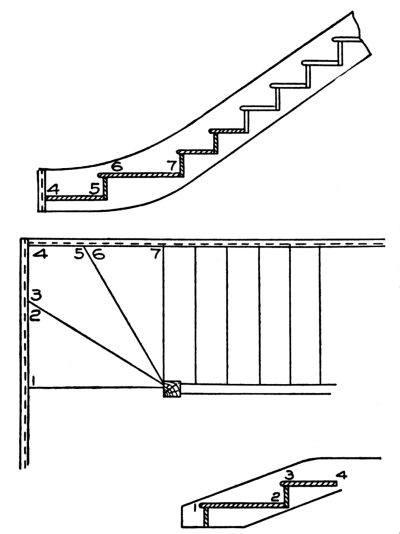
Fig. 34. Elevation and Plan of Dog-Legged Stair with Three Winders and Six Flyers.
Platform stairs are often constructed so that one flight will run in a direction opposite to that of the other flight, as shown in Fig.35. In cases of this kind, the landing or platform requires to have a length more than double that of the treads, in order that both flights may have the same width. Sometimes, however, and for various reasons, the upper flight is made a little narrower than the lower; but this expedient should be avoided whenever possible, as its adoption unbalances the stairs. In the example before us, eleven treads, not including the landing, run in one direction; while four treads, including the landing, run in the opposite direction; or, as workmen put it, the stair “returns on itself.” The elevation shown in Fig. 36 illustrates the manner in which the work is executed. The various parts are shown as follows:
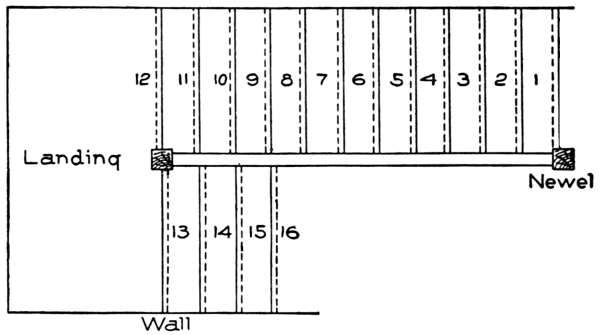
Fig. 35. Plan of Platform Stair Returning on Itself.
Fig. 37 is a section of the top landing, with baluster and rail.
Fig. 38 is part of the long newel, showing mortises for the strings.
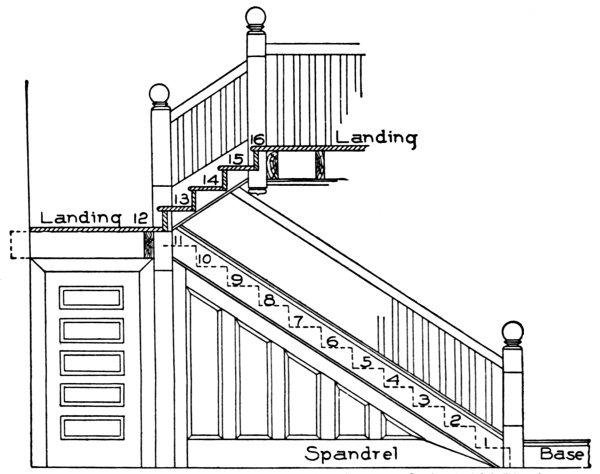
Fig. 36. Elevation Showing Construction of Platform Stair of which Plan is Given in Fig. 35.
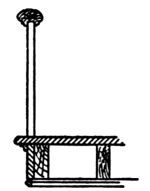
Fig. 37. Section of Top Landing, Baluster, and Rail.
Fig. 39 represents part of the bottom newel, showing the string, moulding on the outside, and cap.
Fig. 40 is a section of the top string enlarged.
Fig. 41 is the newel at the bottom, as cut out to receive bottom step. It must be remembered that there is a cove under each tread. This may be nailed in after the stairs are put together, and it adds greatly to the appearance.
We may state that stairs should have carriage pieces fixed from floor to floor, under the stairs, to support them. These may be notched under the steps; or rough brackets may be nailed to the side of the carriage, and carried under each riser and tread.
There is also a framed spandrel which helps materially to carry the weight, makes a sound job, and adds greatly to the appearance. This spandrel may be made of 1¼-inch material, with panels and mouldings on the front side, as shown in Fig. 36. The joint between the top and bottom rails of the spandrel at the angle, should be made as shown in Fig. 42 with a cross-tongue, and glued and fastened with long screws. Fig. 43 is simply one of the panels showing the miters on the moulding and the shape of the sections. As there is a convenient space under the landing, it is commonly used for a closet.
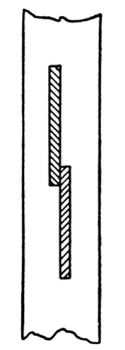
Fig. 38. String Mortises in Long Newel.
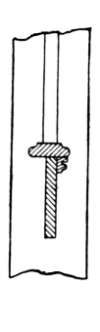
Fig. 39. Mortises in Lower Newel for String, Outside Moulding, and Cap.
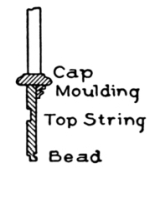
Fig. 40. Enlarged Section of Top String.
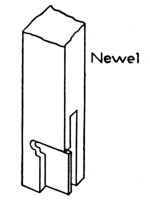
Fig. 41. Newel Cut to Receive Bottom Step.
In setting out stairs, not only the proportions of treads and risers must be considered, but also the material available. As this material runs, as a rule, in certain sizes, it is best to work so as to conform to it as nearly as possible. In ordinary stairs, 11 by 1-inch common stock is used for strings and treads, and 7-inch by ¾-inch stock for risers; in stairs of a better class, wider and thicker material may be used. The rails are set at various heights; 2 feet 8 inches may be taken as an average height on the stairs, and 3 feet 1 inch on landings, with two balusters to each step.
In Fig. 36, all the newels and balusters are shown square; but it is much better, and is the more common practice, to have them turned, as this gives the stairs a much more artistic appearance. The spandrel under the string of the stairway shows a style in which many stairs are finished in hallways and other similar places. Plaster is sometimes used instead of the panel work, but is not nearly so good as woodwork. The door under the landing may open into a closet, or may lead to a cellarway, or through to some other room.
In stairs with winders, the width of a winder should, if possible, be nearly the width of the regular tread, at a distance of 14 inches from the narrow end, so that the length of the step in walking up or down the stairs may not be interrupted; and for this reason and several others, it is always best to have three winders only in each quarter-turn. Above all, avoid a four-winder turn, as this makes a breakneck stair, which is more difficult to construct and inconvenient to use.
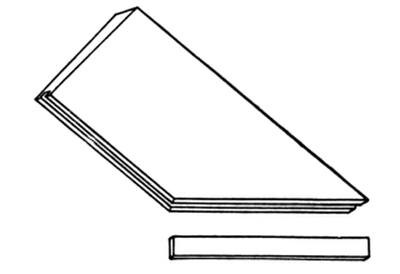
Fig. 42. Showing Method of Joining Spandrel Rails, with Cross-Tongue Glued and Screwed.
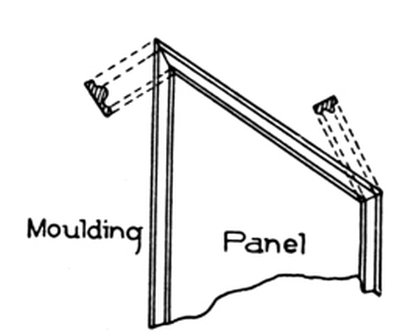
Fig. 43. Panel in Spandrel, Showing Miters on Moulding, and Shape of Section.
Bullnose Tread. No other stair, perhaps, looks so well at the starting point as one having a bullnose step. In Fig. 44 are shown a plan and elevation of a flight of stairs having a bullnose tread. The method of obtaining the lines and setting out the body of the stairs, is the same as has already been explained for other stairs, with the exception of the first two steps, which are made with circular ends, as shown in the plan. These circular ends are worked out as hereafter described, and are attached to the newel and string as shown. The example shows an open, cut string with brackets. The spandrel under the string contains short panels, and makes a very handsome finish. The newels and balusters in this case are turned, and the latter have cutwork panels between them.
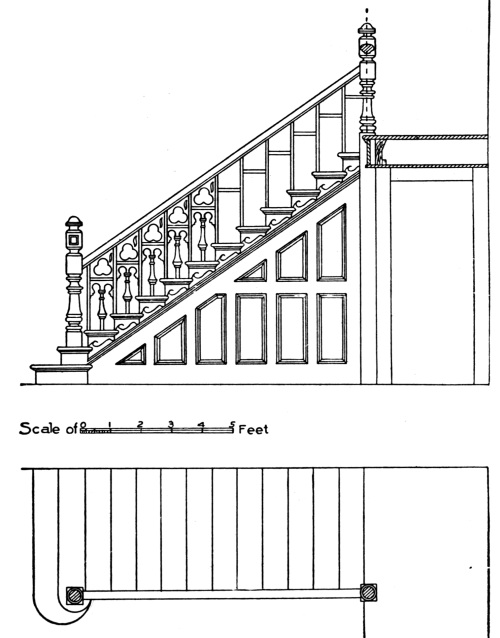
Fig. 44. Elevation and Plan of Stair with Bullnose Tread.
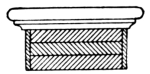
Fig. 45. Section through Bullnose Step.
Bullnose steps are usually built up with a three-piece block, as shown in Fig. 45, which is a section through the step indicating the blocks, tread, and riser.
Fig. 46 is a plan showing how the veneer of the riser is prepared before being bent into position. The block A indicates a wedge which is glued and driven home after the veneer is put in place. This tightens up the work and makes it sound and clear. Figs. 47 and 48 show other methods of forming bullnose steps.
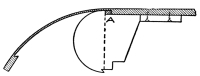
Fig. 46. Plan Showing Preparation of Veneer before Bending into Position.
Fig. 49 is the side elevation of an open-string stair with bullnose steps at the bottom; while Fig. 50 is a view showing the lower end of the string, and the manner in which it is prepared for fixing to the blocks of the step. Fig. 51 is a section through the string, showing the bracket, cove, and projection of tread over same.
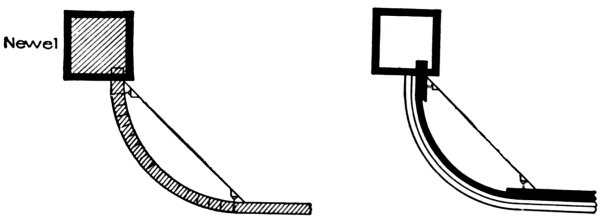
Fig. 47.Fig. 48. Methods of Forming Bullnose Steps.
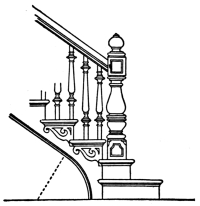
Fig. 49. Side Elevation of Open-String Stair with Bullnose Steps.
Figs. 52 and 53 show respectively a plan and vertical section of the bottom part of the stair. The blocks are shown at the ends of the steps (Fig. 53), with the veneered parts of the risers going round them; also the position where the string is fixed to the blocks (Fig. 52); and the tenon of the newel is marked on the upper step. The section (Fig. 53) shows the manner in which the blocks are built up and the newel tenoned into them.
The newel, Fig. 49, is rather an elaborate affair, being carved at the base and on the body, and having a carved rosette planted in a small, sunken panel on three sides, the rail butting against the fourth side.
Open-Newel Stairs.
Before leaving the subject of straight and dog-legged stairs, the student should be made familiar with at least one example of an open-newel stair. As the same principles of construction govern all styles of open-newel stairs, a single example will be sufficient. The student must, of course, understand that he himself is the greatest factor in planning stairs of this type; that the setting out and designing will generally devolve on him. By exercising a little thought and foresight, he can so arrange his plan that a minimum of both labor and material will be required.
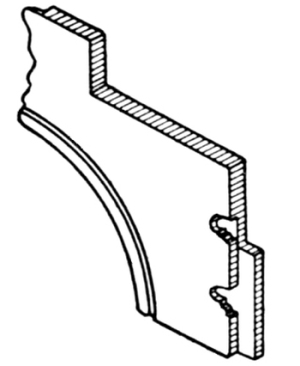
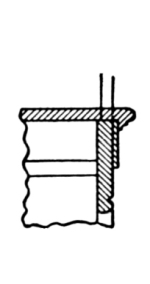
Fig. 50. Lower End of String to Connect with Bullnose Step. Fig. 51. Section through String.
Fig. 54 shows a plan of an open-newel stair having two landings and closed strings, shown in elevation in Fig. 55. The dotted lines show the carriage timbers and trimmers, also the lines of risers; while the treads are shown by full lines. It will be noticed that the strings and trimmers at the first landing are framed into the shank of the second newel post, which runs down to the floor; while the top newel drops below the fascia, and has a turned and carved drop. This drop hangs below both the fascia and the string. The lines of treads and risers are shown by dotted lines and crosshatched sections. The position of the carriage timbers is shown both in the landings and in the runs of the stairs, the projecting ends of these timbers being supposed to be resting on the wall. A scale of the plan and elevation is attached to the plan. In Fig. 55, a story rod is shown at the right, with the number of risers spaced off thereon. The design of the newels, spandrel, framing, and paneling is shown.
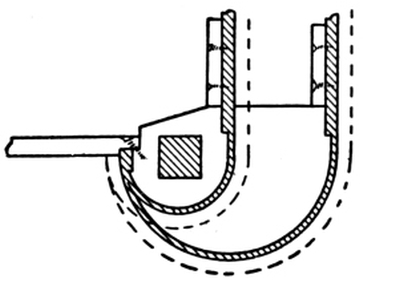
Fig. 52. Plan of Bottom Part of Bullnose Stair.
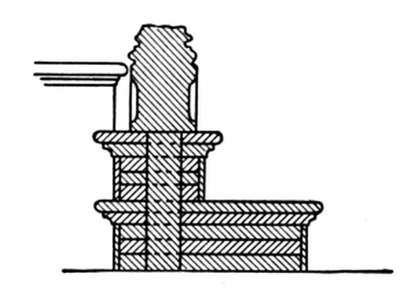
Fig. 53. Vertical Section through Bottom Part of Bullnose Stair.
Only the central carriage timbers are shown in Fig. 54; but in a stair of this width, there ought to be two other timbers, not so heavy, perhaps, as the central one, yet strong enough to be of service in lending additional strength to the stairway, and also to help carry the laths and plaster or the paneling which may be necessary in completing the under side or soffit. The strings being closed, the butts of their balusters must rest on a subrail which caps the upper edge of the outer string.
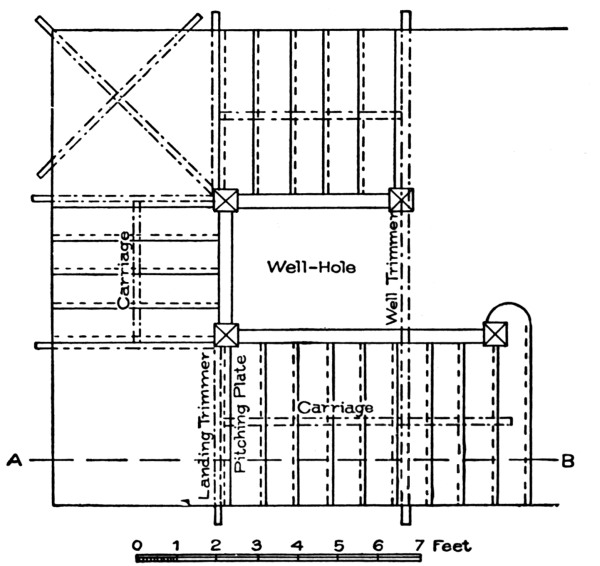
Fig. 54. Plan of Open-Newel Stair, with Two Landings and Closed Strings.
The first newel should pass through the lower floor, and, to insure solidity, should be secured by bolts to a joist, as shown in the elevation. The rail is attached to the newels in the usual manner, with handrail bolts or other suitable device. The upper newel should be made fast to the joists as shown, either by bolts or in some other efficient manner. The intermediate newels are left square on the shank below the stairs, and may be fastened in the floor below either by mortise and tenon or by making use of joint bolts.
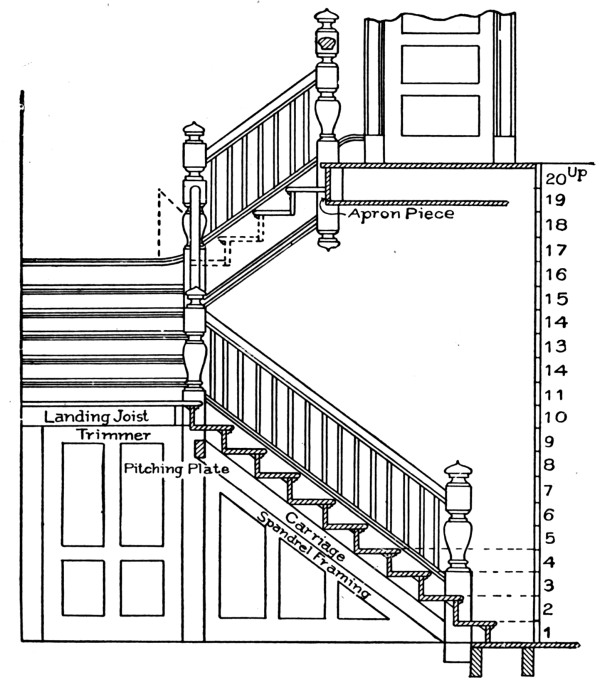
Fig. 55. Elevation of Open-Newel Stair Shown in Plan in Fig. 54.
Everything about a stair should be made solid and sound; and every joint should set firmly and closely; or a shaky, rickety, squeaky stair will be the result, which is an abomination.
Stairs with Curved Turns.
Sufficient examples of stairs having angles of greater or less degree at the turn or change of direction, to enable the student to build any stair of this class, have now been given. There are, however, other types of stairs in common use, whose turns are curved, and in which newels are employed only at the foot, and sometimes at the finish of the flight. These curved turns may be any part of a circle, according to the requirements of the case, but turns of a quarter-circle or half-circle are the more common. The string forming the curve is called a cylinder, or part of a cylinder, as the case may be. The radius of this circle or cylinder may be any length, according to the space assigned for the stair. The opening around which the stair winds is called the well-hole.
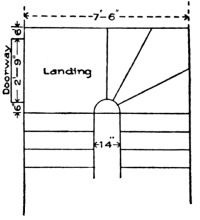
Fig. 56. Stair Serving for Two Flights, with Mid-Floor Landing.
Fig. 56 shows a portion of a stairway having a well-hole with a 7-inch radius. This stair is rather peculiar, as it shows a quarter-space landing, and a quarter-space having three winders. The reason for this is the fact that the landing is on a level with the floor of another room, into which a door opens from the landing. This is a problem very often met with in practical work, where the main stair is often made to do the work of two flights because of one floor being so much lower than another.
A curved stair, sometimes called a geometrical stair, is shown in Fig. 57, containing seven winders in the cylinder or well-hole, the first and last aligning with the diameter.
In Fig. 58 is shown another example of this kind of stair, containing nine winders in the well-hole, with a circular wall-string. It is not often that stairs are built in this fashion, as most stairs having a circular well-hole finish against the wall in a manner similar to that shown in Fig. 57.
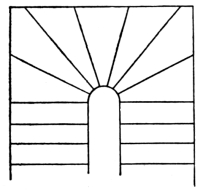
Fig. 57. Geometrical Stair with Seven Winders.
Sometimes, however, the workman will be confronted with a plan such as shown in Fig. 58; and he should know how to lay out the wall-string. In the elevation, Fig. 58, the string is shown to be straight, similar to the string of a common straight flight. This results from having an equal width in the winders along the wall-string, and, as we have of necessity an equal width in the risers, the development of the string is merely a straight piece of board, as in an ordinary straight flight. In laying out the string, all we have to do is to make a common pitch-board, and, with it as a templet, mark the lines of the treads and risers on a straight piece of board, as shown at 1, 2, 3, 4, etc.
If you can manage to bend the string without kerfing (grooving), it will be all the better; if not, the kerfs (grooves) must be parallel to the rise. You can set out with a straight edge, full size, on a rough platform, just as shown in the diagram; and when the string is bent and set in place, the risers and winders will have their correct positions.
To bend these strings or otherwise prepare them for fastening against the wall, perhaps the easiest way is to saw the string with a fine saw, across the face, making parallel grooves. This method of bending is called kerfing, above referred to. The kerfs or grooves must be cut parallel to the lines of the risers, so as to be vertical when the string is in place. This method, however—handy though it may be—is not a good one, inasmuch as the saw groove will show more or less in the finished work.
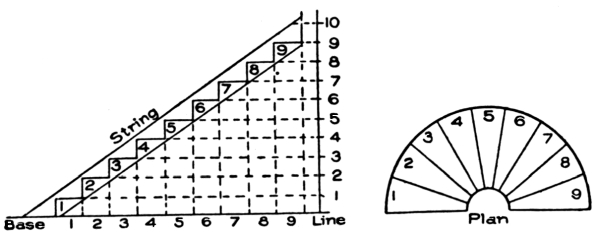
Fig. 58. Plan of Circular Stair and Layout of Wall String for Same.
Another method is to build up or stave the string. There are several ways of doing this. In one, comparatively narrow pieces are cut to the required curve or to portions of it, and are fastened together, edge to edge, with glue and screws, until the necessary width is obtained (see Fig. 59). The heading joints may be either butted or beveled, the latter being stronger, and should be cross-tongued.
Fig. 60 shows a method that may be followed when a wide string is required, or a piece curved in the direction of its width is needed for any purpose. The pieces are stepped over each other to suit the desired curve; and though shown square-edged in the figure, they are usually cut beveled, as then, by reversing them, two may be cut out of a batten.
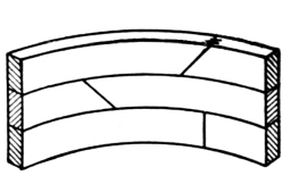
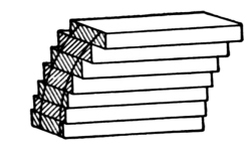
Fig. 59. Fig. 60.
Methods of Building Up Strings.
Panels and quick sweeps for similar purposes are obtained in the manner shown in Fig. 61, by joining up narrow boards edge to edge at a suitable bevel to give the desired curve. The internal curve is frequently worked approximately, before gluing up. The numerous joints incidental to these methods limit their uses to painted or unimportant work.
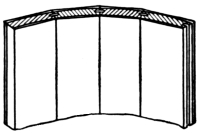
Fig. 61. Building Up a Curved Panel or Quick Sweep.
In Fig. 62 is shown a wreath-piece or curved portion of the outside string rising around the cylinder at the half-space. This is formed by reducing a short piece of string to a veneer between the springings; bending it upon a cylinder made to fit the plan; then, when it is secured in position, filling up the back of the veneer with staves glued across it; and, finally, gluing a piece of canvas over the whole. The appearance of the wreath-piece after it has been built up and removed from the cylinder is indicated in Fig. 63. The canvas back has been omitted to show the staving; and the counter-wedge key used for connecting the wreath-piece with the string is shown. The wreath-piece is, at this stage, ready for marking the outlines of the steps.
Fig. 62 also shows the drum or shape around which strings may be bent, whether the strings are formed of veneers, staved, or kerfed. Another drum or shape is shown in Fig. 64. In this, a portion of a cylinder is formed in the manner clearly indicated; and the string, being set out on a veneer board sufficiently thin to bend easily, is laid down round the curve, such a number of pieces of like thickness being then added as will make the required thickness of the string. In working this method, glue is introduced between the veneers, which are then quickly strained down to the curved piece with hand screws. A string of almost any length can be formed in this way, by gluing a few feet at a time, and when that dries, removing the cylindrical curve and gluing down more, until the whole is completed. Several other methods will suggest themselves to the workman, of building up good, solid, circular strings.
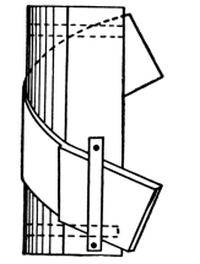
Fig. 62. Wreath-Piece Bent around Cylinder.
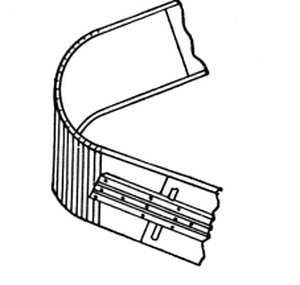
Fig. 63. Completed Wreath-Piece Removed from Cylinder.
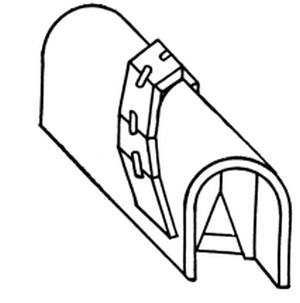
Fig. 64. Another Drum or Shape for Building Curved Strings.
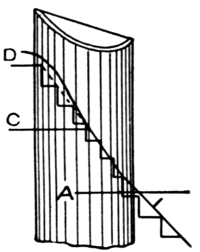
Fig. 65. Laying Out Treads and Risers around a Drum.
One method of laying out the treads and risers around a cylinder or drum, is shown in Fig. 65. The line D shows the curve of the rail. The lines showing treads and risers may be marked off on the cylinder, or they may be marked off after the veneer is bent around the drum or cylinder.
There are various methods of making inside cylinders or wells, and of fastening same to strings. One method is shown in Fig. 66. This gives a strong joint when properly made. It will be noticed that the cylinder is notched out on the back; the two blocks shown at the back of the offsets are wedges driven in to secure the cylinder in place, and to drive it up tight to the strings. Fig. 67 shows an 8-inch well-hole with cylinder complete; also the method of trimming and finishing same. The cylinder, too, is shown in such a manner that its construction will be readily understood.
Stairs having a cylindrical or circular opening always require a weight support underneath them. This support, which is generally made of rough lumber, is called the carriage, because it is supposed to carry any reasonable load that may be placed upon the stairway. Fig. 68 shows the under side of a half-space stair having a carriage beneath it. The timbers marked S are of rough stuff, and may be 2-inch by 6-inch or of greater dimensions. If they are cut to fit the risers and treads, they will require to be at least 2-inch by 8-inch.
In preparing the rough carriage for the winders, it will be best to let the back edge of the tread project beyond the back of the riser so that it forms a ledge as shown under C in Fig. 69. Then fix the cross-carriage pieces under the winders, with the back edge about flush with the backs of risers, securing one end to the well with screws, and the other to the wall string or the wall. Now cut short pieces, marked O O (Fig. 68), and fix them tightly in between the cross-carriage and the back of the riser as at B B in the section, Fig. 69. These carriages should be of 3-inch by 2-inch material. Now get a piece of wood, 1-inch by 3-inch, and cut pieces C C to fit tightly between the top back edge of the winders (or the ledge) and the pieces marked B B in section. This method makes a very sound and strong job of the winders; and if the stuff is roughly planed, and blocks are glued on each side of the short cross-pieces O O O, it is next to impossible for the winders ever to spring or squeak. When the weight is carried in this manner, the plasterer will have very little trouble in lathing so that a graceful soffit will be made under the stairs.
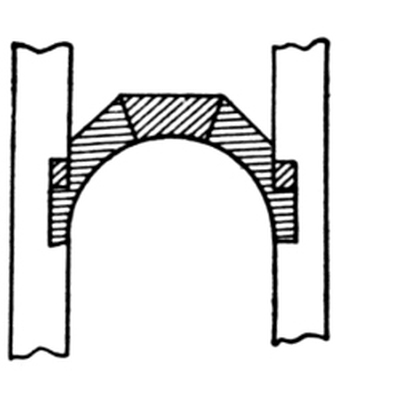
Fig. 66. One Method of Making an Inside Well.
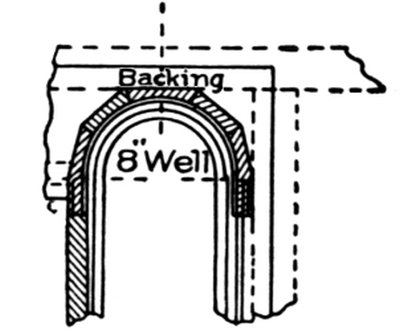
Fig. 67. Construction and Trimming of 8-Inch Well-Hole.
The manner of placing the main stringers of the carriage S S, is shown at A, Fig. 69. Fig. 68 shows a complete half-space stair; one-half of this, finished as shown, will answer well for a quarter-space stair.
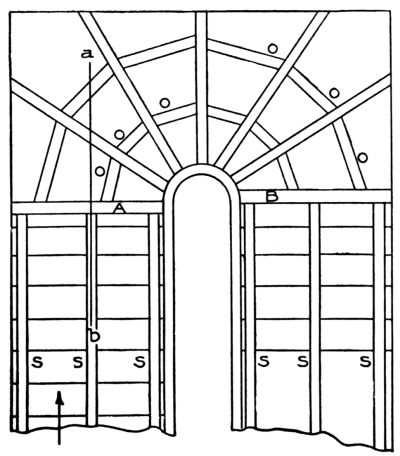
Fig. 68. Under Side of Half-Space Stair, with Carriages and Cross-Carriages.
Another method of forming a carriage for a stair is shown in Fig. 70. This is a peculiar but very handsome stair, inasmuch as the first and the last four steps are parallel, but the remainder balance or dance. The treads are numbered in this illustration; and the plan of the handrail is shown extending from the scroll at the bottom of the stairs to the landing on the second story. The trimmer T at the top of the stairs is also shown; and the rough strings or carriages, R S, R S, R S, are represented by dotted lines.
This plan represents a stair with a curtail step, and a scroll handrail resting over the curve of the curtail step. This type of stair is not now much in vogue in this country, though it is adopted occasionally in some of the larger cities. The use of heavy newel posts instead of curtail steps, is the prevailing style at present.
In laying out geometrical stairs, the steps are arranged on principles already described. The well-hole in the center is first laid down and the steps arranged around it. In circular stairs with an open well-hole, the handrail being on the inner side, the width of tread for the steps should be set off at about 18 inches from the handrail, this giving an approximately uniform rate of progress for anyone ascending or descending the stairway. In stairs with the rail on the outside, as sometimes occurs, it will be sufficient if the treads have the proper width at the middle point of their length.
Where a flight of stairs will likely be subject to great stress and wear, the carriages should be made much heavier than indicated in the foregoing figures; and there may be cases when it will be necessary to use iron bolts in the sides of the rough strings in order to give them greater strength. This necessity, however, will arise only in the case of stairs built in public buildings, churches, halls, factories, warehouses, or other buildings of a similar kind. Sometimes, even in house stairs it may be wise to strengthen the treads and risers by spiking pieces of board to the rough string, ends up, fitting them snugly against the under side of the tread and the back of the riser. The method of doing this is shown in Fig. 71, in which the letter O shows the pieces nailed to the string.
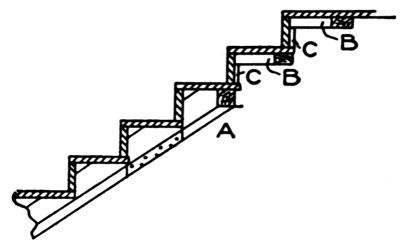
Fig. 69. Method of Reinforcing Stair.
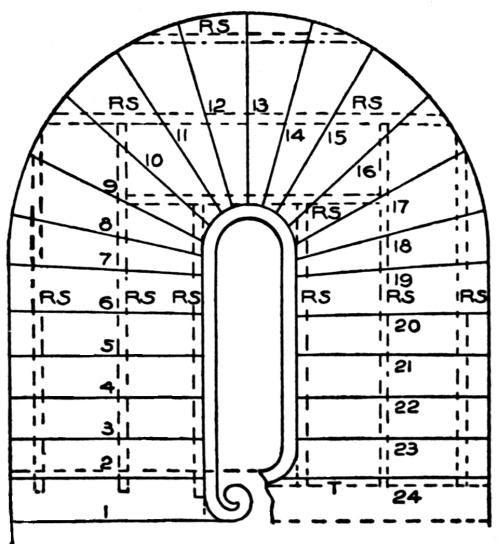
Fig. 70. Plan Showing One Method of Constructing Carriage and Trimming Winding Stair.
Types of Stairs in Common Use.
In order to make the student familiar with types of stairs in general use at the present day, plans of a few of those most likely to be met with will now be given.
Fig. 72 is a plan of a straight stair, with an ordinary cylinder at the top provided for a return rail on the landing. It also shows a stretch-out stringer at the starting.
Fig. 73 is a plan of a stair with a landing and return steps.
Fig. 74 is a plan of a stair with an acute angular landing and cylinder.
Fig. 75 illustrates the same kind of stair as Fig. 74, the angle, however, being obtuse.
Fig. 76 exhibits a stair having a half-turn with two risers on landings.
Fig. 77 is a plan of a quarter-space stair with four winders.
Fig. 78 shows a stair similar to Fig. 77, but with six winders.
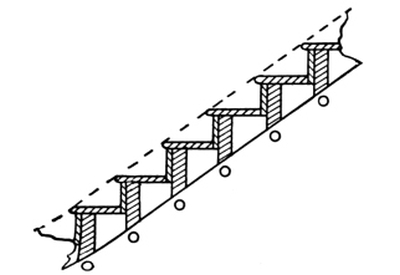
Fig. 71. Reinforcing Treads and Risers by Blocks Nailed to String.
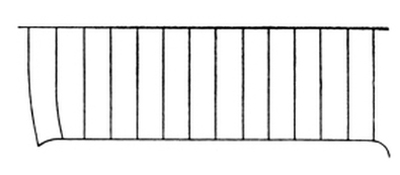
Fig. 72. Plan of Straight Stair with Cylinder at Top for Return Rail.
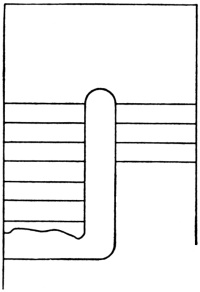
Fig. 73. Plan of Stair with Landing and Return Steps.
Fig. 79 shows a stair having five dancing winders.
Fig. 80 is a plan of a half-space stair having five dancing winders and a quarter-space landing.
Fig. 81 shows a half-space stair with dancing winders all around the cylinder.
Fig. 82 shows a geometrical stair having winders all around the cylinder.
Fig. 83 shows the plan and elevation of stairs which turn around a central post. This kind of stair is frequently used in large stores and in clubhouses and other similar places, and has a very graceful appearance. It is not very difficult to build if properly planned.
The only form of stair not shown which the student may be called upon to build, would very likely be one having an elliptical plan; but, as this form is so seldom used—being found, in fact, only in public buildings or great mansions—it rarely falls to the lot of the ordinary workman to be called upon to design or construct a stairway of this type.
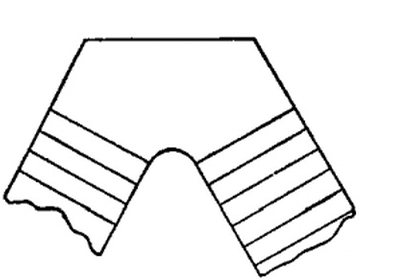
Fig. 74. Plan of Stair with Acute-Angle Landing and Cylinder.
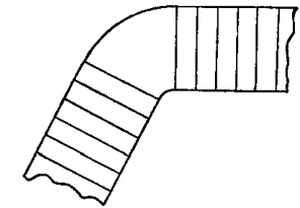
Fig. 75. Plan of Stair with Obtuse-Angle Landing and Cylinder.
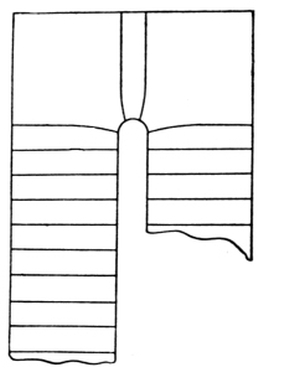
Fig. 76. Half-Turn Stair with Two Risers on Landings.
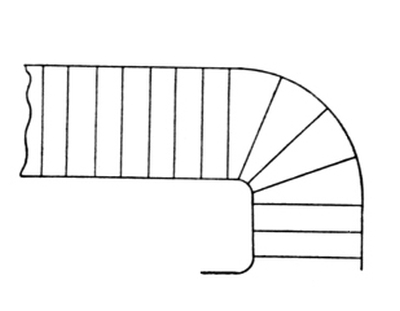
Fig. 77. Quarter-Space Stair with Four Winders.
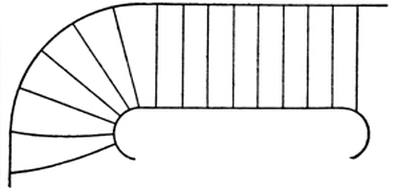
Fig. 78. Quarter-Space Stair with Six Winders.
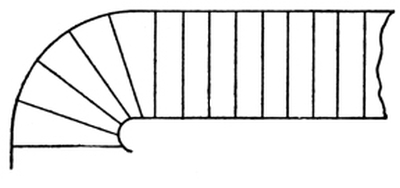
Fig. 79. Stair with Five Dancing Winders.
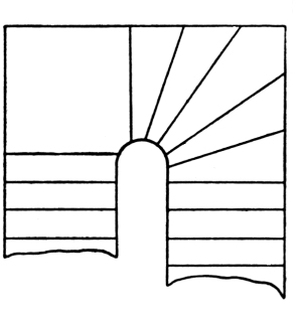
Fig. 80. Half-Space Stair with Five Dancing Winders and Quarter-Space Landing
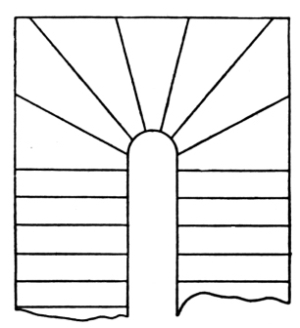
Fig. 81. Half-Space Stair with Dancing Winders all around Cylinder.
GEOMETRICAL STAIRWAYS AND HAND-RAILING
The term geometrical is applied to stairways having any kind of curve for a plan.
The rails over the steps are made continuous from one story to another. The resulting winding or twisting pieces are called wreaths.
Wreaths.
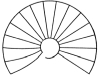
Fig. 82. Geometrical Stair with Winders all Around Cylinder.
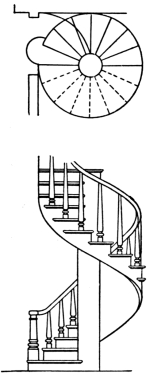
Fig. 83. Plan and Elevation of Stairs Turning around a Central Post.
The construction of wreaths is based on a few geometrical problems—namely, the projection of straight and curved lines into an oblique plane; and the finding of the angle of inclination of the plane into which the lines and curves are projected. This angle is called the bevel, and by its use the wreath is made to twist.
In Fig. 84 is shown an obtuse-angle plan; in Fig. 85, an acute-angle plan; and in Fig. 86, a semicircle enclosed within straight lines.
Projection. A knowledge of how to project the lines and curves in each of these plans into an oblique plane, and to find the angle of inclination of the plane, will enable the student to construct any and all kinds of wreaths.
The straight lines a, b, c, d in the plan, Fig. 86, are known as tangents; and the curve, the central line of the plan wreath.
The straight line across from n to n is the diameter; and the perpendicular line from it to the lines c and b is the radius.
A tangent line may be defined as a line touching a curve without cutting it, and is made use of in handrailing to square the joints of the wreaths.
Tangent System.
The tangent system of handrailing takes its name from the use made of the tangents for this purpose.
In Fig. 86, it is shown that the joints connecting the central line of rail with the plan rails w of the straight flights, are placed right at the springing; that is, they are in line with the diameter of the semicircle, and square to the side tangents a and d.
The center joint of the crown tangents is shown to be square to tangents b and c. When these lines are projected into an oblique plane, the joints of the wreaths can be made to butt square by applying the bevel to them.
All handrail wreaths are assumed to rest on an oblique plane while ascending around a well-hole, either in connecting two flights or in connecting one flight to a landing, as the case may be.
In the simplest cases of construction, the wreath rests on an inclined plane that inclines in one direction only, to either side of the well-hole; while in other cases it rests on a plane that inclines to two sides.
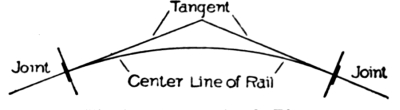
Fig. 84. Obtuse-Angle Plan.
Fig. 87 illustrates what is meant by a plane inclining in one direction. It will be noticed that the lower part of the figure is a reproduction of the quadrant enclosed by the tangents a and b in Fig. 86. The quadrant, Fig. 87, represents a central line of a wreath that is to ascend from the joint on the plan tangent a the height of h above the tangent b.
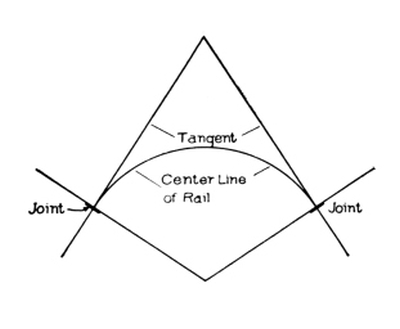
Fig. 85. Acute-Angle Plan.
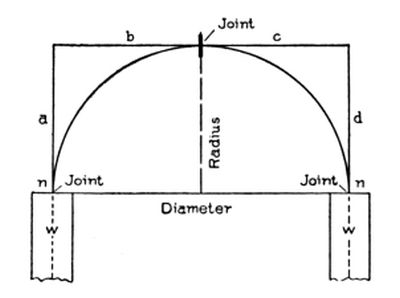
Fig. 86. Semicircular Plan.
In Fig. 88, a view of Fig. 87 is given in which the tangents a and b are shown in plan, and also the quadrant representing the plan central line of a wreath. The curved line extending from a to h in this figure represents the development of the central line of the plan wreath, and, as shown, it rests on an oblique plane inclining to one side only—namely, to the side of the plan tangent a. The joints are made square to the developed tangents a and m of the inclined plane; it is for this purpose only that tangents are made use of in wreath construction. They are shown in the figure to consist of two lines, a and m, which are two adjoining sides of a developed section (in this case, of a square prism), the section being the assumed inclined plane whereon the wreath rests in its ascent from a to h. The joint at h, if made square to the tangent m, will be a true, square butt-joint; so also will be the joint at a, if made square to the tangent a.
In practical work it will be required to find the correct geometrical angle between the two developed tangents a and m; and here, again, it may be observed that the finding of the correct angle between the two developed tangents is the essential purpose of every tangent system of handrailing.
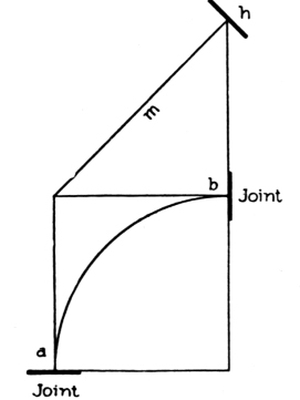
Fig. 87. Illustrating Plane Inclined in One Direction Only.
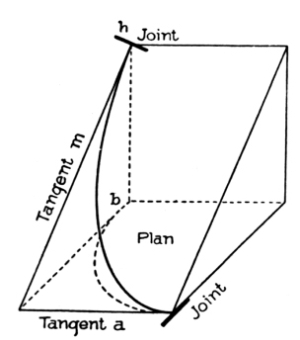
Fig. 88. Plan Line of Rail Projected into Oblique Plane Inclined to One Side Only.
In Fig. 89 is shown the geometrical solution—the one necessary to find the angle between the tangents as required on the face-mould to square the joints of the wreath. The figure is shown to be similar to Fig. 87, except that it has an additional portion marked “Section.” This section is the true shape of the oblique plane whereon the wreath ascends, a view of which is given in Fig. 88. It will be observed that one side of it is the developed tangent m; another side, the developed tangent a″ (= a). The angle between the two as here presented is the one required on the face-mould to square the joints.
In this example, Fig. 89, owing to the plane being oblique in one direction only, the shape of the section is found by merely drawing the tangent a″ at right angles to the tangent m, making it equal in length to the level tangent a in the plan. By drawing lines parallel to a″ and m respectively, the form of the section will be found, its outlines being the projections of the plan lines; and the angle between the two tangents, as already said, is the angle required on the face-mould to square the joints of the wreath.
The solution here presented will enable the student to find the correct direction of the tangents as required on the face-mould to square joints, in all cases of practical work where one tangent of a wreath is level and the other tangent is inclined, a condition usually met with in level-landing stairways.
Fig. 90 exhibits a condition of tangents where the two are equally inclined. The plan here also is taken from Fig. 86. The inclination of the tangents is made equal to the inclination of tangent b in Fig.86, as shown at m in Figs. 87, 88, and 89.
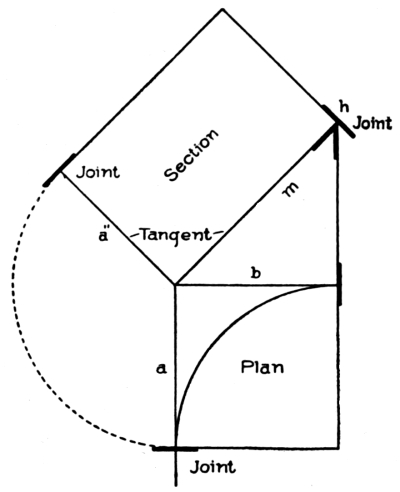
Fig. 89. Finding Angle between Tangents.
In Fig. 91, a view of Fig. 90 is given, showing clearly the inclination of the tangents c″ and d″ over and above the plan tangents c and d. The central line of the wreath is shown extending along the sectional plane, over and above its plan lines, from one joint to the other, and, at the joints, made square to the inclined tangents c″ and d″. It is evident from the view here given, that the condition necessary to square the joint at each end would be to find the true angle between the tangents c″ and d″, which would give the correct direction to each tangent.
In Fig. 92 is shown how to find this angle correctly as required on the face-mould to square the joints. In this figure is shown the same plan as in Figs. 90 and 91, and the same inclination to the tangents as in Fig. 90, so that, except for the portion marked “Section,” it would be similar to Fig. 90.
To find the correct angle for the tangents of the face-mould, draw the line m from d, square to the inclined line of the tangents c′ d″; revolve the bottom inclined tangent c′ to cut line m in n, where the joint is shown fixed; and from this point draw the line c″ to w. The intersection of this line with the upper tangent d″ forms the correct angle as required on the face-mould. By drawing the joints square to these two lines, they will butt square with the rail that is to connect with them, or to the joint of another wreath that may belong to the cylinder or well-hole.
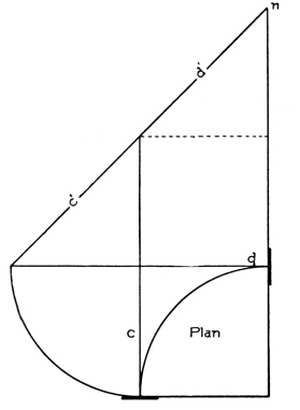
Fig. 90. Two Tangents Equally Inclined.
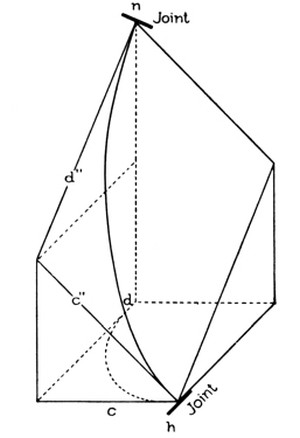
Fig. 91. Plan Lines Projected into Oblique Plane Inclined to Two Sides.
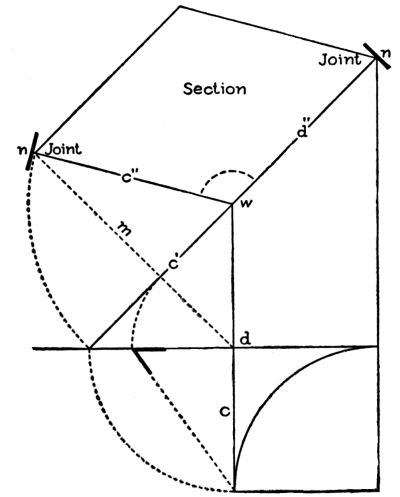
Fig. 92. Finding Angle between Tangents.
Fig. 93 is another view of these tangents in position placed over and above the plan tangents of the well-hole. It will be observed that this figure is made up of Figs. 88 and 91 combined. Fig. 88, as here presented, is shown to connect with a level-landing rail at a. The joint having been made square to the level tangent, a will butt square to a square end of the level rail. The joint at h is shown to connect the two wreaths and is made square to the inclined tangent m of the lower wreath, and also square to the inclined tangent c″ of the upper wreath; the two tangents, aligning, guarantee a square butt-joint. The upper joint is made square to the tangent d″, which is here shown to align with the rail of the connecting flight; the joint will consequently butt square to the end of the rail of the flight above.
The view given in this diagram is that of a wreath starting from a level landing, and winding around a well-hole, connecting the landing with a flight of stairs leading to a second story. It is presented to elucidate the use made of tangents to square the joints in wreath construction. The wreath is shown to be in two sections, one extending from the level-landing rail at a to a joint in the center of the well-hole at h, this section having one level tangent a and one inclined tangent m; the other section is shown to extend from h to n, where it is butt-jointed to the rail of the flight above.
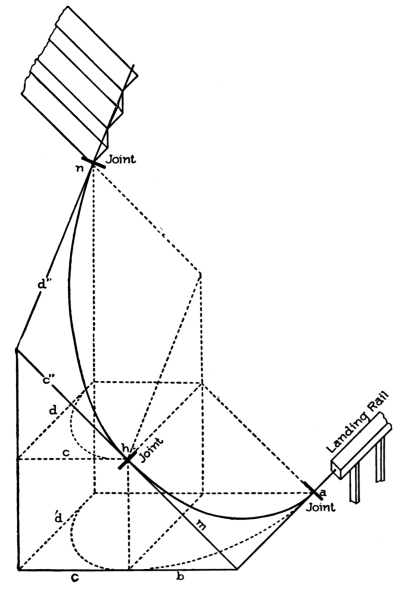
Fig. 93. Laying Out Line of Wreath to Start from Level-Landing Rail. Wind around Well-Hole, and Connect at Landing with Flight to Upper Story.
This figure clearly shows that the joint at a of the bottom wreath—owing to the tangent a being level and therefore aligning with the level rail of the landing—will be a true butt-joint; and that the joint at h, which connects the two wreaths, will also be a true butt-joint, owing to it being made square to the tangent m of the bottom wreath and to the tangent c″ of the upper wreath, both tangents having the same inclination; also the joint at n will butt square to the rail of the flight above, owing to it being made square to the tangent d″, which is shown to have the same inclination as the rail of the flight adjoining.
As previously stated, the use made of tangents is to square the joints of the wreaths; and in this diagram it is clearly shown that the way they can be made of use is by giving each tangent its true direction. How to find the true direction, or the angle between the tangents a and m shown in this diagram, was demonstrated in Fig. 89; and how to find the direction of the tangents c″ and d″ was shown in Fig. 92.
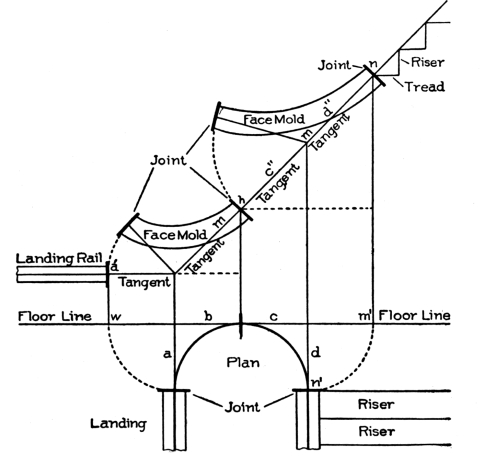
Fig. 94. Tangents Unfolded to Find Their Inclination.
Fig. 94 is presented to help further toward an understanding of the tangents. In this diagram they are unfolded; that is, they are stretched out for the purpose of finding the inclination of each one over and above the plan tangents. The side plan tangent a is shown stretched out to the floor line, and its elevation a′ is a level line. The side plan tangent d is also stretched out to the floor line, as shown by the arc n′ m′. By this process the plan tangents are now in one straight line on the floor line, as shown from w to m′. Upon each one, erect a perpendicular line as shown, and from m′ measure to n, the height the wreath is to ascend around the well-hole. In practice, the number of risers in the well-hole will determine this height.
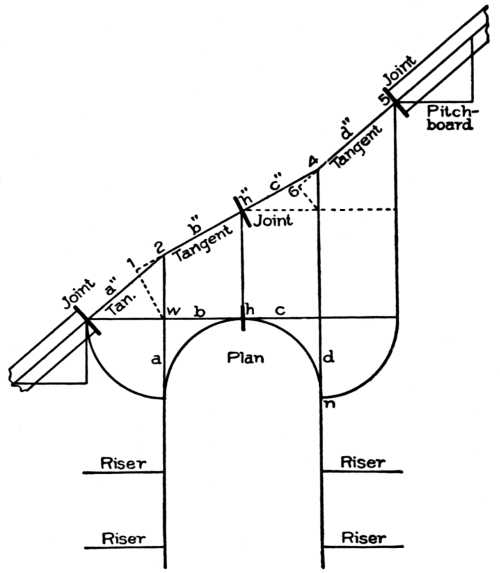
Fig. 95. Well-Hole Connecting Two Flights, with Two Wreath-Pieces, Each Containing Portions of Unequal Pitch.
Now, from point n, draw a few treads and risers as shown; and along the nosing of the steps, draw the pitch-line; continue this line over the tangents d″, c″, and m, down to where it connects with the bottom level tangent, as shown. This gives the pitch or inclination to the tangents over and above the well-hole. The same line is shown in Fig. 93, folded around the well-hole, from n, where it connects with the flight at the upper end of the well-hole, to a, where it connects with the level-landing rail at the bottom of the well-hole. It will be observed that the upper portion, from joint n to joint h, over the tangents c″ and d″, coincides with the pitch-line of the same tangents as presented in Fig. 92, where they are used to find the true angle between the tangents as it is required on the face-mould to square the joints of the wreath at h.
In Fig. 89 the same pitch is shown given to tangent m as in Fig. 94; and in both figures the pitch is shown to be the same as that over and above the upper connecting tangents c″ and d″, which is a necessary condition where a joint, as shown at h in Figs. 93 and 94, is to connect two pieces of wreath as in this example.
In Fig. 94 are shown the two face-moulds for the wreaths, placed upon the pitch-line of the tangents over the well-hole. The angles between the tangents of the face-moulds have been found in this figure by the same method as in Figs. 89 and 92, which, if compared with the present figure, will be found to correspond, excepting only the curves of the face-moulds in Fig. 94.
The foregoing explanation of the tangents will give the student a fairly good idea of the use made of tangents in wreath construction. The treatment, however, would not be complete if left off at this point, as it shows how to handle tangents under only two conditions—namely, first, when one tangent inclines and the other is level, as at a and m; second, when both tangents incline, as shown at c″ and d″.
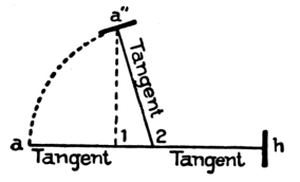
Fig. 96. Finding Angle between Tangents for Bottom Wreath of Fig. 95.
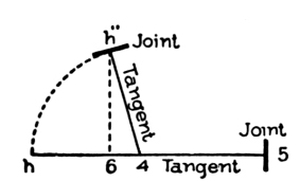
Fig. 97. Finding Angle between Tangents for Upper Wreath of Fig. 95.
In Fig. 95 is shown a well-hole connecting two flights, where two portions of unequal pitch occur in both pieces of wreath. The first piece over the tangents a and b is shown to extend from the square end of the straight rail of the bottom flight, to the joint in the center of the well-hole, the bottom tangent a″ in this wreath inclining more than the upper tangent b″. The other piece of wreath is shown to connect with the bottom one at the joint h″ in the center of the well-hole, and to extend over tangents c″ and d″ to connect with the rail of the upper flight. The relative inclination of the two tangents in this wreath, is the reverse of that of the two tangents of the lower wreath. In the lower piece, the bottom tangent a″, as previously stated, inclines considerably more than does the upper tangent b″; while in the upper piece, the bottom tangent c″ inclines considerably less than the upper tangent d″.