HOW TO BUILD AN ICE-BOAT.
Reading edition
It is now time, boys, to house your canvas canoe, and put your miniature sloop and steam-yacht out of commission. No doubt you have become quite nautical in your habits the past season, and it seems a pity that you should be obliged to give up being a jolly tar, with your blue shirt and tarpaulin, just because the weather is a little cooler, and the wind inclined to be rather fresh.
But there is no necessity for becoming a thorough landlubber. Why not have a boat for the winter—an ice-boat; not one in miniature, but one that you can sail in yourself? The construction is simple enough. With a few tools, the aid of your friends the carpenter and blacksmith, and last, but not least, a little ingenuity, you may continue to scud over the "briny," and not forget all your nauticalities.
WORKING PLANS FOR AN ICE-BOAT.
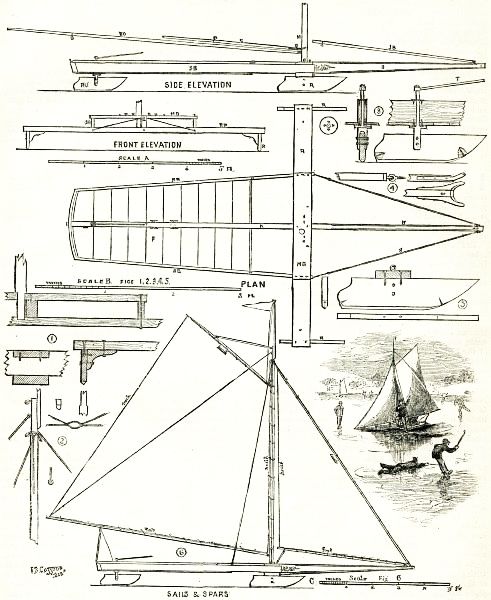
Perhaps you remember that model ice-boat at the Centennial, the Whiff. Yours need not be as large nor as elaborate, but it will serve your purpose. The principal parts of the hull consist of eight pieces in all, and straight at that, viz., keel, runner plank, mast bench, two side boards, and three runners. That certainly don't look like a great undertaking. Now look at the drawings on the plate, and see what is to be done, and then how to do it. As in all boats, the keel (K) comes first, made of white pine, twelve feet long, one and three-quarter inches thick, and four inches deep; runner plank (RP), of pine, seven feet in length, six inches wide, and one and a half inches thick; mast bench (MB), three feet long, six inches wide, and one inch thick; side boards (SB), seven feet long, three inches deep, and one inch thick. Runners and rudder to be made of ash, the former two feet long, five inches deep, and one inch thick; the latter twenty-one inches long, four and a half inches deep, and one inch thick. Let your carpenter get the timber for you, and see that it is all well-seasoned, free from knots and checks, and straight-grained.
When you have all your pieces nicely planed, be careful to follow your dimensions, lengths, etc., and don't saw off an inch too much. Now for the keel and bowsprit. Measure off from the right-hand end of the keel four feet six inches on the under edge; then cut to the right hand with draw-knife down to two inches; finish with plane. There's your bowsprit. On the upper edge of the keel, five feet from the end of the bowsprit, cut a place for the mast bench one inch deep and six inches wide. Go to work on your runners and chocks (for inside of runners) with draw-knife and key-hole saw. All your pieces being cut out, the next thing is putting them together. Place the keel on the centre of the runner plank, and mark with a pencil; then turn it over, and nail the RP to the keel. This is simply to hold it in place until you get your mast bench and side boards bolted to the runner plank. Use quarter-inch bolts six inches long for this. Fig. 1 shows detail, cross section of side board, and longitudinal section of RP and MB. The plan gives the position of the bolt holes. Screw bolts up firmly, the nuts on the under side of the RP. Put a couple of two-inch screws through the MB to the keel.
Now for the stern. Bend a piece of inch stuff from the ends of the SB, and nail it firmly to keel and SB. You will notice the end of the keel projects a little. If you find this hard to do when the wood is dry, steam it; or if not that, just saw off a bit of your keel, and make the stern straight across. It does look a little more ship-shape, though, to have a curve in the stern. Turn the boat over, and nail the flooring (F), of half-inch stuff, firmly to SB and K. Your boat is now good and stiff; but, remember, don't attempt to turn your hull over before you've got the side boards fastened to the stern piece, and that again to the keel; the other ends of the side boards are supposed to be bolted to the rudder plank. You have the main part of the hull done. Make full-size drawings of runners and rudder iron-work, and show these drawings to your blacksmith, and let him attend to that part of the business. Be careful in drawing the details of the runner irons, rudder-post, etc., to use the right scale—that marked B.
Now for your spars. Mast, white pine, eight feet nine inches from end to end, four inches at base, one inch at head. Put the stick in your bench vise, and shape it with a spokeshave. Boom, eight feet six inches long, one and a half inches thick at the middle, and one inch at either end; fasten it to the mast with a staple and screw-eye; Fig. 4 shows it. Put a brass ferrule on the end of the boom to prevent it from being split by the staple. Gaff, four feet long, and an inch and a quarter thick. Make the throat as in Fig. 4. Jib-boom, four feet eleven inches long, an inch and a quarter thick; fasten it to the bowsprit by a staple and eye, the former to be driven in the bowsprit. Topmast, two feet three inches long, one inch at foot, narrow it half an inch, and screw it to the mast. That completes the sparring.
The standing rigging is next in order. For shrouds and back and jib stays use hemp line; heavy cod line will do. Fasten to eyes in the mast bench and side board, as shown in Fig. 2. Brass eyelets suitable may be got at the sail-maker's.
In shaping the mast you must leave a shoulder for the shrouds and stays to rest on. The jib stay runs through the bowsprit, and is fastened to the runner plank in the same way as the shrouds. The bowsprit stays extend to the runner plank, under the ends of the side boards. The front elevation gives the position.
Make sails out of heavy unbleached muslin; when hemmed to be of the following dimensions: mainsail hoist, six feet six inches; head, four feet two inches; leech, nine feet four inches; foot, eight feet six inches. Jib hoist, six feet nine inches; leech, eight feet eleven inches; foot, five feet.
The running rigging hardly needs a description. Small single blocks, either of wood or metal, may be used, with the exception of the blocks for the main and jib sheets, which should be double. The peak and throat halyards run from blocks through screw-eyes in the mast bench, thence to cleats on the side of the keel; jib halyards through eyes, and then to the cleat; jib sheets fastened to eyes, then through double pulley, and back to the cleat—one on either side, of course. For the topping lift use blue-fish line; and for the running rigging, the same.
Before you put your sails on, or, in fact, any of the spars, standing or running rigging, you must remember that you have not put the runners on yet, nor got the rudder in place. See that the blacksmith has made the iron-work according to the drawings. Bolt the rudder to the rudder-post, screw the irons to the runners, the chocks to the under side of the runner plank, and then to the runners. Look at the detail drawings, and see that everything is all right; then you may begin to put on the finishing touches.
Sand-paper every part so as to get the finger-marks off, and then give your wood-work, spars and all, a coat of shellac. Step your mast; draw taut as you possibly can the standing rigging; but don't forget to put brass rings on your mast and jib stay, or you'll have to unrig. Then bend your sails, reeve your running rigging, and, with a little oil on the working parts of the rudder, you are ready to run a race with a locomotive if one is at hand and you've got a clear sheet of ice under you.
Don't forget that this craft of yours is inclined to speed at times, and requires a steady hand, a quick eye, and ready nerve to manage it, or you'll be running into Bill A. or Charlie B., perhaps shooting yourself out as from a catapult, or driving high and dry up the side of a hill. Nobody knows what may happen if you don't keep your wits about you. Above all, don't smash your boat, because it can be put to good use when the boating season opens again. We will tell you how by-and-by.
A LITTLE ANTIQUITY.—Drawn by Miss C. A. Northam.