THE MEASURES. (continued 2)
Reading edition
Make the width at waist, from 3 to 4, about 3 inches, and draw also a line down to 7. Now curve back-seam, as shown, and whatever amount there is from 6 to F place from 7 to 8, and curve from 4 past 5 to 8.
Draw a line from I to 1, raise above I to J three-fourths inch, and curve the shoulder. Starting from J up upright line, curve back seam to 4 and 8; also mark a dim line from J past I, K to G, just like in a sack back—the dotted line shows that. Point G is one-fourth of breast, or 9 inches, from B.
Notice that the curve on the back, from C to 3, is a trifle outside of the straight line, and that below 3 it runs a shade inside to give an appearance of a long waist, and below E it curves outside again to F.
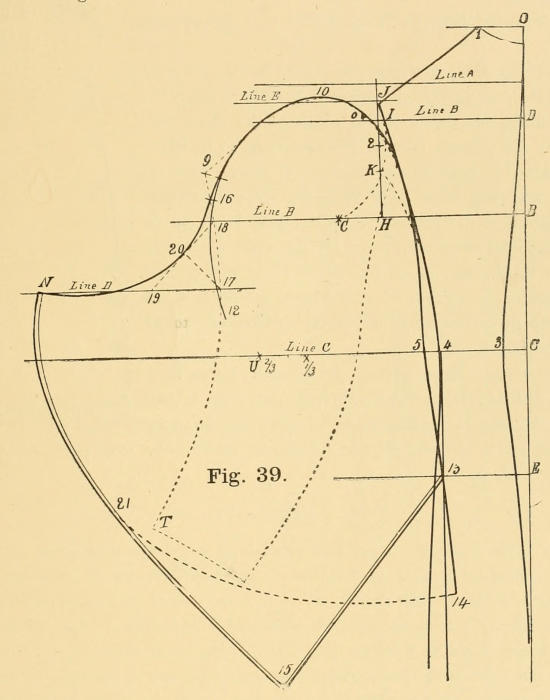
Fig. 39.
The inside seam from J past breast-line should be very nearly straight, and begin to curve only near the waist, and from 5 down it must have the same curve as outside line below point E to F.
Now have a sleeve cut for a 36 size and lay this on to K, as shown, so that the sleeve-head rests against the line from K to I; then in the centre, between I and K, find point 2 and stick a pin.
Now turn to Figure 38: In the middle, between line A and D, draw line E; keeping it pinned at 2, move the lower part of the sleeve towards the back till the top of the sleeve-head just touches line E at 10. While it lays thus draw along the top from 2 to 10 and 9, also down from 9, in front of sleeve pattern, to line B. This gives the outline of the sleeve, but we modify it by drawing a corrected line from 10, inside of point 9 of sleeve, down to 12.
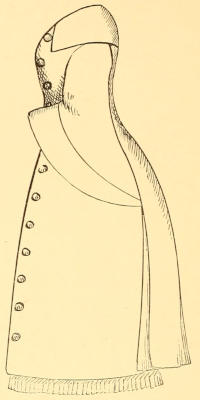
Figure 39 gives the balance of the sleeve. First draw a line in the centre, between lines B and C, which places line D.
Then take out the pin which was placed in the sleeve at point 2, and without moving the sleeve stick a pin at point U; this point is found two-thirds of the width of the sleeve forward. When this is done take hold of the sleeve at its lower point and move it upwards, till point T of sleeve rests on line D at N, and then curve from 16 to N. To produce this curve just right take the distance from line B at 18 to line D at 17, and place the same from 17 to 19, and draw a straight line from 19 to 18, then curve line from 16, resting on line at 20, thence to N. From N curve form of sleeve to 21 and 15, and to 13 for one style of sleeve, or from U to 21 and 14 for another style.
Go in from 4 to 5 three-quarters of an inch; curve from 10, past 2, touching the back, and along it past line B, and thence separate from the back to 5 and 14—this last line must touch at point 13 on the straight line which was drawn down from point 4 on Fig. 37 and is marked 5 on the same.
THE FRONT—FIG. 40.
Lay the back down on paper and extend all the lines across, line A, B, C, D and bottom line. Measure from Z to A on line B, one-half of breast, or 18 inches; from B to H is one-third of breast and 1 inch; H to P is one-fourth of breast, equal to 4½ inches. Draw a line up at P, and one up and down at A. Mark line A also. From K to L is one-sixth of breast, equal to 3 inches, and K to 7 is the same, 3 inches; curve neck.
Draw a line from L to D and place the width of the top of shoulder on the back from L to 8, and curve from 8 upwards above the line one-fourth inch; draw from 8 down in front of line P to 9. This will be three-fourths inch in front of line P. Let this curve of the arm-hole extend below line B, or nearly down to midway between lines B and C, and curve to 6. From 6 draw down to 5, which is three-fourths inch from 4 to 15 and 17; at the last point it should be about 1¼ inch over the straight line drawn down from 4 on the back.
From point G, which, as before stated, is one-fourth of the breast-measure, 9 inches from B, draw a straight line down. Curve from G to 12, 13 and 18; the last point is 2 inches from T; also curve from G to 12, 14 and 19. Point 19 is the same distance from T as 18.
Draw bottom line from 19 to 30 at front, where curve three-fourths inch below the line. Add in front over F line, for double-breasted 3 inches, and for single-breasted 1½ inches.
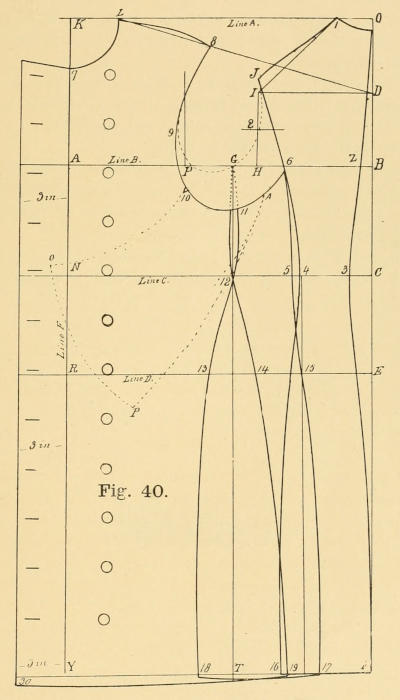
Fig. 40.
Now we have only to show how the under-sleeve is produced. This is done by measuring first the sleeve-head from O, where point J of the back is sewn on, to 16, which point is in middle, between 9 and 18. This will measure 10½ inches; as we put in 1 inch of fullness in the sleeve-head it leaves us only 9½ inches, which is measured down the front from 8 to 10 and notched. Lay sleeve notch, marked 16, on to notch on the fore-part 10, hold it there with a pin, move it till line on sleeve, marked C, will lay parallel with any of the lines, as C or B on fore-part. Then mark on the fore-part along the sleeve, from notch at 10 to N of sleeve, and from N to 21; the sleeve will now be marked on the fore-part line 10 to O, P and A, and will be cut the same shape as the arm-hole from 10 to A, and can be traced off on another sheet of paper.
The principle as given in this article is suitable, and the only thing necessary, to produce any style of dolman. The change necessary for the short or long pointed sleeve, or for any shape of arm-wing, does not alter the principle. Pleated backs, or very much fullness in the top of the sleeve, must be met by putting enough extra goods in to meet the amount required for pleats or fullness.
When a regular pattern is cut addition is made where pleats are wanted. When more fullness is wanted in the sleeve the easiest and most correct plan is to cut the sleeve in two, from the highest part of the sleeve-head, and opened as far as required, about 1 or 2 inches, and a little more round put on the top.
The principle, as shown in this book, will produce for every style of garment a correct fit, and yet it may be urged upon all using it, that in order to produce new styles, or garments of such styles that contain pleats or ornaments laid on the cloth, the reader’s own judgment must necessarily help to carry him through.
In conclusion, let me say—that any point or measuring that does not seem clear, by addressing me I will always be ready to enlighten to the best of my ability.