Chapter IX · MAKING RIVETED BOOTS AND SHOES.
Reading edition
When once the principles of lasting, explained in Chapter V., are understood, the process of making riveted boots and shoes is by no means a difficult one. It is a very ready way, and also a very cheap way, of making a good strong covering for the foot.
Riveted work will need a last made of iron, or one having an iron bottom, which may be made by putting an iron plate upon an ordinary wooden last. If making for your own feet only, the latter would be best. If making for customers, buy iron lasts, one at a time, till a set of sizes is obtained. If making for your own children, who naturally grow out of boots very quickly, it is well to use an ordinary wooden last. In this case be very careful not to use the rivets too long, and when off the last, clench the rivets on a small iron foot.
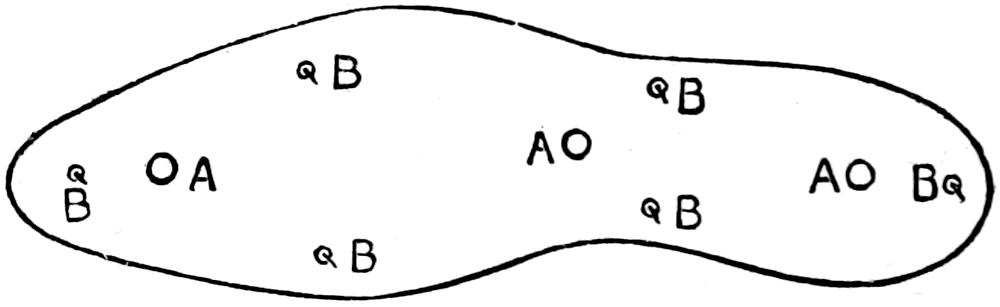
Fig. 175.—Thin Sheet Iron to cover Last.
On p. 64 will be found all the information needed for buying the lasts and fitting them up to the measure of the foot. A thin sheet of iron, as Fig. 175, with three holes in it, at A, A, and A, can be made to cover the whole of the bottom. The sheet-iron should be blocked so as to fit the last’s bottom perfectly. It can be held on by six screws, as shown by the six B’s. This will allow the iron to be taken off when the last is wanted to make hand-sewn work on.
This sheet of iron would make the boots too large; but this is remedied by putting a pair of extra inner soles, the thickness of the sheet-iron. These soles, blocked and dried on the last, make a pair of riveted boots as smooth as hand-sewn inside.
The inner sole proper is tacked at A, A, A, Fig. 176, and rounded up to the last. It is skived down a little at the waist only, and then merely at the edge.
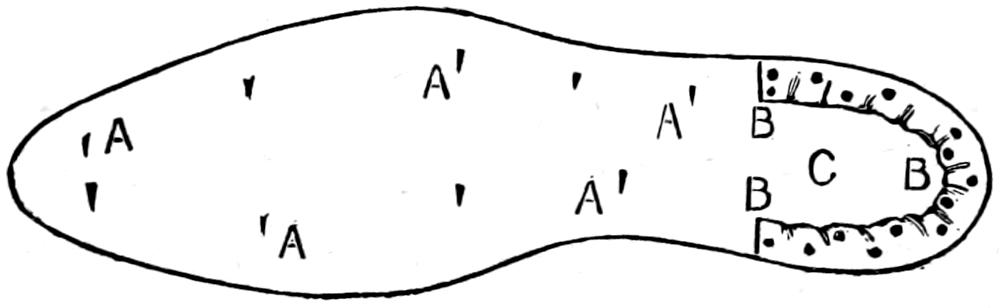
Fig. 176.—Boot Bottom with Blinders and Split-lift on Heel.
Chapter IV. (p. 70) gives information on buying the tops and sole leather; but for riveted work welts are not wanted, but, instead, a piece of soft first-cut about 14 in. long and 2 in. wide. This treated like split-lifts will make a pair of runners. Proceed to wet and fit it as described for welts; but it must be used nearly dry, and the stiffeners can be skived on the bottom the same as on the top.
The principles of lasting are the same as those described in Chapter V., to which reference should be made; but for riveted work use very short tingles (miniature tin-tacks), in place of lasting tacks; and instead of these being put in as shown at B, B, D, D, and C (Fig. 87, p. 78), they are put in at the extreme edge of the overlapping leather, and are knocked right in and clenched. Also, in lasting for riveting, the heel of the last must be knocked into the top more at D (Fig. 84, p. 75), so that there is enough stuff for the rivets to catch while building the heel; the heel should be lasted in nearly as well as the toe, so that when the lasting is finished the upper should be quite smooth all round. The centre should be filled up with a little felt, and the whole bottom made flat and level all over. The way to put the felt and the shank-piece in the waist is described on p. 52.
For a boot of very light substance, the sole can now be put on; but to make medium or stout boots, put on the runner, or put on a middle sole, and then skive the centre of it a little. If the runner is put on, it will need preparing in the same way as a split-lift, described on p. 99, only the twist will not be wanted up the sides, but merely at the toe end, or centre, of the runner. It must be tingled on all round, not using many tingles, and these as far from the edge as possible, so that while the sole is being put on, the rivets will not come in contact with and drive them through, and so tend to make the sole unsolid. The position of the runner is shown by A, B, C (Fig. 177), the ends can be skived off at A and C.
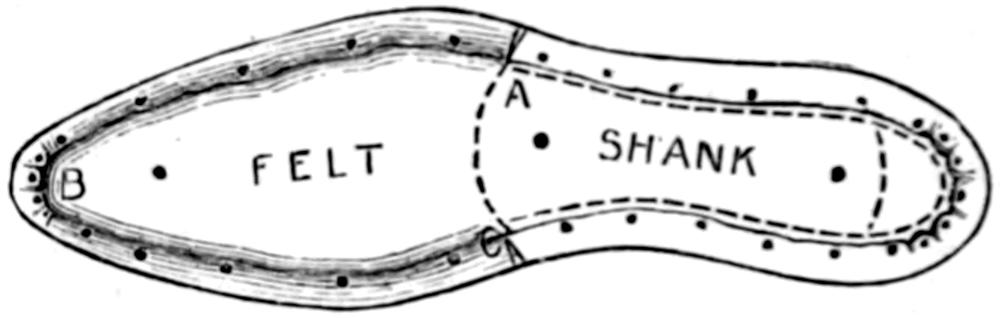
Fig. 177.—Boot Lasted ready for Riveting.
If a middle sole is used, it is put all over the forepart as far as A, C, where it will also want skiving. To fit the sole on while rounding it up, put in a few iron brads about ¹⁄₂ in. long—not rivets—and leave them projecting about ¹⁄₈ in., or little more, as shown by the short strokes near the A’s in Fig. 176; file up these till they are somewhat pointed, then the centre and the edge can be pasted.
A pair of soles of inferior quality towards the heel would be less costly; with these it is best to make the seat with a pair of good split-lifts instead of with the soles. The split-lifts can be bradded on, as shown by B, B, B, with ¹⁄₂ in. brads, and they can be driven in and clenched. The runner or the split-lift can be rounded up all round, to within ³⁄₁₆ in. of the upper. This allows enough in the forepart to imitate a welt and to make the seat at the heel.
The sole is now pasted, and laid on its place, and a brad driven in at C, Fig. 176. It can then be tapped down all over with the flat end of the hammer, first striking gently over each of the brads marked A, and then continuing till it is all flat and smooth, as Fig. 178. The sole is now rounded up to the runner and split-lift, and to within ¹⁄₈ in. of the upper at the waist on each side; all this should be done to give as good form to the boot as possible.
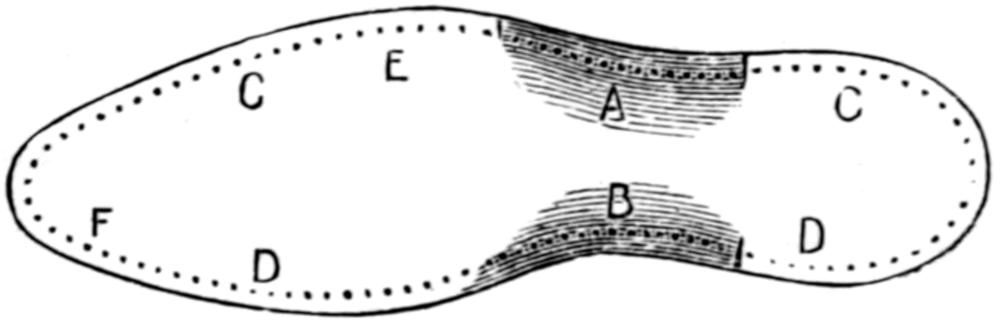
Fig. 178.—The Riveted Sole.
The instruction to leave on ³⁄₁₆ in. all round the forepart must be qualified. Do so, if the wearer wears straight; if, however, he wears unevenly, leave the stuff a little full where the most wear comes, and trim it close on the other side.
Now rivet the sole on. If not used to driving rivets, make holes to receive them, and in doing this, and in driving the rivets, see that their points incline distinctly inward, or the rivets may run off the edge of the last instead of clenching. If the work is light, the holes can be made near to the edge, as the sole will in this case need to be a shade closer; while for stout work the rivets can be a trifle farther from the edge of the sole. A second row may be put all round, or only at E and F; but the single row even would be enough for light work.
If the heel part is not flat, it is better to put a second split-lift on the sole; or the first whole lift may be put on, skiving away the centre till it fits. How to finish building the heels, and the way to brad the top piece, is described on pp. 114, 115.
If the boots have been made upon wood lasts, without iron on them, at this stage the last should be withdrawn, the whole of the bottom tapped down on the iron foot, and the last then replaced. The rivets may be driven with a hammer, but it is easier to do this with a beater, as shown on p. 122, or with a driver like Fig. 179, which is a patent rivet-driver (price 1s. 6d., made of hardened steel). A similar one can be made by heating an old long rasp, and beating it somewhat smooth, and then re-tempering it.

Fig. 179.—Rivet Driver.
Knifing-up, rasping, buffing, sand-papering, etc., breasting heels, seat setting, finishing-off waist, setting-up fudge-wheel on welt (or runner in this case), putting into colour, and finishing, etc., are explained in Chapter VIII.
Having followed these directions, the boots are off the last, and all that is now necessary is to sock them. If made on last to the correct size, sock them as described on p. 146; if made upon the wood last with the extra iron bottom, sock them with a second inner sole. Take the sheet iron off the last, block the sock, let it dry, and then round and skive it up. Paste it well all over the flesh side, put it in the boot. Replace the last without the iron in the boot, and let the sock dry before taking out the last. French chalk can be shaken in the boot to prevent the last sticking to the sock and pulling it out.
While the boots are on the last they may be cleaned, as they will not be soiled by taking out the last this time.
To avoid repeating information that has already appeared, references have been given above to pages in which some of the processes connected with boot and shoe making are described.
In making riveted, pegged, or machine-sewn boots, the tops are cut longer and wider than they would be for hand-sewn work. From ¹⁄₄ in. to ¹⁄₂ in. more stuff is left on all round the bottom of the uppers. In this class of work the rivets, pegs, or stitches are nearer the centre of the sole than hand-sewing is. The welt is sewn in nearer the edge, and any upper leather above the seam has to be cut off close to the welt. As a rule, the leather is not subjected to any special treatment to soften it, though, if very stubborn, it can be made softer by damping it with water.
All leather will form wrinkles and pipes in lasting—at the toe especially, at the extreme edge of the leather. Any other work is easier to last than hand-sewn, in which there is only just enough upper leather to hold with the pincers. While lasting the toe, put a few tingles in only, say, one in the centre, then the draft tacks, one on each side. Last up the lining first, knocking the tingles only just through the inner sole, so that they may be drawn out when lasting the upper. When doing this, see that you last the lining smooth previous to proceeding with the upper. Then place a tingle between the centre and draft tacks. There will now be a pucker on each side; these you try to tap or hammer out before putting in more tacks. Every tack put in after should be through the top of one of these pipes, or puckers; and when the toe has enough tacks in it, well hammer it all round, starting at the edge of the sole, and working towards its centre, till you get to the edge of the toe-leather. All the pipes will not be got out by this means, so cut a V-piece out of each remaining, and then tap it down again, or the tops of the ridges may be skived off. In either case, cut only to within about ³⁄₈ in. or ¹⁄₄ in. of the edge of the last, so that the rivets, pegs, or stitches shall have firm and solid leather to go through. By the above means light leather tops can be lasted without the use of the knife at all.
This chapter may conclude with a few recipes which the shoemaker is sure to find useful at some time or other.
Shoemakers’ Size.—This is made in the following manner: Ingredients, ¹⁄₄ lb. yellow soap, twopenny-worth of glue, and one quart of soft water. Process: Cut the soap up fine, and break the glue into small pieces; put them into a saucepan, and pour the water over them; put it on the fire, and well stir it till it just boils. Pour it out into another vessel to cool It is then ready for use.
Burnishing Ink.—To make good burnishing ink, you will hardly be likely to better the following, which is an American recipe: One pint of alcohol, 1¹⁄₂ oz. of tincture of iron, 1 oz. of extract of logwood, 1 oz. of pulverised nut-galls, ¹⁄₂ pt. of soft water, and ¹⁄₂ oz. of sweet oil; the oil must be mixed with the alcohol prior to adding the water and other ingredients.
Another: Soft water, 5 gallons; bring it to a boil, and add 8 ozs. of pulverised logwood extract, keeping it on the fire for three minutes only; then remove, and stir in 2¹⁄₂ oz. of gum arabic, 1 oz. of bichromate of potash, and 80 grs. of prussiate of potash.
Another: Soft water, 1 gallon; extract of logwood, 1 oz.; boil till the extract is dissolved, take from the fire, and add 2 ozs. of copperas and ¹⁄₂ oz. each of bichromate of potash and gum arabic, all well powdered.
Black and White Heel-balls.—To make black heel-balls, take 8 ozs. of the best beeswax and 1 oz. of tallow, melt, and well stir; then add 1 oz. of very finely powdered gum arabic, stir again, and mix in lampblack to colour. Another and better recipe is to melt together 2 lbs. of best beeswax and 3 ozs. of suet, and stir in 4 ozs. of ivory black and 3 ozs. of lampblack; then add 2 ozs. of finely-powdered gum arabic (best) and 2 ozs. of rock candy. These must be well mixed, and, when partly cold, poured into leaden moulds to the shape and size you wish.
For white or bottom ball, leave out the above colours, and if wanted only as a transparent polish this will suffice; but if needed as a white substance, add a little flake white.
Shoemaker’s Wax.—Take 4 ozs. of pitch, 1 oz. of resin, and about a ¹⁄₄ oz. of good tallow, and heat them well on a slow fire in a pipkin or old saucepan. Be very careful they do not take fire, as they are very combustible. Stir this admixture till the resin has melted and mixed well with the other ingredients; then pour the whole into a pail of cold water, and when it has got sufficiently cool to handle, put one hand underneath, and with the other turn the edges over to the centre, to make the mixture into one ball. Take it out, and make it into a roll. Take one end in each hand, and pull it out as long as you can without breaking it. Double it, and pull out again and again; the more it is pulled (or worked), the better and brighter it will be. This done, lay it out on a slab, seeing it does not stick. Roll it out, cut it into strips about 1 in. wide, and cut the strips into pieces about 1¹⁄₂ in. long; each piece is called a ball. Wax has to be made hard in warm weather, and soft in cold. To make it softer, add more tallow; to make hard, use more resin. It is best to make it hard, as it can easily be made soft without being again heated—simply by working a little tallow into it. The balls of wax should always be kept in water, to prevent their sticking to anything or to each other.
Making Fake.—Fake is not sold ready for use, but it can be made in the following way: Take two hard heel-balls and about two-thirds of a white glazing ball, break them up into small pieces, and put them into a small tin box. Proper fake tins can be bought; any tin will do, but the deeper the rim of the lid is the better, as it will prevent the spirit evaporating when not in use. Just cover the contents of the tin with mineral naptha, and then put the whole on the hob or in the oven; but the fire must not be fierce, the lid must not be on the box, and it must be well watched, for this process, of course, rarefies the spirit and intensifies its inflammability. The use of fake is to lessen the labour in finishing, for if heel-ball is ironed on, it is very hard to rub off. It is used after the edge has been knifed, rasped, scraped, sand-papered, inked, dried, and nicely ironed with warm irons, which gives it, in itself, a good gloss. The fake is rubbed on with the finger, and when it has set a little, it should be rubbed off with a soft cloth till it leaves a bright even jet-black gloss. Brown work is finished in the same way, and the fake is made just the same, only all white ball is used, and not any heel ball.