PART II.
Reading edition
FORWARDING.
This branch of the art may be divided into several parts. We will give precedence to that branch or class of forwarding that requires the utmost precision and opens to the ambitious forwarder a field of exertion worthy of his best efforts. Let the workman who strives to excel in his art remember that his work goes through the hands of critics and judges; that it possibly may be compared with the productions of the most celebrated artists. Let him, then, look well to his laurels if engaged upon first-class job or
CUSTOMER WORK.
The book being taken from the sewing-press, the end-papers and the first sheet are then turned back. A strip of paper is placed about one-eighth of an inch from the back, so as to prevent the paste from spreading unevenly, and paste is then applied with the finger along the edge of the sheet. The sheet is turned over, and the same process repeated to the first and second leaves of the end-papers, if the book is to be lined with buff or brown paper. After the papers have been cut to the proper size and evenly folded, they are pasted along the folded edge in the same manner as the end-papers were. The first leaf of the end-paper is then turned over, and the lining-paper laid full up to the back-edge of the book. If this be done carelessly, or not entirely straight and square from end to end, the future appearance of the book will be considerably marred. As much of the beauty of the joint depends upon the manner in which the lining has been performed, if it is intended to line with marbled paper, after turning over the end-leaf, place the lining as near as possible to the back-edge, so as to expose to the action of the brush almost the entire leaf of the end-paper that lies on the book. Paste this lightly over; then place the lining upon it, and rub it even and smooth with the hand. In either case it should be left to dry before the end-paper is folded down to its place, as it is liable to force the lining-paper from the back. A better method is to paste the marble-paper upon the white end-paper before it is inserted in the book. The papers may then be lightly pressed, to make them perfectly smooth, and hung upon lines to dry. By this process there is no fear of the book being wrinkled by the dampness from the lining-paper. Attention should be paid that such papers only as will blend well with the colour of the leather intended for the cover are used.
If a joint of calf or morocco is required, all that is necessary for the forwarder to do is to tip the back-edge of the lining that goes next to the book very slightly, merely to secure it until it reaches the finisher, and place one or two guards of stout paper along the joint, to be afterwards torn out by the finisher.
These matters being adjusted, the end-paper turned back to its place, and the twine on which the book has been sewn pulled tight, care having been taken to avoid pressing the twine against the end-papers, on account of their liability to tear near the bands, the bands which are intended to be laced in the boards must be opened, or the strands separated with a bodkin and scraped with a dull knife so as to bring them to a point and make them more convenient to pass through the boards which are to form the side covers.
The book is now taken between the hands and well beaten up at the back and head on a smooth board, or on the laying-press, to bring the sheets level and square, as the beauty of the book, in all the subsequent operations, depends much on the care and attention paid in this place. The volume is then laid carefully upon a board, with the back to the edge of the board, a strip of pasteboard is laid on the upper side, the book placed in the laying-press, and the back evenly glued. The glue should be well rubbed in between the sheets, taking care that the sheets are even on the back and the volume equal in thickness throughout the whole length. It is then laid on a board to dry, but must not be placed before the fire, as, by so doing, the glue becomes hard and liable to crack in the process of
ROUNDING.
In commencing this operation, the book is placed upon the laying-press with the fore-edge towards the workman; the left hand should then be placed flat and open upon it, the thumb towards the fore-edge. With the four fingers the volume is slightly bent and the upper portion of the back drawn towards the workman. The right hand is then engaged with a backing-hammer in lightly tapping the sheets with an upward motion from the centre of the back. The volume is then turned upon the other side, and the operation is repeated until it is evident that the book has acquired a sufficient round. The left hand is held to the back while the round is pressed into the fore-edge with the fingers of the right. The volume is then held up and the back carefully examined to ascertain if the round is perfectly regular, and, if not, it must be again submitted to light blows of the hammer until the back describes a portion of a perfect circle. Care should be taken that the round be not too flat for the thickness of the volume, or, on the other hand, that it does not become what is called a pig-back,—a horrible monstrosity in binding, having a sharp ridge in the centre of the back. If the round be not regular and even from the centre to the edges, as well as from head to tail, and entirely free from twist, no after-skill or care can overcome the evil, but it will ever remain to prove the want of care or the incapacity of the workman. The next process, and equally important, is that of
BACKING,
which is done to form the groove for the reception of the boards. One of the backing-boards is placed upon the volume at an equal distance from the back, the distance depending upon the thickness of the board; then, turning the volume, the other is placed in a similar manner; the boards are then firmly grasped by the left hand across the back, and, with the assistance of the right hand, the whole carefully put into the laying-press, the edge of the boards nearest the back of the volume even with the cheeks of the press, and screwed up with the press-pin as tight as possible. The backing-hammer is then taken in the right hand and employed in turning the sheets from the centre over the backing-boards, to form the necessary groove. For this purpose the first blows should commence near the centre of the volume, and should be as light as possible, the blows glancing towards the edge, so as to merely commence the turning of the sheets, without causing any indentations or wrinkles on the inside of the volume. This should be proceeded with lengthwise of the volume, each series of blows growing gradually nearer to the edge or backing-board, and, as they approach, becoming more firm, until the sheets are turned over the backing-board, so as to form a regular and solid groove. The process is repeated up the other side, the volume examined to see if the back is regular and equal in its circle throughout, and any slight irregularities corrected by light taps of the beating-hammer; but nothing can justify a workman in striking a heavy blow near the centre of the back, as it must inevitably crush and wrinkle the paper on the inside. It serves but to prove his ignorance of the principle upon which the entire operation is based. There is nothing connected with the forwarding of a book that requires more attention, patience, and skill, than the rounding and backing, and there is nothing that contributes more to the general appearance of the volume. If well done, it gives a character and a tone to all the subsequent operations; if done badly, no care or skill that may be afterwards employed can hide it. It remains an enduring mark of a careless or inefficient workman. The volume is now ready for the boards, which have been previously prepared. This is done by cutting the sheets of milled-boards according to the size of the book, with the table or patent-shears. One side of the board is then lined with paper, the shrinkage of which will cause the board to curl towards it. If the volume be large, or a thick board be required, it will be necessary to paste two or more thicknesses of board together. Place them in the standing-press, under pressure, until dry; then take them out and line them on the side of the board that has been pasted, or, if one board be thinner than the other, upon the thin board, in the same manner as the single board. Boards made in this manner should always be prepared some length of time before they are used. The boards being in readiness, the volume is taken and one point of the compasses placed at the centre of the back, and the other point extended towards the fore-edge until it reaches the edge of the smallest bolt. This will give the proper size to cut the boards, as the groove or joint will give the projection or square of the board. If the volume be rare and valuable, let the workman be merciful in the use of his steel, as the cropping of ignorant workmen has impaired the value of many a choice tome. If it be intended that the leaves are to remain uncut, previous to the rounding of the volume, take a large butcher's-knife and carefully trim the extreme ends of the projecting leaves. After the size has been obtained, the next operation is
SQUARING THE BOARDS.
This is done by cutting the back-edge of the boards with a plough in the laying-press; the boards are then marked with the compasses from the edge which has been squared towards the front; the front cutting-board is placed at the compass-holes, and again put in press, with the front cutting-board or runner level with the cheek of the press, the back-board being a little higher, so as to allow the plough-knife to cut against it. The rough part is cut off with the plough as hereafter described, with this difference:—that, in cutting pasteboards, the workman cuts towards him. The boards are then taken out of press, and the square applied to the head, and marked with the point of a bodkin; this is cut off in the same manner. The volume is then opened and examined for the purpose of finding a leaf of an average length, which is measured by placing the thumb of the left hand against the edge of the head and applying against it one of the points of the compasses, carrying the other so much over the end of the leaf as will allow for the square of the boards at the tail; and if the volume be large for a portion of the square at the head, the superfluous portion is then cut off with the plough. In taking the size, let the workman recognise as a rule that every book should be cut as large as possible, lest he be suspected of having an eye more to the shaving-tub than to his reputation as a binder. Among the early binders, De Rome is noted for his merciless cropping. But few volumes have preserved the integrity of their margins after having been submitted to the cruel operation of his steel. A volume cut to the print is said to bleed; therefore be careful to avoid the slightest approach towards the commission of such an act of Vandalism. The boards having been squared for the back, front, head, and tail, they are placed, with the lined side of the board next to the book, preparatory to the
LACING IN.
Each board is then marked with a bodkin opposite to the slips intended to be laced in; a hole in a vertical position is then made through the board, and being turned, another in the same way near to the first. The bands, having been pasted and passed in above, are returned through the other hole, and, being pulled tight, the boards will necessarily be perpendicular to the back, and confined in the groove. After cutting off the end of the strings near to the lace-holes, they must be beaten well and evenly into the board by placing the under part on an iron (called the knocking-down iron) fixed at the end of the laying-press, and beating above with the backing-hammer.
If it be desirable that the bands should not be seen inside, the hole may be made so vertical that, by placing the bodkin in the same on the other side, another verging a contrary way to the first may be made, and the band, being passed in this one continued hole, will not be seen underneath. The liability, however, of its tearing out is an objection, and from this cause the common way, with care in beating down, is preferable.
After the slips have been well beaten down, the roundness of the back must be examined, and any twist that is perceptible corrected with the backing-hammer. A piece of smooth tin, larger than the volume, must then be inserted between each board and the book, with one edge of the tin full up to the joint. The volume is next placed between pressing-boards even with the joint, and put into the standing-press, which must be screwed tight and evenly down. Stewart's double-screw iron standing-press is well adapted for the purpose, and is in very general use. After the press has been screwed down, the back of the volume is then damped with thin paste, and, according to the firmness of the sewing and book, grated and scraped, and finally rubbed smooth with paper-shavings, and left to dry in the press for as long a time as possible. If a large volume, it is usual to apply a little glue to the back. When taken out of the press, the boards must be disengaged from the end-papers, where they adhere, so that they may move freely up and down in the cutting.
CUTTING THE EDGES.
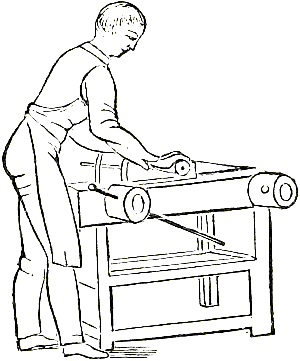
The manner of preparing the volume for cutting is very important, as swerving from right angles in cutting the head and tail will present a disagreeable appearance. Every precaution must be taken to insure the volume being cut perfectly square. The front-board is drawn down from the head just sufficient for the knife to operate upon in the cutting. A piece of trindle is inserted between the volume and the back-board for the point of the knife to cut against. The volume is then placed, with the back towards the workman, on a cutting-board in the left hand; the runner or smooth-edged board is then fixed on the other side, with the right hand, even and square with the edge of the mill-board, and the whole, held tight with the left hand, put into the cutting-press, to the level of the right-hand cheek of the same, taking care that the volume hangs perpendicular to the cheeks of the press. Being screwed tight with the pin, the workman then takes the plough with the right hand, by the head of the screw, and, placing it on the groove of the press, proceeds to cut the book, holding the other end of the screw firmly with the left hand, and causing the knife to advance gradually through the book by turning the screw gently as he cuts, which should be all one way,—viz.: as the arms are removed from the body. The plough must be held firm in the groove or guides of the press, to prevent the knife jumping or cutting the edges uneven; and, should the knife be found to run up or down, the defect must be remedied by removing some of the paper or boards placed under the knife where it is fastened to the plough. If there should be none required to bring the knife even with the plough, then a piece must be placed on whichever side of the bolt the defect may require. The head being cut, the same operation is repeated for the tail.
Much precaution is necessary in cutting the fore-edge. Mark the book with a bodkin on the projecting part of the end-papers, and on each side, at the head and foot, close to the square side of the boards, drawing a line from one to the other; then, laying the boards open, insert a trindle at each end of the volume, under the back, so as to throw the round out; then wind a piece of fine cord several times round from the head to the tail, to prevent the leaves returning after the back is made flat, to form the gutter on the fore-edge. This done, beat the back flat on the press, and place one of the cutting-boards at the end of the book, even with the line before made; turn it, and place the runner as much below the line on the title-side as has been allowed for the square on the fore-edge. Taking the whole in the left hand, the volume must be examined to remedy any defects, should it not be regular and equal on both sides, and then put into the press, the runner as before even with the right cheek, taking care to keep the other board projected above the left, equal to the square allowed in front, so that, when cut through, the fore-edge may be equally square with the boards on each side. After the fore-edge is cut, the string is taken off, the back resumes its circular form, and the edge in consequence presents a grooved appearance, which puzzles the uninitiated to ascertain how it is produced. The method above described is called "cutting in boards," and is superior to any other.
It is of the utmost importance to the young workman that he should pursue and acquire a methodical system in all his operations. Select the best method, as a matter of course, and then adhere to it. Do not, every time you perform one particular process, do it in a different manner. For instance: in backing or in turning up your books, it is better to always have the head towards you; in cutting head and tail, to have the back nearest you. In laying your work down, always do it in one way. Let that way be the one whereby you can most conveniently take it up again. Much time may be wasted, from inattention to these particulars, in the unnecessary handling and confused manner of working. It will be found that the best and most expeditious workmen are those who do their work in a systematical manner. In taking leave of this department, our parting admonition to the young workman is, strive to excell. Do not be content if your work will merely pass, and say to yourself, "Oh, that is good enough!" If it is possible for you to do it better, it is not good enough. Employ your reasoning faculties as well as your physical powers, so that you do not sink into a mere machine. When performing a process, ask yourself the question, "Why is this done? What is the object of it? Can the process be improved?" You will find the hand to be an apt instrument of the mind and will, and that you will speedily be recognised as an intelligent workman. Have, at least, this much ambition.
The next process which the volume must undergo is the gilding or colouring of
THE EDGES.
Colouring the edges with one colour, equally sprinkling over, marbling, and gilding, come under this head; and the style of ornament of this description must depend on the price allowed for the work, and will vary according to the taste of the workman and wish of the employer.
OF COLOURING AND SPRINKLING.
The colours most used are brown and red, in preparing which it is necessary to grind them in water, very fine, on a slab, with a muller. Each colour is then placed in a separate vase, and mixed up with a little paste and water to the proper consistency for use. To procure a better edge, two drops of oil and about an equal quantity of vinegar and water may be mixed with the paste.
In colouring the edges equally over, the boards at the head of the volume must be beat even with the edges, and the book rested on the edge of the press or table; then, holding the book firm with the left hand, the colours must be applied with a small sponge or brush, passing it evenly upon the edge, proceeding towards the back one way and the gutter the other, to avoid a mass of colour being lodged in the angle of the fore-edge. This done, the other parts are similarly coloured, the fore-edge being laid open from the boards and a runner held firm above to prevent the colour searching into the book. It will be perceived that a dozen volumes may be done at the same time with scarcely more than the additional trouble of placing one above the other. For further security, and to prevent the colour searching into the books, it is advisable to put them into the laying-press and screw them moderately tight. In fact, for all good work, this must be done.
In sprinkling, it is usual to tie together a number of volumes with a board on each side of the outside books, or place them in the laying-press first, with the heads upwards; then, with a large brush, similar to a painter's, dipped in whatever colour may be wished, and well beat on the press-pin over the pot till the sprinkle becomes fine, the edges are covered. The pin and brush are held sufficiently above the book, and the edge sprinkled by beating lightly at first, and stronger as the brush becomes less charged with colour, being careful that the spots are as fine as possible, the sprinkle being thereby made more beautiful.
The cleanest method, and at the same time the surest to produce a fine sprinkle, is to use a wire sieve and a stiff brush, something like a shoe-brush, for convenience. The sieve should be oval in form, with a very thick wire running round the edge until they meet, then projecting about a foot from the sieve so as to form a handle, the whole somewhat resembling in shape the bat used by ball-players. Fine brass wire is the best for the sieve. The wire should be about one-fourth of an inch apart. After every thing is in readiness, dip the stiff brush in the colour and lay the sieve over the pan, and rub the brush over it to get rid of the superfluous colour, which will drop into the pan; then knock off all the loose colour adhering to the sieve; then hold the sieve over the books, and rub the brush over the wires, lightly at first, and afterwards harder as the brush loses the colour. The colour will descend like a fine mist, and the effect produced upon the edge cannot be equalled by the old method. Several colours are sometimes used with very pleasing effect; some of these combinations will be described, and many others will readily occur to the workman as his taste may suggest.
COLOURS.
Of vegetable colours, and ochres, directions for mixing which have been given above, it will only be necessary to particularize the most approved and generally-used substances. The liquid ones will require a more lengthened description.
Blue.—Indigo and Prussian blue, with whiting for lighter shades.
Yellow.—Dutch pink, King's yellow, and yellow orpine.
Brown.—Umber, burnt over the fire.
Red.—Vermilion; or Oxford ochre, burnt in a pan.
Pink.—Rose-pink; to make it brighter, add lake.
Green.—The first and second mixed to any shade.
The liquid or spirit colours will be found best for use, as the edges will not rub, which all other colours are liable to do. Some of the receipts are well known; but, it being necessary to give a faithful record of the art, the whole of the colours used and modes of preparation will be presented.
BLUE.
Two ounces of the best indigo, finely powdered, mixed with a teaspoonful of spirit of salts and two ounces of best oil of vitriol. Put the whole into a bottle, and let it remain in boiling water for six or eight hours, and mix with water as wanted to the shade required.
YELLOW.
French berries, saffron, or faustic chips. Boil with a small portion of alum; strain and bottle for use.
GREEN.
The two colours above will make an excellent green used in proportions as the shade required. Another green may be made by boiling four ounces of verdigris and two ounces of cream of tartar till a good colour is produced.
ORANGE.
Two ounces of Brazil dust, one ounce of French berries, bruised, and a little alum. Boil in water and strain.
RED.
Brazil dust, half a pound; alum, two ounces, well powdered; boiled in a pint of vinegar and a pint of water till brought down to a pint. Strain and bottle. The red edges now in vogue are made with vermilion, mixed with vellum-size. The better class are scraped before they are coloured, and afterwards they are burnished.
PURPLE.
Logwood chips, in the proportion of half a pound to two ounces of alum, and a small piece of copperas, boiled in three pints of soft water till reduced a third, will make a good purple.
Brazil dust, submitted to the action of strong potash water, will make a good purple for immediate use, but will not keep.
BROWN.
A quarter of a pound of logwood, and the same quantity of French berries, boiled together. If a darker shade is required, add a little copperas. Plain brown edges are made with burnt umber, in the same manner as that described for red edges.
With these colours, edges of books may be sprinkled to almost an infinite number of patterns. A few will be given; for, though fancy sprinkles are seldom used where the binder can get the edges of extra books marbled, they will be of use to those who would find marbling a work of too great preparation and expense for a small number of books in places where there is no marbler.
RICE MARBLE.
This pattern has been so called from the use of rice; but linseed, or bread crumbs, will answer the same purpose. The rice is laid on the edge of the book according to fancy, and the edge sprinkled with any colour, the rice thus forming blank spaces. The edge may be coloured previously all over, or sprinkled with a lighter shade.
WHITE SPOT.
Take white wax and melt it in a pot; then with a brush throw some upon the edge of the book; when it is set, colour the edge with a sponge. Take the book and give it two or three smart knocks on the end of the press, when the wax will fly off and a beautiful white spot remain. This pattern may be much varied by using two or three colours or sprinkling the edge before the wax is thrown on, and, after it is, again with other colours.
Whiting mixed with water to a thick consistency will nearly answer the same purpose, and is less expensive than wax.
FANCY MARBLE.
Take a small portion of rose-pink, green, or any other vegetable colour, and well bray it on the slab with the muller, till reduced to a fine powder. Prepare a dish, or other vessel, large enough to admit the fore-edge of the book, and filled with clear water; then with the palette-knife mix a portion of the colours with spirits of wine, and convey with the knife some of the same to the middle of the vessel, and allow it to flow gradually on the surface of the water. The spirit of wine will cause it to spread in a diversity of pleasing forms, when the edge of the book must be dipped in the same manner as for marbling, and a very neat pattern will be produced at a trifling cost, as no more colour need be mixed than wanted at each time.
GOLD SPRINKLE.
After the edges of the book are stained with any of the colours above described, a good effect may be given by sprinkling with a gold liquid, made in the following manner:—Take a book of gold and half an ounce of honey, and rub them together in a mortar until they are very fine; then add half a pint of clear water and mix them well together. After the water clears, pour it off and put in more, till the honey is all extracted and nothing left but the gold; mix one grain of corrosive sublimate with a teaspoonful of spirits of wine, and when dissolved put the same, with a little thick gum-water, to the gold, and bottle it, always shaking it well before using. When dry, burnish the edge, and cover it with paper till the work is finished.
MARBLING.
Marbling is an art which consists in the production of certain patterns and effects by means of colours so prepared as to float upon a preparation of mucilaginous liquid, possessing certain antagonistic properties to the colours prepared for the purpose, and which colours, when so prepared, floated and formed into patterns upon the surface of the liquid, are taken off by laying thereon a piece or sheet of paper or dipping therein the smoothly-cut edges of a book.
It is a process which it is not very easy to describe; and yet, to any one beholding it for the first time, nothing appears more simple or easy of execution. Yet the difficulties are many; and the longer any one practises it, the more he will become convinced that there are many more discoveries to be made before the art can be brought to any thing like perfection or effects produced with that certainty which the workman could desire. In short, it may be said to be still in its infancy.
When the art was first discovered, and by whom, or in what city or country it was first practised, it is hardly possible to determine. It is supposed that we cannot go farther back for its origin than the beginning of the seventeenth century, and that Holland has the honour of being the birthplace of the art,—the old Dutch and some drawn and antique patterns, with stormont and other spots, being considered the most original.
Many years ago this old Dutch paper, in the size of foolscap, was imported into England, wrapped round small parcels of Dutch toys, and thus passed free of duty. When taken off, it was carefully smoothed and sold to bookbinders, commanding a high price, being only used on the better kinds of work. Indeed, so choice was it that you may still see in some old books the inside-linings made of pieces carefully joined together. Something of the art has unfortunately been lost since that time, for both the colours and the execution of some of these old specimens far surpass the best efforts of the most celebrated modern marblers.
It is proposed, however, to show, as clearly and briefly as possible, how it is done and practised at the present day by the best English workmen, and to describe the various processes in such a manner as will enable any individual possessed of a common share of understanding and discernment, to do it himself; and, where there are two ways of doing it, that will be described which experience has pronounced to be easiest and best.
In describing one pattern, that will be considered sufficient to include all of the same class, or that are done in the same manner, although different colours may be used. For instance, a brown may be described, and green, being the same in every respect as regards the mixing and working the colours, may be substituted for the brown; and so in regard to other colours.
COLOURS.
The colours required for marbling are the same as those ordinarily used for painting both in oil and distemper. They should be procured in a dry state, just as they are produced or manufactured, and ground by the marbler himself. A list is subjoined:—
REDS.
Drop Lake.
Peach-wood Lake.
Vermilion.
Rose-Pink.
Oxford Ochre, Burnt.
BLUES.
Indigo.
Chinese Blue.
Ultramarine.
Prussian Blue.
YELLOWS.
Lemon Chrome.
Dutch Pink.
Oxford Ochre, Raw.
BLACKS.
Vegetable Lamp-Black.
Drop Ivory-Black.
BROWN.
Turkey Umber Burnt.
ORANGE.
Orange Lead.
Orange Chrome.
WHITE.
China Clay.
Pipe-Clay.
Flake White.
Paris White.
DROP LAKE.
This is the most beautiful, but the most expensive, of all the reds, and is used only for book-edges and the most superior kinds of work. There are different shades of this colour, viz.:—scarlet, crimson, and purple. The scarlet is the most expensive, and looks the best on edges, possessing a brilliancy which no other colour will produce; but there is a great quantity of a very inferior kind of drop lake about, which is of no use whatever to a marbler, for, when it comes to be worked, it is found to possess no body.
In order to ascertain whether the article about to be purchased will answer, take a piece of the colour, and, breaking it, apply the broken part to the tongue. If it adhere to the tongue, it is very doubtful whether it will do; but if it hold up the moisture without any inclination to adhere, it may be tried with better expectations. This colour is sold in the form of small cones or drops, from which it derives its name, and is a preparation of cochineal; therefore the value of it depends much upon the price of that article.
VERMILION.
This colour is but little used, on account of its great specific gravity, and seldom without being combined with some other colour. It is a preparation of mercury, and, though nominally at a much lower price than lake, yet so little of it goes to a pound, it comes nearly as dear as that article.
ROSE-PINK.
This is a very useful though common colour. It is composed of chalk or whiting coloured with Brazil wood; consequently it is what is termed a fugitive colour, the pink very quickly fading on exposure to the atmosphere or to heat. When combined with indigo or a little Chinese blue it makes a good purple.
BURNT OCHRE.
This colour is obtained in its native state from pits dug in the earth in the neighbourhood of Oxford; hence, it is called Oxford ochre, and sometimes stone ochre. It is in fact a kind of clay, and when made red-hot turns to a kind of red colour. It is one of the most useful colours, and, as the price is low, is extensively used. With the addition of a little black it makes a good brown; with a little blue or indigo it makes a good olive; or it is a good colour used by itself, and is not liable to change.
WOOD LAKE.
This is a preparation of peach-wood, and has only been introduced of late years to the notice of marblers. It is manufactured at Birmingham. This colour is an exception to the rule, as it is sold in the pulp or damp state, and may be mixed and even used without grinding, being made almost exclusively for marbling. It is the best red that can be used for general purposes, and for appearance comes next to the drop lake.
CHINESE BLUE.
This is a very beautiful but not a very durable colour. It is, however, an almost indispensable one to the marbler, as it will produce nearly every shade of blue by the addition of certain proportions of white. This colour requires to be particularly well ground, as indeed do all the blues. It is also sold at some places in the pulp or damp state. There are some very good damp blues made.
INDIGO.
This colour is a most valuable article, and cannot be dispensed with under any consideration. It is too well known to require describing. Though not a bright colour, it is one of the most durable, and for mixing and producing greens and purples of a permanent kind is invaluable. Neither can a good black be made without it. Care should, however, be taken to procure it of the best quality.
ULTRAMARINE.
This is a very beautiful colour, but must be used very sparingly, as it will not glaze or take any kind of polish, and is always inclined to rub off. The kinds now in general use are the French and German, the genuine article being far too high in price for this kind of work.
PRUSSIAN BLUE.
This colour has been of late almost entirely superseded by the Chinese blue, which is a much brighter colour, Prussian blue being darker and heavier looking, and is a very bad colour for glazing.
DUTCH PINK.
This is a common but very useful colour. It is a preparation of whiting and quercitron bark, and is used in making greens, no other colour answering the purpose so well. It is also very useful in mixing with chrome to produce the various shades of yellow required.
CHROME.
This is of various shades, varying from a light lemon colour to a deep orange approaching to a red. It is a useful colour; but, unless you get it genuine, it is very difficult to get it to work properly.
RAW OCHRE,
Or Oxford ochre in its native state. This may be used in certain proportions for making olive tints combined with Dutch pink and blue or black. It is also of use in small quantities to mix with yellow when it is inclined to run off, this colour being of a very adhesive nature.
DROP IVORY-BLACK.
This colour cannot be well used alone. It may, therefore, be called only an auxiliary to others.
VEGETABLE-BLACK.
This is a superior kind of lamp-black, but prepared from vegetable instead of animal matter. It is surprisingly light, and cannot be used alone, and will not produce a black for marbling except in combination with double its weight of good Indigo.
TURKEY UMBER, BURNT.
This colour produces a very good brown, but it is not required if you have the burnt Oxford ochre, as, with the aid of that colour and a little indigo and black, any shade of brown may be produced.
ORANGE LEAD.
This is a very heavy colour, and is but little used, except for the edges of account books.
WHITE.
For this an article called China clay is used; also, for some purposes, the common pipe-clay.
GUM.
Of all the varieties of gum, there is but one that is of any use to the marbler, and that is called gum-tragacanth or gum-dragon. Too much care cannot be exercised in the choice of this article, as much of the excellence of the work depends upon it. It should be large, white, and flaky. Occasionally there will be found some very good in small white flakes; but let that in dark brown lumps be rejected at once, no matter at what price it may be offered. If used at all, it would only do for the most common kind of work; but there is, in reality, no saving in an inferior article, as one pound of a really good sort will go as far as two of a bad, and produce a far more satisfactory result. Good gum ought to dissolve in cold water; it requires at least forty-eight hours soaking, being well stirred about at intervals; but some gums take longer to dissolve. Good gum will produce a smooth surface, but bad gum will often yield a rough one, which is inimical to the purpose. Again, some will give a smooth surface, and yet possess no strength; the colours will flow well upon it and form properly, and, when the paper is taken off, will look, at first, very beautiful, but upon looking at it five or ten minutes after it has been hung up, the colours will be found running off, causing indescribable annoyance and mortification.
DIRECTIONS FOR PREPARING THE GUM.
Procure a large earthen pan, glazed on the inside, capable of containing from eight to twelve gallons of water. Put therein one pound of gum-tragacanth, and on it pour about two gallons of soft water. Stir it every few hours with a clean birch broom kept expressly for the purpose, breaking the lumps and adding more water as it thickens or absorbs that previously put in. In about forty-eight hours you may venture to use it; but seventy-two hours would be better. Some gum is all the better for a longer period, as, although a considerable portion of the gum may be dissolved, yet the best properties of it are not extracted till the whole is dissolved. It must be strained through a fine hair sieve before using, and if any lumps remain, put them back into the pan until they are all dissolved.
OF LINSEED.
It is possible to marble some patterns on mucilage of linseed, but it is a very objectionable vehicle to work upon, and can never be made to produce a satisfactory result. It is made either by boiling one quart of linseed in six or eight gallons of water, or by pouring the boiling water upon the linseed and stirring it until it extracts the mucilaginous properties of the seed; but it very soon decomposes or turns to water.
CARRAGEEN, OR IRISH MOSS.
This is an article used by some, and can be dispensed with altogether: it is not a necessary article. When used, it should be picked (the white being the best) and well washed; then set it to simmer in a gentle heat for an hour or two, strain it through a fine hair sieve, and it will be ready for use; but it will require a portion of the solution of gum-tragacanth to be able to do much with it.
FLEA-SEED.
This is an article but little known except to those who have occasion to use it. It is a small, brown, hard seed, in size, shape, and colour closely resembling the annoying little insect whose name it bears, and from which it may possibly derive its appellation. It produces a very strong and powerful mucilage—far stronger than that which can be obtained from linseed; and what enhances its value is that it will not so soon lose its strength or turn to water, but will keep several days. It is a great assistant, mixed with gum, in the making of French and Spanish marbles, but is a total enemy to nonpareil and drawn patterns.
To prepare it, put a quarter of a pound of the seed into a pan, pour upon it a gallon of boiling water, keep it well stirred for ten minutes, and let it stand for half an hour; then stir it again for ten minutes more, and in another half-hour add another gallon of boiling water, stirring it as before, at intervals, for one hour; after which let it remain, and the seed will settle at the bottom of the pan. When cold, pour off the top for use, and the seed will bear more boiling water, though not so much as at first. Sometimes the seed will yield a third extract; but this must be determined by your judgment, as the seed, when exhausted, will lose its viscid property, and must then be thrown away. The seed should never be stirred up after it has cooled, for it will settle without being again heated or having more boiling water added to it.
OX-GALL.
The surest way of obtaining this article genuine is by procuring it in the bladder as it is taken from the animal, if you are acquainted with any butcher upon whom you can depend. The gall from some animals is very thick, but will, after keeping some time, get thin, without at all losing its properties; in fact, gall is all the better for being kept, and is none the worse for a strong smell.
WATER.
Soft or rain water, when it can be procured, is the best adapted for all the preparations in marbling.
OF THE PREPARATIONS OR VEHICLES REQUIRED FOR MARBLING UPON.
For Spanish, French, Italian, West End, and British patterns, there will be required a mixture of gum-tragacanth and the mucilage of flea-seed, in the proportions of one quart of the latter to two gallons of the former. Beat them well up together till they are thoroughly mixed or incorporated with each other, strain it through a fine hair sieve into the trough, and it will be fit for use.
For Dutch, nonpareil, curls, antiques, and, in short, all patterns which require to be formed with any kind of instrument on the preparation in the trough, use nothing but the pure solution of the gum-tragacanth; in fact, you may marble all the patterns on this alone, so that if there be any difficulty in procuring the other articles, and you can procure good gum, you may do any or all of the patterns upon it, although some of them are improved by the addition of the mucilage of the flea-seed.
As some gum is stronger than other, it is hardly prudent or possible to give any exact weight of gum to any certain quantity of water. Practice and your own judgment must determine this. Besides, if the gum be not sufficiently soaked or beaten up, it will not yield so much or so good size as it would were it in its right state. The following will give some idea to guide in the matter:—If, on skimming the surface and sprinkling on the colours, they lose their shape and appear to turn round on the solution, especially in the corners of the trough, it is a sign that it is too thin; if, on the other hand, on skimming there is a great resistance when the skimmer is drawn along, and, upon sprinkling on the colours, they crack, and are a long while spreading out, it is a sign it is too thick; but a little practice will soon enable the learner to form a correct judgment in this matter.
OF GRINDING THE COLOURS.
On this head you must be very particular indeed; for, if the colours are not finely or properly ground, it cannot be expected that the work will look well. When a large quantity is required, a colour-mill is the most advantageous method; but if on a small scale, or for edges, the ordinary stone and muller will be best adapted for the purpose. Indeed, all colours required for edges ought to be most particularly well ground upon a slab, with a muller, the mill not grinding so finely as by this method.
The colours must all be ground with a preparation of beeswax, in the average proportion of one ounce of the prepared beeswax to one pound of colour. Blues and greens require rather more. This will prevent the colour rubbing off on the hand, and will make it burnish or glaze easily.
DIRECTIONS FOR PREPARING THE WAX FOR GRINDING.
To attempt to grind beeswax in its native state would be a fruitless task, as it would stick to the stones and not unite with the other ingredients. To obviate this, prepare it in the following manner: Take of the very best beeswax two pounds, put it in an earthen pipkin, and with it a quarter of a pound of the very best curd-soap cut into small or thin pieces; place it in a moderate heat, and when both soap and wax are quite dissolved, (but be sure they are not boiling,) put the pipkin containing the hot liquid upon a table, take in one hand a pot of cold water, and, gently stirring the melted wax with the other, pour in the water, a little at a time, keeping it constantly stirred, and it will gradually thicken, until at last it can hardly be stirred at all. Care must be taken not to have it too hot when the water is poured in, as there is danger of it flying out of the pipkin and scalding the workman. If properly mixed, when cool, it can be pulverized between the finger and thumb; and in this state it will mix or grind with the colour easily, but ought to be rubbed or worked in with the dry colour before wetting it for grinding.
TROUGHS.
The troughs should be made of wood, perfectly flat and smooth at the bottom, and of sufficient thickness to keep them from warping. They should be about two and a half inches deep inside, and about two inches larger than the sheet of paper you intend marbling, or your edges will be imperfect. There should be about three inches parted off on the right-hand side by a sloping partition, which should be about an eighth of an inch below the sides, that the waste may be skimmed over it without running it over the top. The whole should be perfectly level and true; and, if the joints are stopped with white lead, be sure it is quite dry and hard, or it will entirely spoil the solution, and will fill the pattern with white.
FRENCH OR SHELL MARBLE.
To commence with the easiest and most common kinds of marbled papers:—the colours being properly ground, and the trough placed on a level table or fixed bench of convenient height, with some feet of spare room on each side, place the pots containing the colours on the right-hand side, and the paper or books to be marbled on the left. Let there be a small brush in each of the pots of vein-colours, and a larger one in the last or body-colour. Have a small iron rod or bar about twelve or fourteen inches long, placed so that you may be able to take it up when required with the left hand. Fill the trough to about one-half or three-quarters of an inch from the top with the solution of gum-tragacanth and flea-seed, as previously described, and proceed to mix the colours.
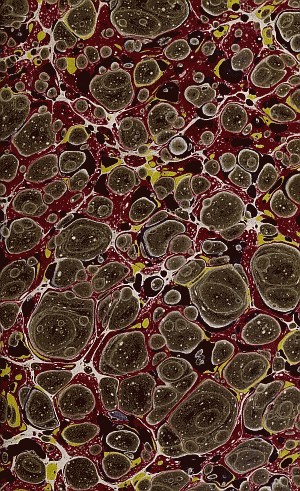
For convenience of reference, the various patterns described and processes employed will be numbered.
No. 1.—large brown french or shell, with three veins, viz.: red, yellow, and black.
Mix together ox-gall and water in the proportion of one-eighth of the former to seven-eighths of the latter. Mix the vein-colours with this mixture, putting in a little at a time, and gently stirring it about with the brush (but be careful not to make it froth by too rapid stirring) until you arrive at the proper consistence, which must be ascertained by sprinkling a little colour on the solution in the trough. If the colour sinks, and does not spread out, add a little neat-gall; but, should it spread too far and open too much, mix a little more colour with water only, and put it to that which spreads too much.
The brown will require more gall, less water, and a few drops of the very best olive-oil, which will cause it to form itself into rings or shells as it falls on the solution in the trough. This colour will require to be thicker than the vein-colours, and, when thrown or sprinkled, should drive or force the other colours into the form of veins. By increasing the quantity of gall in the last colour, it will bring the veins to almost any degree of fineness; but there is a point beyond which it is not advisable to go. If the brown does not shell enough, but forms in holes, add a few more drops of oil, and well mix it; but if there be too much oil it will spoil the effect of the shell altogether, which cannot be counteracted in any other way than by mixing some more colour without any oil, and adding it thereto.
Having, then, all in readiness, first skim the surface of the solution lightly all over, and immediately (for when you begin it is necessary to move quickly till all the colours are on) sprinkle on the colours, beginning with the red, next yellow, thirdly, black; then with the principal or body-colour go well and equally all over, taking care to throw as much colour on one part of the surface as another; then take up a sheet of paper by the two opposite corners, and let the corner between the finger and thumb of the right hand touch the surface first, while with the left you let the paper gradually descend, till it lies flat upon the liquid. If it is let down too quickly, or the paper gets rumpled, so as to allow the air to get under it, white blotches will appear when it is taken out of the trough; and if the paper be allowed to lie long enough upon the size to draw out the blisters, still the marks will show.
In order to take the paper out, lay a lath or thin stick across the centre of the paper as it lies in the trough; let it be long enough for the ends to rest upon the edges of the trough; then take hold of the paper by the two parallel corners, lay it back over the stick, lift it out of the trough by the stick, in the same manner as it might hang across a line, and place it on a rack to dry.
No. 2.—small brown french.
This pattern is produced with precisely the same colours as No. 1, by using the iron rod previously described. It is held in the left hand, and the brush knocked against it, which causes the colour to fall in small spots, and reproduces the No. 1 pattern, as it were, in miniature.
No. 3.—brown french, with light spot.
This pattern has but two vein-colours—the red and the black. These are mixed with the mixture of gall and water, as described for the veins of No. 1. It has also two other colours. The brown is mixed in a similar manner to the brown for No. 1, but not quite so much gall and oil, to allow for the other colour flowing out upon it; and the last, or light spot, is composed of raw or unburnt Oxford ochre, and is mixed with gall, water, a few drops of olive-oil, and a portion of spirits of turpentine.
No. 4.—small yellow shell.
This is done in the same manner as No. 2 as regards the mixing and working, the only difference being in the body-colour.
No. 5.—brown and purple shell.
This pattern has three veins and two French colours, or colours that have been mixed as French,—that is, with oil in them,—the last of which, in this instance, is the purple. Being mixed with a little more both of the gall and oil than the other, in order to make it flow out, over, and drive up the other colours, a marbler will be able, if he follows these instructions, to imitate any French pattern, whether there be more or less colours in them.
No. 6.—blue stormont
Is an old pattern, but well worthy of being revived. Though apparently very simple and easy of execution, it is nevertheless very difficult to keep in order, in consequence of the speedy evaporation and the chemical changes which are continually taking place among the ingredients with which it is mixed. It requires great quickness and acute observation on the part of the workman.
There is but one vein-colour, (red,) and the ground or body-colour is blue. The same preparation of gum and flea-seed is used for this as for the French marble. Mix the red for vein, as usual, with gall and water. The other colour must consist of good indigo alone, without which the proper effect cannot be produced. The indigo being ground, as before directed in the instructions for grinding the colours, proceed to mix the indigo with gall, water, and spirits of turpentine,—of which last ingredient it will require a considerable proportion, in order to make it break full of little holes. The acme of this pattern is to make it look like fine network. Sometimes it will happen that at first mixing it will not work, but after standing a day or two it will work well, while at other times it will work immediately. If the holes come too large from an excess of turpentine, (for they will sometimes come too large from not having enough,) add a little more gall and some fresh indigo, putting in a few drops of alum-water; but be very careful of this; for, if there be too much, it will make the colour thick and clotted: in which case have recourse to a little of the solution of potash; but it is best, if possible, to do without either of them.
No. 7.—light italian.
A very pretty though simple pattern, but requires great cleanliness of working to turn it out well. The colours being ground as before directed, proceed to mix them with gall and water only, as though they were for veins. The last colour is white; this requires a greater proportion of gall than the other colours, and a larger brush, as in the French patterns.
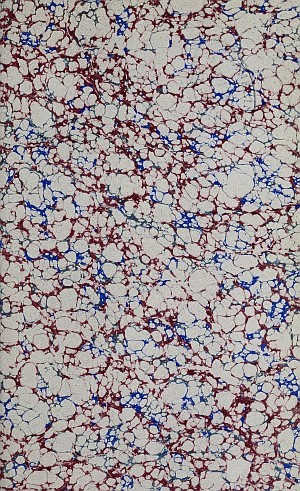
After skimming the size, proceed by beating or knocking on the colours,—viz.: red, green, and black, as in small French, taking especial care to have the rings of the brushes free from any accumulation of colour, or they will cause large spots or blotches, which will spoil the appearance of the work. One difference between this and the small French is that there is no oil used in any of the colours.
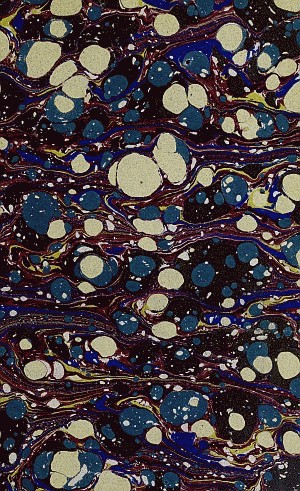
Another method is to use a mixture of weak gall and water instead of the white colour, and which must be firmly knocked or beaten on, proportioned by the judgment of the marbler. This method is preferable to the former for edges, and will answer quite as well for paper.
NO. 8.—small green italian.
A very neat pattern, may be made of one colour only, which must be mixed with gall and water sufficiently strong to cover the whole surface of the solution on the trough; after which, beat on the white, or gall and water, as before. The same size, or preparation of gum and flea-seed, will do for this as for the previous marbles; it must, however, be kept clean, to make the work look nice and bright.
No. 9.—west end, (brown, with light spot.)
This pattern consists of two prominent colours besides the veins; one of these is dark and dotted all over with small white spots; the other, which is the last or top colour, is light, and is made by taking a portion of the darker colour and mixing a quantity of white with it, sufficient to bring it to the desired tint. Mix the colours for veins in the ordinary way, viz.: with the usual proportions of gall and water; then mix the brown with a larger proportion of gall, and sprinkle it on as full as to drive the other colours into veins; then take the white, or gall and water, as in Italian, and beat it finely and equally all over, but not so much as for the Italian pattern. Lastly, take the light or top colour, which will require to be stronger in gall than any of the others, and must be sprinkled lightly and evenly over the whole; lay on the paper as quickly as possible.
This pattern is known by the name of West End, and is in every respect similar to the Spanish in the working, only it is not shaded.
No. 10.—west end, (green, with light spot.)
An excellent pattern may be made similar to No. 9 in all the details of mixing, working, and putting on the colours, the only difference being in the colours, which may be made of two shades of green or olive, and the veins red, yellow, and blue.
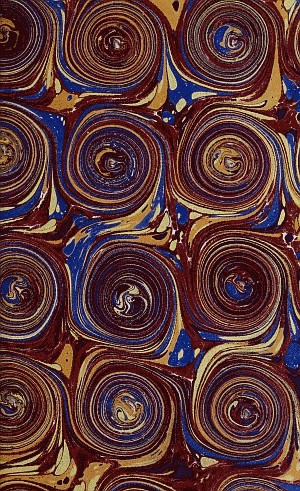
No. 11.—curl.
The pattern called French Curl, after the description of the French marble (see No. 1) will not require much explanation, the only difference in the working being, that there must not be any of the preparation of the flea-seed with the gum; but it must be done on the solution of the gum alone, without any admixture. It will also require a frame with as many pegs as you may require curls on the paper; these pegs must be about three inches long, and about the thickness of a stout goose-quill, tapering toward a point. Throw on the colours the same as for No. 1 large French; take the frame of pegs, and, holding it with both hands, put the pegs down to the bottom of the trough, give it a slight rotary motion, then lift it out quickly, so that no drops fall from the pegs into the trough, and lay on the paper as usual, taking care to lay it down straight and even, or the whole pattern will be askew.
No. 12.—brown curl.
A pattern of curl may be made of one colour only, mixed with the same ingredients as the ordinary French; it is the easiest of the two to make.
NO. 13.—red curl.
A curl pattern may be made of the same colours used for nonpareil, only the colours and gum are both used rather thicker than for the French curl, and the colours must have no oil in them.
SPANISH.
This marble is distinguished from all others by having a series of light and dark shades traversing the whole extent of the sheet of paper in a diagonal direction. And, as it is the design of this work to simplify as much as possible, the marbler will bear in mind that all the plain Spanish patterns may be worked and managed without the aid of any other agents than ox-gall and water, of course presuming that the colours are ground and prepared as before directed.
No. 14.—olive, or light green, spanish.
One of the most simple and easy patterns is called Olive Spanish, with red and blue veins. The veins are mixed with gall and water, as in the previous kinds of marbling, till they are brought to the proper consistence; and, as it is not possible to state any given measure for proportioning the gall and water exactly, some gall being stronger than other, that must be determined by observing the effect produced in the colours as they are tried on the solution. But each successive colour requires more gall than the one which preceded it, and the principal or body-colour requires to be both thicker in itself and stronger in gall than any of the others. This rule is almost without an exception.
Having, therefore, mixed and prepared the colours,—having the preparation of gum and flea-seed in the trough,—proceed to throw on, first the red, then the blue, and lastly, with a large brush full of colour, the olive; beginning at the left-hand corner of the trough, farthest from you, and working down and up closely all over, taking care not to go twice over the same place, or you will produce rings by the falling of one spot upon another, which is considered objectionable. It cannot, however, be entirely avoided. Now take up the paper by the two opposite corners, and, holding it as nearly upright as possible, yet with a degree of ease and looseness only to be attained by practice, let the corner in the right hand gently touch the colour on the trough, while, at the same time, you shake or move it to and fro by a regular motion, at the same time, with the left hand, letting the sheet regularly and gradually descend till it lies flat upon the surface of the solution. Practice will be required before the stripes or shades will be produced with certainty and regularity. We will next take a pattern with three veins.
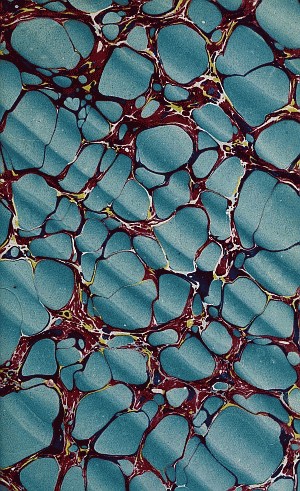
No. 15.—blue or slate spanish.
This is performed in a similar manner to the one just described. First, throw on red, next yellow, thirdly Blue, and lastly the slate, or body-colour, which is composed of indigo, Chinese blue, and a portion of white. We now advance a step further and take up a pattern with four veins.
No. 16.—brown spanish.
This is a well-known pattern. Perhaps as much or more of it has been made than of any other, and it always will be a standing pattern. Proceed in the same manner as before, throwing on first, the red; then yellow; thirdly, blue; fourthly, black; and lastly, the brown, which should be composed of good burnt ochre, darkened with a little black.
No. 17.—double brown spanish.
This pattern has four colours for veins and two body-colours, the last or top colour being a dilution of the other with white. The veins are thrown on in the following order:—first, red; then black; next yellow, (some work the yellow before the black;) fourthly, green; then the brown, which must not be quite so powerful or put on quite so heavy as for brown Spanish, and on this sprinkle the light or top colour, which requires to be stronger in gall than the others.
No. 18.—fancy spanish.
The pattern so designated has something of the appearance of a Spanish being worked over an Italian. It requires seven colours and brushes to execute this pattern, although it may be made of less. Commence, as usual, with red first; then black; thirdly, yellow; fourthly, blue; fifthly, green. These being all thrown or sprinkled on, next throw on the white, by using the iron rod, as for West End or Italian, and beat or knock it on very firmly all over these colours, but not so much as you would do for Italian; and lastly, the principal or body-colour,—say dark olive-green. Shade it by shaking or waving the paper in the same way as for other Spanish.
No. 19.—fancy spanish.
Another compound or fancy Spanish pattern is made by introducing a small French pattern instead of veins. In doing this, be careful not to have so much gall or oil in the colours as though you were going to make French only, and the top or body-colour will require more gall than any of the plain patterns in order to make it work over the French colour.
Beautiful effects may be produced by folding the paper in squares or bending the sheets in various parts before shading, some of which cause the shades to assume an undulating appearance, as though it had been watered like silk.
No. 20.—drag or extra spanish.
To do which you must have a trough twice the length of the sheet of paper; as, in order to produce the elongated form of spots, you will have to drag or push it from one end of the trough to the other in the course of laying down the sheet of paper. The colours and preparation are the same for this as for the other Spanish, only the colours are used considerably thinner, as they would get so thick upon the paper, from one sheet being drawn over and taking up a surface of colour usually allowed for two, that it would peel and crumble off and not burnish.
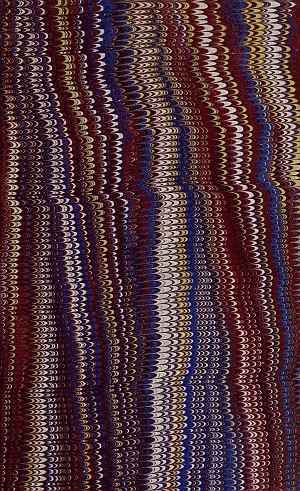
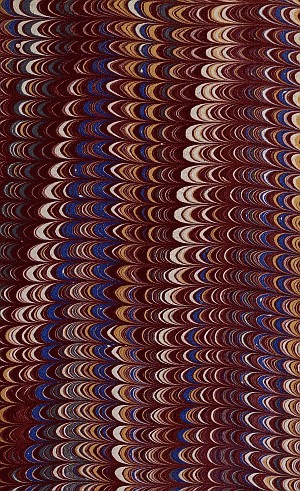
No. 21.—nonpareil or comb.
We now come to this well-known and very popular pattern, which has had a most extraordinary run, and which some people hardly seem tired of, although it has become so common of late as to be used on almost every kind of work.
For this description of marbling use the solution of gum alone in the trough. Mix the colours with gall and water, taking particular care to avoid all oil and grease of every description; but the colours will require to be thicker, and more colour thrown on, than for Spanish, with the exception of the last, which will not require to be so heavily thrown on as the last Spanish colour. Let all the colours be thrown on in about equal proportions. In commencing, proceed as usual:—first, skim the surface of the solution, and immediately follow with the red so as to well cover the whole surface of the solution; then black; next, orange or yellow; fourthly, blue; and, lastly, the top colour, of whatever shade it may be required. Now take the peg-rake, which must be as long as the trough from right to left, and which consists of a piece of wood having pegs inserted about an inch and a half apart and about three inches long, tapering towards the point, and having the appearance of the head of a rake. Pass this once up and down through the colour from front to back, taking especial care that when you draw it back the teeth come exactly between where they went up. Having raked the colour into the proper form, take the comb, which must reach the whole width of the trough from front to back, and draw it steadily through the colour, and the pattern is ready for the laying on of the paper, which must be done with a steady hand, or there will be shades in it.
No. 22.—raked nonpareil.
A very good pattern is made by following the directions for No. 21 until the colours are properly raked, then beat a little white evenly over it, and it is ready for the paper.
No. 23.—nonpareil, (reversed.)
Another pattern is made by precisely the same process as No. 21, till the colours have been raked with the peg; then take the comb, which should be a much larger one, and draw it through the colour from left to right, then immediately reverse it and draw it back again from right to left, and the desired effect will be produced.
No. 24.—antique.
The antique marble is executed thus: after the three first colours have been thrown on, namely, red, black, and yellow, rake it once up and down with the peg-rake, after which proceed to throw on the green, follow with the pink spot, and lastly, beat or knock on small white spots. Some antique patterns are made with a blue or other coloured spot, in lieu of the pink here described, but the process is the same.
No. 25.—antique, (zebra.)
This is done with colours prepared the same as for ordinary nonpareil; throw on four colours, viz.: red, black, yellow, and blue; then rake the same as for nonpareil, after which throw on a light colour for a spot; lay on the paper the same as for Spanish. Sometimes it is made without shading, and passes for another pattern.
No. 26.—wave.
In this pattern the colours are drawn into an undulating form, the points of each row meeting each other. The colours are prepared the same as for nonpareil. The red, yellow, blue, and green are thrown on, over which is beaten or knocked a small white, but not too abundantly; there is now required a kind of double rake or frame, with teeth of stout wire about three or four inches apart, and let the teeth of the hinder one be so adjusted as to be exactly in the centre of the spaces left open by the first one; the second or hindmost row of teeth should be an inch and a half behind the former, the two forming but one instrument. Draw this through the colour similar to a comb, from left to right, but with an undulating or see-saw motion, just sufficient to make the top of the hindermost wave catch or touch the bottom of the foremost one, by which means it will produce a uniform appearance all over the sheet, something in the appearance of irregular squares.
There are some other patterns of a similar kind made without a small white spot, and the same design is sometimes worked upon a French marble, but these require no additional explanation. We now come to
No. 27.—british.
The pattern so called is by no means easy to execute, as it requires a considerable amount of judgment to maintain any thing like uniformity. Some British patterns are made with and some without veins. They require a trough double the length of the paper, as it is dragged or pushed from one end of the trough to the other in the same manner as the drag Spanish, (No. 20;) and the size or preparation must be the same as for that kind of work. A good pattern may be made of one colour,—viz.: black. The colour for this description of marbling will be all the better for being mixed and well stirred about a few days before using, so as to become mellow for working. Two jars or pots, and a large common plate, will be required. Mix the colour in one of the jars, as if for ordinary Spanish, but not with quite so much gall; then pour a little of it into the other jar, and add to it a considerable portion of gall and water, so as to make it very thin and strong; now pour a small quantity of the strong colour (about a teaspoonful) on the plate, and, taking the brush out of the thicker colour and pressing it hard on the plate, take up with it a portion of the strong colour, and proceed to sprinkle it on quickly all over the trough. The dark and light spots will fall together, intermingling with each other and producing that variegated effect which is characteristic of the pattern. Lay on the paper the same as for drag Spanish. Brown, green, and other colours, are done in the same manner; but the colours require to be mellow and the paper soft-sized, or they are apt to run off.
No. 28.—dutch.
The pattern now under consideration is one of the oldest and at the same time most difficult patterns, and is performed by a very different process to any of the preceding. Upon examining this pattern, it will be perceived that the colours are not scattered here and there in an indiscriminate manner, but follow each other, in a kind of regular succession, in a diagonal direction across the sheet, red being the preponderating colour. In order to make this well, the colours must be particularly well ground, and of the first quality. They ought to be mixed a few days before using. It will be useless to expect a satisfactory result with either inferior or badly-prepared materials.
In order to accomplish this pattern, there will be required a number of little tins or pots, an inch and a half wide and about the same, or two inches, in depth. It will also require two frames the size of the paper, with wooden pegs in them, slightly tapering, about a quarter of an inch in thickness, and fixed about three inches apart, at regular distances, over the whole extent of the space required. The colours will be all the better for this class of work by the addition of a little spirits of wine. With this exception, the colours will not require any different treatment from the nonpareil.
Mix each of the colours in a large jug, having a spout, so that you may be able to pour them out into the small tins before mentioned. The colours required will be red, yellow, green, blue, and white. The two frames of pegs must be made exactly alike. One ought to be an exact duplicate of the other.
Having mixed the colours, and tried them by dropping a little of each on the solution in the trough, proceed to fill as many of the little pots with colour as there are pegs on the frame, and arrange them about three inches apart, so that the pegs in the frames may drop into the centre of each pot, and, when lifted out, (which will require to be done with great caution,) will convey one large drop of colour on each peg, with which the surface of the size is to be gently and evenly touched, taking care not to put them in too deep, but at the same time being quite sure they all do touch the size. The tins or pots of colour must be arranged as in the following diagram, about three inches apart:—
G Y G Y G Y G
Y B Y B Y B Y
G Y G Y G Y G
Y B Y B Y B Y
G Y G Y G Y G
G standing for green, Y for yellow, and B for blue. Then fill the same number of tins or pots with white, which must be composed of pipe-clay ground and prepared as the other colours, and arrange them in precisely the same manner, using the second or duplicate frame of pegs to these.
Having arranged all these, commence operations by first skimming the size, (which must consist of gum-tragacanth alone,) and then well cover the whole surface with red, which must be thrown on plentifully with a brush. Then carefully lift the first frame standing in the pots of the three colours, giving it a slight rotary motion, so as to stir the colours, which soon settle, being careful not to upset them. Let one drop from each peg touch the surface of the red upon the size, then quickly take the one with the white and drop that just in the centre of the spots already placed on the trough; next take a rounded piece of tapering wood, (a brush handle is as good a thing as any,) and pass it up and down through the colours as they are now disposed in the trough, from front to back, at regular distances, till the whole extent of the trough has been gone over; then pass the comb through it from left to right, and lay on the paper.
As soon as you have hung it up, pour over it, from a jug with a spout, about a pint of clear water, to wash off the loose colour and gum and make it look clean and bright, after which, when dry, it will require sizing before it can be burnished.
When curls are required, it will be necessary to have a third frame, with as many pegs as you may require curls upon the sheet of paper.
No. 29.—antique dutch.
Is done in a different manner to any of the processes hitherto described. The colours used for this kind of work must be of first-rate quality, and must be ground with spirits of wine or extra strong gin, and mixed up with the same and a little gall, just sufficient to make them float and spread to the extent required. Instead of brushes, have a tapering piece of wood, about the thickness of a little finger, in each pot of colour, (small pots will do, capable of holding about a tea-cup full.) The colours required are red, orange, blue, and green. The red must be the best scarlet lake; the orange, orange lead; the blue, ultramarine and indigo; and the green, indigo and Dutch pink. These must be ground and mixed, as before directed, to the consistence of cream. The lake should be ground one day and the other colours a few days before using, and kept moist. The gum will require to be used thicker for this work than for any other. Having every thing in readiness, take a pot of colour in the left hand, and with the right proceed to lay on the colour with a piece of wood or with a quill, in sloping stripes, like those made by a school-boy in learning to write. Commence with the red and make two strokes almost together, leaving a small open space, and then making two more, and so on, until the required extent has been gone over. Next take the orange, and make one stripe between the two stripes of red; then proceed to fill up the wider space with a stripe of green and a stripe of blue. Perhaps the following may more clearly illustrate the order in which the colours should be arranged on the trough:—
G B R O R G B R O R G B R O R G B
As in the former instance, the initial letters signify the colours. Draw the comb through and the pattern is complete.
EDGES.
The patterns for edges are produced in the same manner as those for paper; and having already devoted so much space to this beautiful art, hitherto confined to a few, it would be useless to repeat the processes. Yet there are some things in regard to edges which every good marbler should understand. When plates are interspersed in any book along with the letter-press, it will require particular care in marbling, or the colour and size will run in and spoil the appearance of the plates. To obviate this, keep the book tightly compressed, and where the plates are at the beginning of the book only, lay it down, when marbled, the beginning side-upwards. For edges you may do with a smaller trough, also a smaller quantity of colour than for paper. The solution to work upon had better be gum-tragacanth alone. Colours for edges will look all the brighter by the addition of alcohol, spirits of wine, or whiskey; but they will evaporate more quickly. Having every thing in readiness, take the book, or, if more than one, as many as you can conveniently manage to hold tightly, with the backs in the right hand and the fore-edge in the left, and let them touch the colour, the back first, allowing them gradually to descend till the whole end is covered; but be very careful that none of the size or colour comes over the fore-edge, which it will do if dipped too deep, and leave a nasty unsightly mark, and greatly disfigure the book. In doing the fore-edge, the beginner had better place the volume between a pair of cutting-boards, and, having thrown out the round, turn back the boards, and proceed as with the end; when done, wipe off the superfluous size from the boards with a sponge, put the boards back in their place, and let the volume dry.
GLAZING OR BURNISHING.
The sheets of paper are burnished by a machine constructed for the purpose. A smoothly-faced flint is fixed in a block of wood, in which is inserted one end of a pole about five feet in length, the other end being attached to and working in a cavity in a spring-board fixed overhead, allowing it to work backwards and forwards upon a plank hollowed out for the purpose. The paper is moved over the plank, and the friction of the flint in passing to and fro over the surface of the paper produces a high polish. Sometimes the paper is calendered by means of friction cylinders—a superior method.
COMBS.
These are made in various ways, some to be worked on the top of the trough and called top-combs, others to be worked by putting the points down to the bottom of the trough and called bottom-combs. The best thing for making them is of brass pin-wire. The comb for small nonpareil ought to have from twelve to fourteen teeth to the inch, for the second size eight, and for large, four.
SIZING THE PAPER.
It is sometimes necessary to size the paper after marbling. The way of making the size is as follows:—Take of the best white soap two pounds, put it in a large copper with about twenty gallons of water; when it is quite dissolved, add thereto about four pounds of the best glue, keeping the whole constantly stirred, to prevent the soap and glue from burning; when both are quite dissolved, strain it into a tub, and when cool, it is ready for use. Should it be found too thick, add more hot water. The best way of sizing is to fill a trough with the liquor and to lay the marbled surface of the paper down upon it, then hang it on the sticks to dry.
PATENT MARBLED CLOTH.
This is an article recently introduced, and in some quarters meets with considerable favour. There are as yet no manufactories of it in this country. It, however, possesses no advantages over good marbled paper, and for outsides will not compare with the papier D'Anonay for durability.
ADDENDA.
In taking leave of the subject of marbling, there is but little more to add. For, when the learner is master of all this book teaches, he will have attained such proficiency in the art as to require nothing further in the way of instruction. Should some new pattern come up, let him apply the principles that govern in mixing and distributing the colours, and, with the aid of his own experience, his chance of accomplishing it will be as good as any one else's. As a step to the attainment of mastery in the art, let the workman divest himself of the various nostrums he has been put in possession of by interested parties, and give himself up with assiduity to the directions here laid down. What is here given is the result of twenty-five years' actual experience of C. W. Woolnough, of London, whose marbles rank among the most beautiful productions of the present day. Therefore let the workman adhere to the instructions, and ultimate success will crown his efforts. Should there be any difficulty in obtaining any of the articles described, they may be procured from Mr. Charles Williams, No. 213 Arch St., Philadelphia. The specimens of marbled paper accompanying these pages, illustrate the prominent classes or patterns of marbling. They were executed by him, and show his mastery of the art.
BURNISHING.
The edges are burnished by placing the volume open, with the fore-edge between boards, similar to backing-boards, in the laying-press, and screwing it tightly therein; then with the burnisher rubbing the edge firmly and smartly over till it presents a uniformly bright surface, and free from any dents or inequalities. When the fore-edge is finished, the volume must be taken out of the press, and the head and tail burnished in a similar manner, the ends of the boards resting in the groove by the joints, the covered boards of the volume being open. Common calf, sheep, and half-binding, may be burnished with the boards closed, six or eight together, but it will be necessary to delay pasting the sides on the latter till after the operation, to avoid the liability of tearing.
GILT EDGES.
This description of edge is the best preservative against external injury and damp. Previous to laying on the gold, the workman must have in readiness the articles necessary to form the groundwork and cause the gold to adhere to the edge. The first is a mixture of red bole or chalk and black lead, well-ground and reduced by water to a fluid consistence, after having added to it a few drops of muriatic acid or vitriol. The size used by some is made from the white of an egg in five times the quantity of water well beaten together; but that most generally used is made from parchment or vellum shavings boiled in water to extract the gluten. It is then passed through a piece of fine muslin and set aside to cool. When cold it is very easy to judge of its strength. Some use ice in summer-time to chill it, as a test of its strength. If too strong or thick, add water, then warm it to melt the size and allow the water to become incorporated with it. To become a good gilder requires considerable judgment, as every variety of paper requires a different treatment. No rule can be laid down that will answer in every case; but if the workman will but pay attention to the directions here given, exercise patience, and above all reflect upon the effects of his operations, ultimate success will be certain. English books are made from linen rags, and the paper is sized. They gild more easily and the edge looks better than American books. They do not require as strong a size for gilding as books printed on paper made from cotton. Books printed in this country are generally made from cotton rags. Quantities of alum and lime are employed in bleaching the pulp, to the sore annoyance of many a gilder, who has found that a damp day would invariably put both his skill and patience to the test. The best qualities of American paper are sized; the generality, however, is not. To determine whether the paper is sized or not, apply the tip of the tongue to it; if it adhere to the tongue, it is not sized, and will consequently require a stronger size for gilding than if it were sized paper. The liability of parchment size to decompose or turn to water in hot weather can be entirely counteracted by adding a very small portion of oxalic acid. Having every thing in readiness, put the book in the laying-press, between the gilding-boards, placed even with the fore-edge of the book and with the cheeks of the press; screw up as tightly as possible with the press-pin.
Then commences the most difficult operation, and one upon which the beauty of the edge almost entirely depends—namely, that of scraping. This is done with a steel scraper. A piece of saw-blade answers the purpose very well. After being ground square on the edge and rubbed perfectly smooth upon the oil-stone, it is kept in order by a smooth steel. The edge must be scraped perfectly smooth, so as not to show the marks of the knife in cutting, or of the scraper. After this is done, it must be coloured lightly over with the bole or chalk, rubbed immediately dry with fine clean paper shavings. This process will have to be repeated three times; it is then well burnished with the agate, and, with a broad, flat camel's-hair pencil, or piece of soft sponge, a coat of size laid evenly on the surface.
The gold is next cut on the gold-cushion to the size required. A slip of paper larger than the edge is drawn over the head of the workman, and by a light pressure upon the cushion the gold will attach itself to the paper; it is then turned, with the gold upwards, (care being taken to have sufficient upon the paper to cover the entire edge,) and laid upon the cheek of the press; then pass a flat camel's-hair pencil, dipped in clean water, evenly over the edge, and immediately lay on the gold by taking up the paper, turning the gold towards the edge, and presenting it with sufficient celerity not to allow the gold to be drawn from the paper in portions by the size. To do this well will require some practice and a steady hand. Should there be any breaks in the gold, other portions must be applied, and, if dry, moisten with water applied by a fine pencil, and lay on the gold.
After the edge is entirely dry, which generally happens in from one to two hours, it must be burnished. For this purpose a flat blood-stone burnisher is the best, to be afterwards followed by a flat agate. Let there be no marks of the burnisher, but spare no pains in burnishing to have the edge perfectly uniform and clear. The head and tail of the volume must be gilt with the same precaution, the back towards the workman. The foregoing direction have been derived from the practical experience of Mr. James Pawson, one of the best gilders in this country.
Should the work be of such a nature that it is desirable to give it the character of the period in which the book was written, or an additional degree of beauty and elegance, this part of book-ornament may be pursued farther in the manner we shall now describe.
ANTIQUE STYLE.
After the edge is finished as above directed, and before taking out of the press, ornaments, such as flowers, or designs in compartments, must be stamped upon it in the following manner. A coat of size is passed quickly over with great precaution and lightness, and only once in a place, to avoid detaching any of the gold. When dry, rub the edge as lightly as possible with palm-oil, and cover with gold of a different colour to the first; then with the tools used in gilding leather, warmed in the fire, proceed to form the various designs by firmly impressing them on the edge. The gold that has not been touched by the tools is then rubbed off with a clean cotton, and there remains only the designs the tools have imprinted, which produce a fine effect. This mode is, however, now seldom used, though almost all the books in the original binding of the sixteenth century are so executed.
GILDING UPON MARBLED EDGES.
This edge, which Dr. Dibdin, in his "Bibliographer's Decameron," calls "the very luxury, the ne plus ultra of the Bibliopegistic Art," is one requiring great care and expertness in the execution. The edges must be scraped before marbling. After the edges have been tastefully marbled, and not overcharged with colour, the book must be put in the press, and well burnished as before directed. The size must then be laid lightly on, to prevent unsettling the colour of the marble, by which the edge would be destroyed, and the gold immediately applied and finished off as in other edges. When dry the marble is perceived through the gold, and presents an appearance of great beauty.
GILDING ON LANDSCAPES, ETC.
When the edge is well scraped and burnished, the leaves on the fore-edge must be evenly bent in an oblique manner, and in this position confined by boards tied tightly on each side, until a subject is painted thereon in water-colours, according to the fancy of the operator. When perfectly dry, untie the boards and let the leaves take their proper position. Then place the volume in the press, lay on the size and gold, and, when dry, burnish. The design will not be apparent when the volume is closed, from the gold covering it; but when the leaves are drawn out it will be perceived easily, the gilding disappearing, and a very unique effect will be produced. The time and labour required makes this operation expensive, and it is consequently very seldom performed. It is, however, considered necessary to describe the proceeding, as the taste or wishes of some may render it necessary that the workman should know how to operate.