ECCENTRIC TURNING.
Reading edition
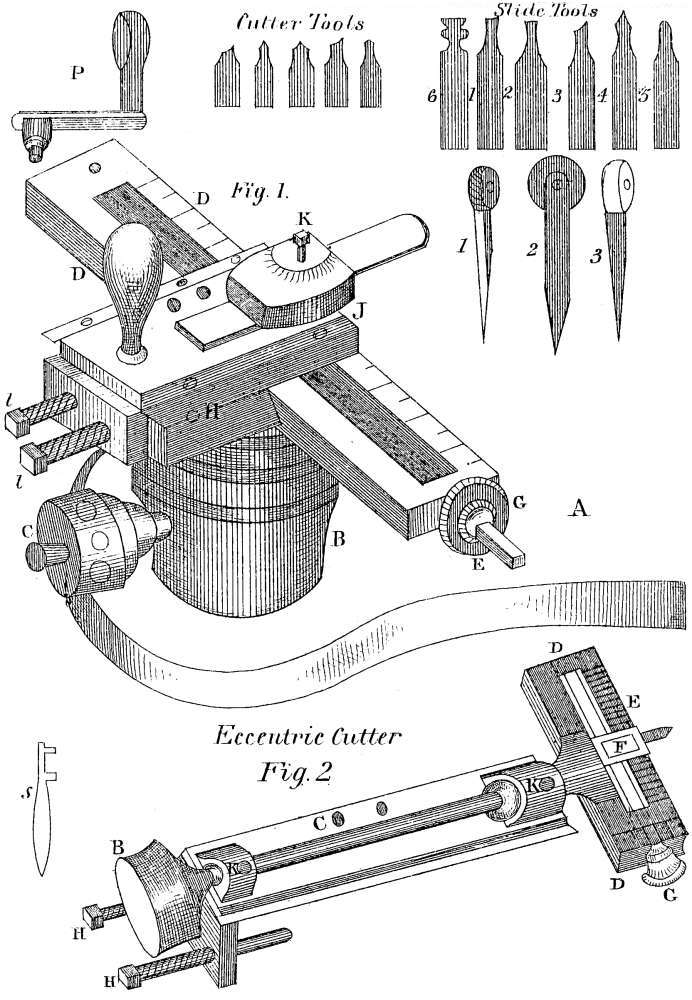
Plate 5.
This name includes all the various, beautiful, and intricate work for which the powers of a lathe are so justly celebrated, and which, once seen, must be admired by all who love the fine arts and examine the powers of machinery. The eccentric cutter, the drill, the eccentric chuck, and the universal, or vertical cutter, are all indispensable for those who wish to perform ornamental turning, and with them the most delicate and intricate patterns can be worked with a precision and accuracy that are truly wonderful. A sliding, or parallel, rest is absolutely necessary for turning patterns, as upon it, in some degree, depends their exactness. Fig. 1, plate 5, is the drawing of one. The foot, A, screws firmly to the bed of the lathe, like the common rest, and the upper part fits into the socket, B, and, by means of the nut, C, is turned in any direction you wish. D D is a bed of steel, five or six inches long; through the groove down the middle is a screw which passes from one end to the other, and, by turning the squarehead, E, the tool slider, J, is pushed backwards or forwards, while the rest itself remains stationary. The steel bed is graduated. Between the bed and the screw, E, is a small brass wheel, divided into numbers, G; this regulates the position of the tool. The tool slider, J, fits into the bed, H, and slides in and out; J is the part where the tool slips in, and it is kept firm by a screw, K. The handle draws it to and from the work, and the nuts l l, regulate the depths of the cuts. The tools belonging to this rest, 1, 2, 3, 4, 5, are of steel, about two inches long, and are ground to different angles: there are various sizes of each. When you intend to ornament a piece of wood or ivory, first turn it quite round, and smooth it with the common tools; you must then make the surface perfectly flat, and to accomplish this, adjust the sliding rest at a proper distance, put in one of the round-ended tools, No. 5, let it just touch the wood by setting the screws, l l; put the lathe in motion, and gently approach the tool to the work; if it cuts too deep, tighten the screws a little more; if too little, push the screw forward. Keep the tool steadily up to the work by pressing on the lever, S, which impels the tool to slide forward, then, with the right hand, turn the head, E, by means of a handle, P, which will thus enable the tool slide to run from one end of the brass bed to the other, at the same time that the lathe is turning rapidly round, and thus the surface of the wood is rendered perfectly smooth, level, and polished. Sometimes, however, it will require to be worked over in this manner three or four times before it becomes quite flat; and frequently, even when it appears level, there will still be a hollow in the middle, which will quite destroy the accuracy of the patterns: to discover whether this is the case or not, take the T square, see plate 1, fig. R; place it with its edge against the wood: if you can see light between it and the work, the surface cannot be even, and requires smoothing over again. The next process is to cut very delicate circles all over the work, at regular distances: this is done to take off the bright look of the wood, that the patterns may appear to greater advantage. Put into the tool slide a double angular tool, No. 4; adjust it so as to make a distinct, but still delicate, cut into the wood. Make one cut in the middle of the work; move the brass wheel, G, one number, or from 1 to 2; make a second cut; move to 3, then to 4, and so on: each circle you will find enlarges gradually, till you arrive at the end of the wood. Pattern 1, plate 6, is a specimen of this work; but remember, it is merely a preparation for other patterns. In doing side work, as the side of a box, or a knitting-case, unscrew the screw C, and turn the brass bed of the rest round till in a line with it, then proceed as directed for face work. The wood being ready, we will now go on to give a description of the eccentric cutter, plate 5, fig. 2. Like the tool slider, it fits into the sliding rest, but now it is no longer the work which moves round and the tool stationary, but the wood remains firmly fixed while the tool rapidly revolves and cuts the patterns. For this purpose, it is obviously necessary that the fly wheel should turn the cutter, while the small wheel remains immovable. Several methods are used to perform this: the one given plate 4, fig. K, is the easiest. The frame here represented should be of iron, firmly screwed to the bench of the lathe, and of sufficient height to be about a foot above the head of the workman. In front is a spindle, which works in two nuts, No. 1 1, exactly in a line with the mandrel. Two wooden wheels, No. 2 2, are fastened to this spindle; the one on the left hand remains stationary over the fly wheel of the lathe, by which it is turned, the other slips backwards and forwards, according to the work it is required to do. Take off the usual catgut from the fly-wheel, and pass a long one over it, and over the small wheel on the over-head frame, No. 2. When the cutter, 2, plate 5, is fixed in the slide rest, draw the other small wheel on the spindle, No. 2, forward, till just above the rest, then pass a catgut over it, and round the small brass wheel, B, of the cutter, and the whole will turn together. The brass wheel of the lathe must then be fixed at one particular number. It is usually divided into three hundred and sixty divisions, each marked by a small hole in the brass wheel, as in fig. A, plate 4, and it is by properly dividing the numbers on this plate that the accuracy of the patterns depends; to keep the wheel steady, a small steel key, h, plate 4, is slipped into the brass knob, O, plate 4, and the other end, being pointed, enters into one of the small holes, say the one marked 360; the work is then immovable until you remove the key into another hole. The cutter itself is of brass, with a spindle, C, which works in two brass collars. At one end is the wheel, B, by which it is turned, at the other a steel frame, T D, which is marked on the upper edge in small lines, E, to regulate the quantity of eccentricity. The steel tool-box, F, holds the tool, which is kept firm by a small screw underneath. By means of a screw through the frame, D D, similar to that of the sliding rest, the tool is pushed backwards and forwards, and cuts a large or a small circle. G is the nut that moves it, and it also is divided into numbers. This cutter, for many patterns, is quite as useful as the eccentric chuck, but, in conjunction with the former, is invaluable, and the patterns performed by them may be multiplied according to the taste and genius of the turner. The two screws, H H, fix the depth of the cut; the wheel of the sliding rest determines the necessary distance, that of the cutter the eccentricity, while the brass wheel keeps the pattern accurate. The tools, Nos. 1, 2, 3, 4, 5, plate 5, are of various forms and sizes: care must be taken not to break them, and the cutter must be constantly well oiled with olive oil; the holes, K K, are made to receive it. In using this tool, make the wheel of the lathe go very quick, but approach the tool very gently and slowly to the work. The better to do this, the lever, S, is used; it enters into one of the holes in the side of the cutter, and into a similar one in the sliding rest, so that by a slight pressure the tool is impelled gently forward. There are generally about two dozen tools shaped like those in the plate, but of various sizes.
To imitate the second pattern, plate 6, which, it will be perceived, is a number of circles, slide the cutter towards the edge of the work by turning the screw of the slide rest, then, to make the outer circle of the border, turn the small nut, G, of the cutter six times round; put a double angular tool into the tool box, screw it firmly, adjust your cutter by the screws, H H, to the proper distance, and stop your wheel with the steel key at 360. Cut one circle, alter your wheel thirty numbers, cut another circle, then thirty numbers more, till the twelve circles are all cut. This done, alter the wheel fifteen numbers, which will make the circle cut half through two of the former ones, then move 30, as before, till the twelve are done. For the small inner circles turn the nut, G, of the cutter two turns back, to reduce the size, and move 30 as before. The pattern in the middle is still circles, though differently arranged. Draw back the cutter till a little past the middle of the work, then unscrew the nut, G, fifteen turns, cut one circle, move the brass wheel 15, cut another; move 15, cut another; then move 45, cut another; move 15, then 15, and so on till all are finished.
Third pattern.—Set the cutter at five turns, and move five numbers on the brass wheel for every circle. For the middle pattern, turn the nut of the cutter eight times, move ninety numbers on the wheel, till four circles are cut; then move 45, cut another; then 90 again. To make the small circles, turn the nut, G, backward two turns, and move 90 as before, for the four first circles; then move 45; then 90 to the end.
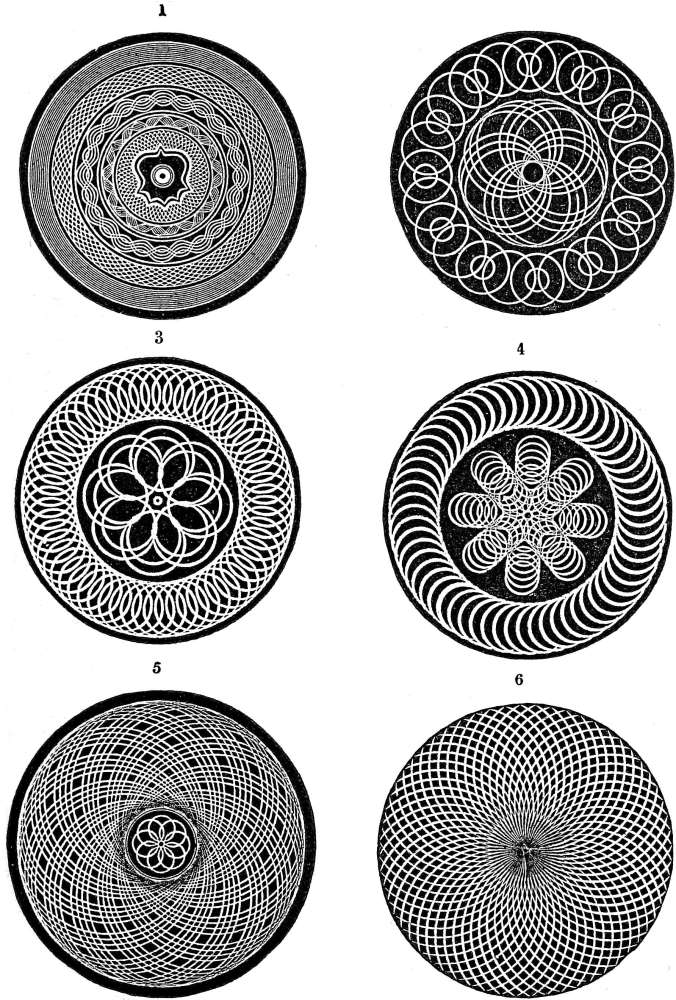
Plate 6.
Fourth.—The border of this pattern is the same as the one in No. 3, only you place a piece of wood about a quarter of an inch in depth across the bed of the lathe, letting it pass half under the slide rest; screw the rest down firmly, and proceed as above. By thus raising the rest in a slanting position, half the circle only is cut, which has a very pleasing effect. For the centre pattern, set the cutter at a small circle, cut one in the middle, having the wheel fixed at 360. Then move the brass wheel of the slide rest, plate 5, three numbers for each circle; these done, return to the middle circle and continue the same to the other end. Then move the brass wheel of the lathe to 45, and repeat as above, three numbers for each circle, till the next row is finished; then again move forty-five numbers on the large wheel; and so on to the end.
Fifth pattern.—Set the cutter at a large circle, the brass wheel at 360. Move 5 for four circles, then move 15, then 4 four times more, then 15 again, and so on to the end. For the middle, set the cutter to a small circle, and move the brass wheel of the lathe 90 four times.
Sixth pattern.—Set the cutter to the largest circle it will make, begin in the middle of the work, set the wheel at 360, and move ten every time.
To assist the beginner, a drawing is given of the wheel, supposing the largest number to be 360, A, plate 4. By this the numbers are all arranged; a table of the divisions is also given; for on the proper and accurate calculation of the numbers depends the exactness of the patterns. The plate on the wheel divided at 144 is the plate for marking half-circles and arcs, as in plate 12, fig. 3, which shall be described hereafter. These patterns are very beautiful, and, from the arcs being gradually reduced in size, they have a curious and elegant appearance, but they cannot be worked without an eccentric chuck.
THE DRILL.
The drill is a most useful auxiliary to the eccentric cutter, not only for drilling holes, which it does with great nicety and speed, but also for making mouldings and patterns of various kinds. Unlike the cutter, which moves either in a large or small circle, the drill can only work upon its own centre, and therefore the size of the pattern depends upon the tool placed in it, its position being regulated by the screw in the sliding rest, into which it slips like the cutter. It is turned by a rope exactly the same as in the directions already given for the eccentric cutter, and greatly resembles it in shape, except at the end, A, plate 7, which is made just to receive the tool, and a small screw keeps it firm. Suppose you wish to ornament anything—say, the pen-holder, plate 9—with concave mouldings, as in A. Having set the rest, by the aid of the T square, exactly in the same slanting direction, put a round-ended tool, No. 3, into the drill, set it to the proper distance, fix the brass wheel at 360, cut a round hole; move the wheel to 72, cut another, and so on till five are drilled; then, without altering the rest, put in a smaller round-ended drill, hold it by means of the lever well up to the work, make the large wheel go very quick, and slowly turn the screw of the slide rest, so as to impel the drill which ever way you wish. Do not cut too deep at first, or you will break the tool; if a great depth is required, go over in the same line three or four times. This done, count 72, as before, and proceed the same; the pattern will have the appearance of the pen-holder in the drawing. The end, B, after being turned to the shape, is ornamented in small holes, that resemble a honeycomb, in the same manner, with a round-ended drill; counting so as to make them fit nicely between each other. To do this, you must be able to subdivide your first numbers. Thus, suppose you drill a round hole at 1, 40, 80, and so on till you come to 360, these numbers can be divided by beginning the next row (which must be begun the breadth of the tool from the former one, by turning the slide-rest screw half, or a whole turn, according to the breadth of the tool) at 20, then count forty numbers as before; but if you had taken forty-five instead of forty for your number, you could not have divided it evenly in the second row, so as to make the holes intersect each other. Be very careful to remember how many times you turn the slide-rest wheel, that each cut may be of equal length. There are generally about four dozen tools belonging to the drill, of various sizes, but of the shapes given in plate 7. Nos. 1 and 2 drill large or small holes, as for instance, round the sides of a turned pincushion, or needle-book, for the stitches to go through; 3 is used to make concave mouldings, or to cut quite through the work in straight lines, as in the lighter case, E, plate 9. This pattern looks very pretty, and is quite easy, if your work is turned sufficiently thin; it should be lined with coloured velvet. No. 4 makes concave mouldings flat at the bottom; these tools are also used to cut round dots: 5, cuts small or large beadings, which give great lightness and finish to the work. Having made a moulding with the hollow tool No. 2 of the slide rest, choose a beading tool that just fits the moulding, put it in your drill, set it to cut sufficiently deep to be quite round at the top; having cut one, count by the brass wheel the proper distance, to make them fit close, but without one spoiling the shape of the other; the round dots on the bottom of the lighter case are intended to represent these beads. Tool No. 6 cuts mouldings of the same shape as the drawing. In using this and the tools Nos. 7 and 8, be careful, after the first cut, where you place them for the second, to make them fit; and in using all the drill tools, make the lathe go as quick as you can, but move your tool very slowly, and keep the drill slide well oiled.
LIST OF NUMBERS ON THE SMALL WHEEL AND ECCENTRIC CHUCK.
LATHE WHEEL. CHUCK WHEEL.
No. of divisions for one cut. No. of cuts to complete the circle. Odd numbers. No. of divisions for one cut. No. of cuts to complete the circle. Odd numbers. No. of divisions for one cut. No. of cuts to complete the circle. Odd numbers.
1 360 — 1 96 — 1 120 —
2 180 — 2 48 — 2 60 —
3 120 — 3 32 — 3 40 —
4 90 — 4 24 — 4 30 —
5 72 — 5 19 1 5 24 —
6 60 — 6 16 — 6 20 —
7 51 3 7 13 5 7 17 1
8 45 — 8 12 — 8 15 —
9 40 — 9 10 6 9 13 3
10 36 — 10 9 6 10 12 —
11 32 8 11 8 8 11 10 10
12 30 — 12 8 — 12 10 —
13 27 9 13 7 5 13 9 3
14 25 10 14 6 12 14 8 8
15 24 — 15 6 6 15 8 —
16 22 8 16 6 — 16 7 8
17 21 3 17 5 11 17 7 1
18 20 — 18 5 6 18 6 12
19 18 18 19 5 1 19 6 6
20 18 — 20 4 16 20 6 —
21 17 3 21 4 12 21 5 15
22 16 8 22 4 8 22 5 10
23 15 15 23 4 4 23 5 5
24 15 — 24 4 — 24 5 —
25 14 10 25 3 21 25 4 20
26 13 22 26 3 18 26 4 16
27 13 9 27 3 15 27 4 12
28 12 24 28 3 12 28 4 8
29 12 12 29 3 9 29 4 4
30 12 — 30 3 6 30 4 —
31 11 19 31 3 3 31 3 27
32 11 8 32 3 — 32 3 24
33 10 30 33 2 30 33 3 21
34 10 20 34 2 28 34 3 18
35 10 10 35 2 26 35 3 15
36 10 — 36 2 24 36 3 12
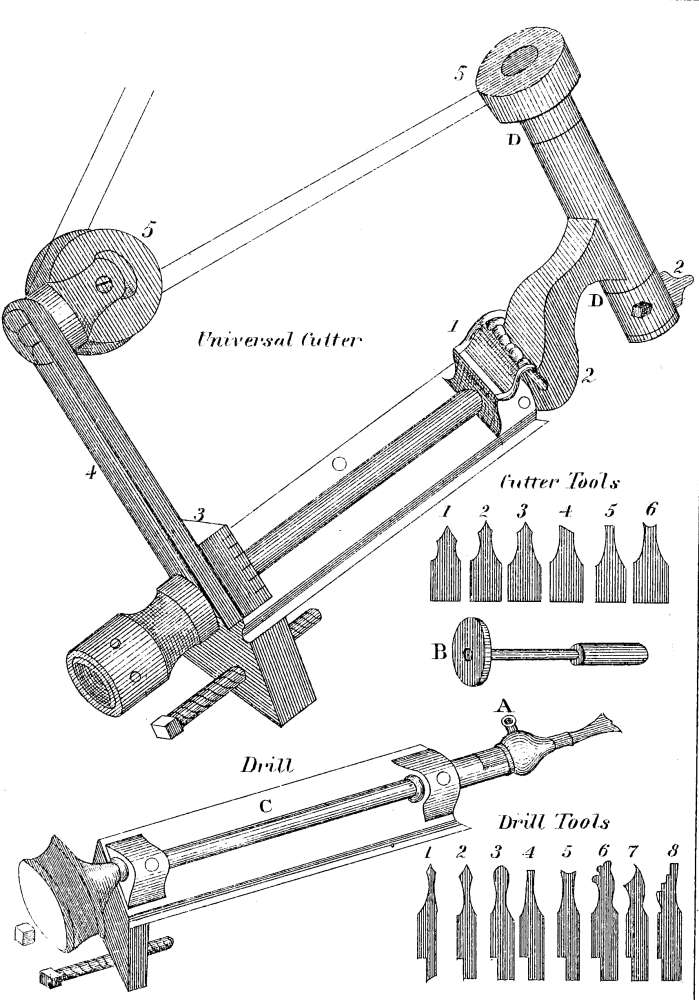
Plate 7.
These tools are also useful for cutting out the edges of work in vandykes, as in the top of the lighter case, E, for which pattern the tool No. 8 was used, the gimped edge being cut with No. 2; the end of the needle-case, D, in plate 9, is done with a round-ended drill, No. 3, in the same manner as directed for the end of the pen-holder. In the patterns Nos. 1 and 6 of plate 11, the straight lines near the centre are cut with the round-ended drill.
GONEOMETER.
All the eccentric tools require the greatest care in sharpening, and the above ingenious machine has been invented for this purpose; it is represented at P, in plate 4. The upper part, 1, is a plate of brass, the outer edge, 2, is graduated as high as 50 each way, beginning at the tongue, 3. Beyond the numbers is a groove, in which one end of the tool slide, 4, slips, and is firmly fixed (so as to point to any of the numbers that suit the angle of the tool) by a nut underneath. The whole plate, 1, is raised and lowered at pleasure by a small hinge at 5, and the requisite height is fixed and settled by counting the numbers on the steel tongue, 3. Underneath is another brass bed with two feet, upon which the machine rests, while the front part leans forwards and rests upon the end, 5. The box that contains the goneometer has three drawers in it; the first is lined with brass, except for about three inches in width, which space is covered with fine Turkey stone. To use this machine, take out this drawer, lay the feet of the goneometer on the brass, put the slide-rest tool, No. 4, into the tool box, screw it firm, then slide the tool box along the groove till it arrives at the proper angle, say 45; fix it with the nut underneath, then raise the whole brass plate, 1, sliding it along the tongue, 3, till at the exact height necessary for the tool to touch the Turkey stone. Rub it backwards and forwards upon it with oil. When one side is sharp, move the tool slide to the opposite angle, to sharpen the other. The small eccentric tools are placed in the steel case, U, and the case fits into the tool slide.
CIRCULAR REST.
The rest we have already described, called the Parallel Rest, works, as its name sufficiently expresses, in a straight line; it is therefore useless for ornamenting spherical objects, and the circular rest has lately been invented to supply this deficiency. It is a most ingenious contrivance, and perfectly fulfils the purpose for which it was invented.
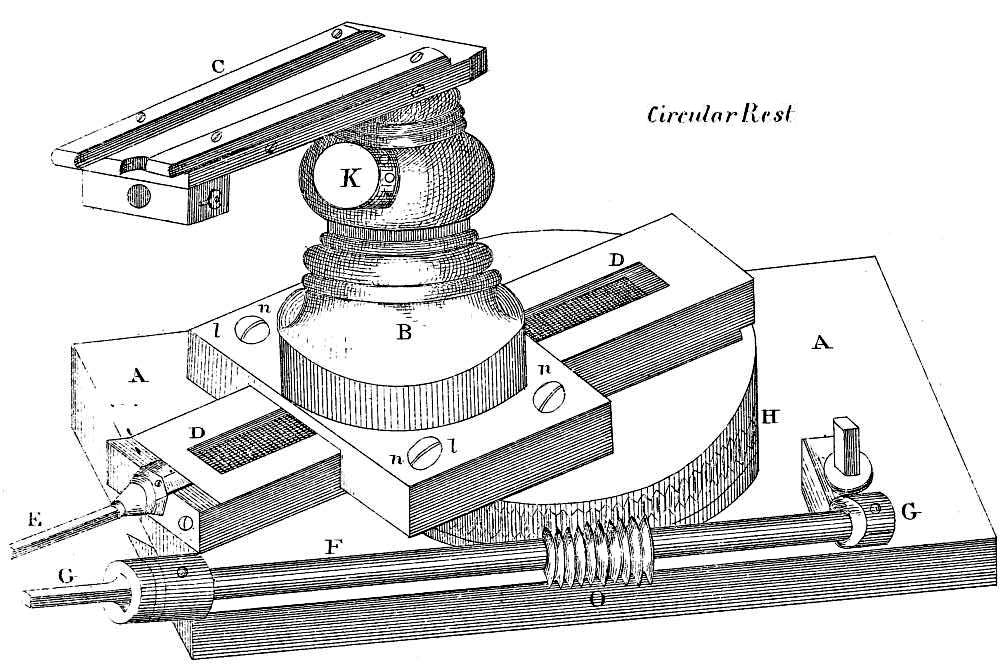
Plate 8.
The bed, A A, is the same as in the parallel rest, and screws in the same way to the bed of the lathe. B is a brass socket and pillar, which support the bed C, in which the tool box slides; they are formed in the same piece with the lower bed, L L, and firmly fixed into the lower part, which is grooved, by four brass-headed screws, N N. The grooves enable the whole socket and tool box to slide backwards and forwards on the bed of steel, D D, and by means of the screw which passes through it the workman regulates the advance or retreat of the rest to or from the work in a straight line, while the lower part remains stationary. The small wheel, E, is graduated, and turned by a key, to enable the turner to count the distance. F is a steel spindle, which works in two brass collars, G G; about half-way down. The spindle is formed into a screw, O, which turns upon the brass wheel, H, and by moving the nut, J, moves the whole rest in a circular direction, in the same way that the screw in the steel bed, D D, impels it in a straight line: by this ingenious contrivance all objects that are round or spherical can be ornamented: such as balls, the globular sides of vases, or small baskets, in every variety of pattern. The learner will easily discover the proper method of using this rest, which is very simple in its mechanism and use. The nut, K, is for setting the tool slider at different angles, the same as in the parallel or sliding rest; the tools to be employed are those of the above-mentioned rest.
THE VERTICAL, OR UNIVERSAL CUTTER.
Plate 7.
This cutter, which also fits into the slide rest, is different from the others; and, as its name denominates, the patterns it can cut are almost endless, for it may be turned in any direction. The bed of the slide is the same as with the drill; at the end, No. 1, is a screw, which, when turned by the key, B, inclines the tool-holder, 2, to any angle that may be required, and it is regulated by the lines on the brass plate, 3, which are marked by a small steel point; so that if you wish to cut out a pattern slanting to the right, and another to correspond slanting to the left, you have only to mark the number on the plate, where you cut the first, and then with the key move the cutter to the same position on the opposite side. When the tool-holder, 2, stands straight, as in the plate, the tool cuts horizontally: when it is screwed down to the last line on the plate, it cuts perpendicularly, but the cut always scoops out; and by putting the tool as far out of the holder as you can, the cut will be larger, and the scoop deeper. The back support of the pulley, 4, moves with the tool-holder; and the pulleys, 5, correspond with each; the back one is turned in the same direction as the front one, by unloosing the screw, 6. The gut, after passing over the pulley on the over-head frame, comes through the two back pulleys of the cutter and round the front one, as in the plate; but when the cutter is screwed flat, a short cord, the same as that used for the drill, is sufficient; and the back pulleys are then not necessary. This tool requires constant oiling at D D, for the friction is very great; it also demands much care and delicacy in using it, as it must not be incautiously thrust against the wood, or it will stick fast, and not turn round. There are about four dozen tools, all of the shapes given in the plate, but of various sizes. This cutter slides into the slide rest, and the depth of the cut is, as usual, regulated by the screws at the end, and the cutter is brought to the work by the aid of the same lever as is used for the drill and eccentric cutter. The patterns cut by this tool are counted and regulated by the numbers on the brass wheel, as with the others. When the turner has once tried it, he will readily discover its advantages for all kinds of ornamental work, particularly for the sides of boxes, needle-cases, and many other articles; but it is needless to give many drawings of the patterns, as they much depend upon the taste of the turner.
One beautiful design for a lighter case, or small basket, is worked with this cutter with a flat-ended tool. Turn the work very thin, chuck it firmly, make one cut deep enough to allow the tool just to cut through, and no more. Count thirty on the brass wheel of the lathe every time; the next row make the cut deeper, so that the opening will be larger, then move 60. By this means a piece of ivory will be left standing out, with openings cut between, which, when lined with coloured velvet, looks light and elegant. This row count sixty every time; the next, thirty, as at the beginning.
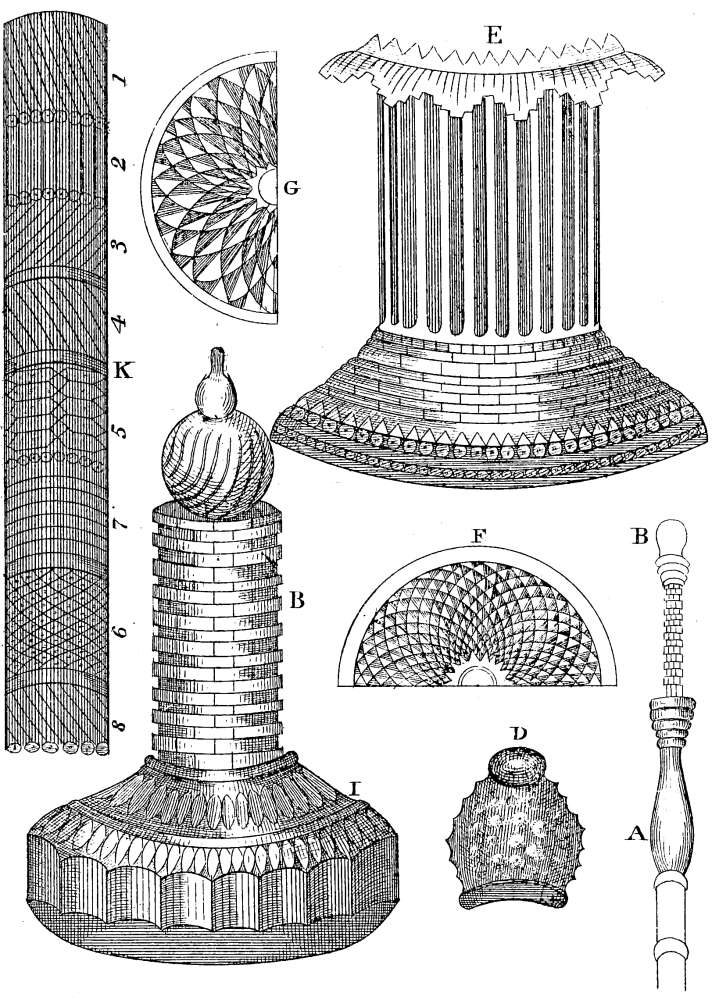
Plate 9.
The needle-case in plate 9, fig. K, is entirely ornamented with this cutter in a variety of patterns. Figs. 1, 3, 4, and 8, are worked with the flat and round-ended tools; 2, with the tool No. 6; 5 with the tool 3; 7, with 4; and 6 with No. 6.
The bottle, B, is also ornamented with the same tools. It is hollow down the neck, and is intended to contain a tin or glass of water; in the stopper is glued a small camel’s-hair brush, which rests in the water, and is meant to be used for wetting postage-stamps, and fastening them upon letters. The bottom of the neck unscrews at fig. 1, and the part below it is hollowed out like a box, to hold the stamps. The neck is ornamented in steps. Set the cutter quite flat, facing the side of the work; use the tool No. 5; cut one line, move the brass wheel of the lathe just far enough to make the second cut join the first, and the same all round. In the next row make the first cut half-way between the others; thus, if you have begun at the numbers, 1, 6, 12, in the second row begin at 3, then go to 9, then to 15, and so on. Every row of steps begins half-way through the former ones, and for each row move the cutter on the slide rest the breadth of the tool. The convex moulding at the bottom of the neck is done by putting one of the hollow tools of the sliding rest into a handle, and rounding the ornament with it. The other patterns are all done with the same cutter, by placing the tools at different angles. In the same plate, 9, the two patterns F and G are very beautiful, they are worked with the eccentric cutter. F resembles the scales of fish lying one over another: put the most angular tool, No. 5, (of the cutter tools), into the cutter; describe a circle from the edge of the middle line to the outer one; cut one circle very deep, move ten numbers on the brass wheel of the lathe, and so on to the end.
The pattern, G, is worked exactly the same, only a less angular tool, No. 4, is used, and fewer numbers are counted: it resembles leaves, one lying over the other.
The stopper of the bottle, B, is also ornamented with this cutter, and with an angular tool. First turn the stopper quite circular, (the knob at the top must be glued in afterwards). Set the sliding rest at a convenient distance, and place under it one of the slide-rest tools, so as to raise it in an uneven manner; screw the rest firmly, and set the circle just large enough to encircle half the stopper. By this means the tool cuts the UNDER part of the circle, and passes over the other half: this pattern must be cut very deep, and about five numbers be counted between each cut on the brass wheel of the lathe.
D is another pattern for a stopper; it is worked with a round-ended drill. Cut the holes rather deep, and as near as you can to one another, only leaving a very little thin shell of ivory between them, and the pattern will resemble a honeycomb. The lighter case, E, is ornamented with the drill and vertical cutter. Turn the upper part very thin, then drill long lines quite through the ivory, leaving a space between each; this looks light and elegant, if lined with coloured paper. The base is cut in steps with the vertical cutter; count twenty for each cut; the second row, make each cut between the former ones, moving for each row the breadth of the tool. The top is cut out in leaves with the drill tool No. 8.
To sharpen all these tools, use the goneometer, taking care that you fix it exactly at the proper angle, by counting the position by the numbers. If you do not place the tool just at the right angle, it will cut the patterns quite crooked.