PRELIMINARY.
Reading edition
If the workman who finally finishes wood-work, had the selection of the materials out of which the work is formed; and wrought the work himself; the following suggestions would scarcely be required, for he would see to it that the material was free from shakes, cracks, worm holes, doze, sap and fractures; and he would so choose his material, that the full beauty of the grain would show, when the polish coat went on. He would also see, that the work was clean. That is, that no plane marks were visible, no rough spots, or cross-grains noticeable, and that all angles were sharp and definite, all mouldings smooth and not a nail head or screw top to be seen, nor any point that could suggest a nail head. As a rule, however, the workman who puts on the last finishing touches never makes the work, though he is always expected to cover and hide all the faults of bad workmanship, bad selection of timber, and a thousand other objectionable things in connection with work, over which he has had no control. In order to aid the finisher as much as possible, I give a few hints herewith, for the use of the workman whose duty it may be to prepare and put up the work to be finished. The suggestions given, are equally applicable for hard and soft woods and I trust they will not be out of place.
First, then see that the material is dry, free from imperfections, of the full sizes required, and of such variety of grain as may be suitable for the purpose intended. Next, make all joints close and as near perfect as possible as on this point rests, in a great measure, the artistic appearance of the work. Make all angles sharp and clean, and all mitered mouldings true and with perfect intersections. Never use glass-paper where a scraper can be applied, and when a large quantity of mouldings of similar contour and size are to be employed; it is always better to make a scraper their reverse shape, and use it in cleaning and preparing the mouldings for the varnisher, than to use glass-paper for the purpose.
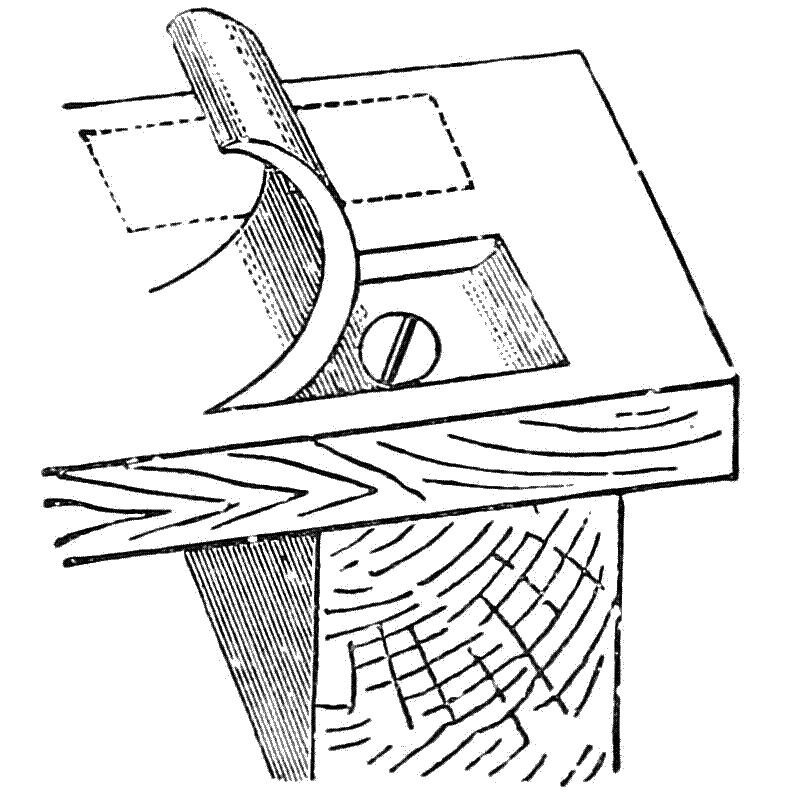
Fig. 1.
Wherever possible and suitable I would advise the use of glue in putting up finish, and I may here remark to the workman, that after a little practice in the use of glue and a little knowledge of its worth and capabilities, he will prefer it, to nails or screws where he can apply it; further on I will give a few hints and suggestions on the proper methods of using glue in house finishing. Of course, I am well aware that the use of nails and screws is a necessity in wood-finishing, but where the work is to be left natural color, or stained and polished, there should not be the slightest suspicion of a nail or screw head, and to meet this condition the skilled workman resorts to several expedients to hide the fastenings among which are the following. These methods, which are similar, are called “sliver-nailing,” or sometimes, “chip blind-nailing.” In the first method, shown at Fig. 1, the wood is raised with a firmer chisel and the screw or nail is then put in place and driven home. At Fig. 2, the “sliver” or chip, is raised with a gouge. In the first instance a sharp knife should be employed to draw lengthwise with the grain two deep cuts the width of the chisel, as this keeps the sides of the chip from splitting. The chisel should be set at a steep angle at first till the proper depth is reached, and then made to turn out a cut of even thickness until there is room to drive in a screw or nail. If too sharp a curve is given, the “sliver” is likely to break apart in being straightened out again. In Fig. 2, I show how the “sliver” is raised by using a gouge. To do this nicely a gouge about three-quarters of an inch across the face should be used and the curve should be quick. In this case no knife cut is needed, as the corners of the gouge will cut as it progresses.
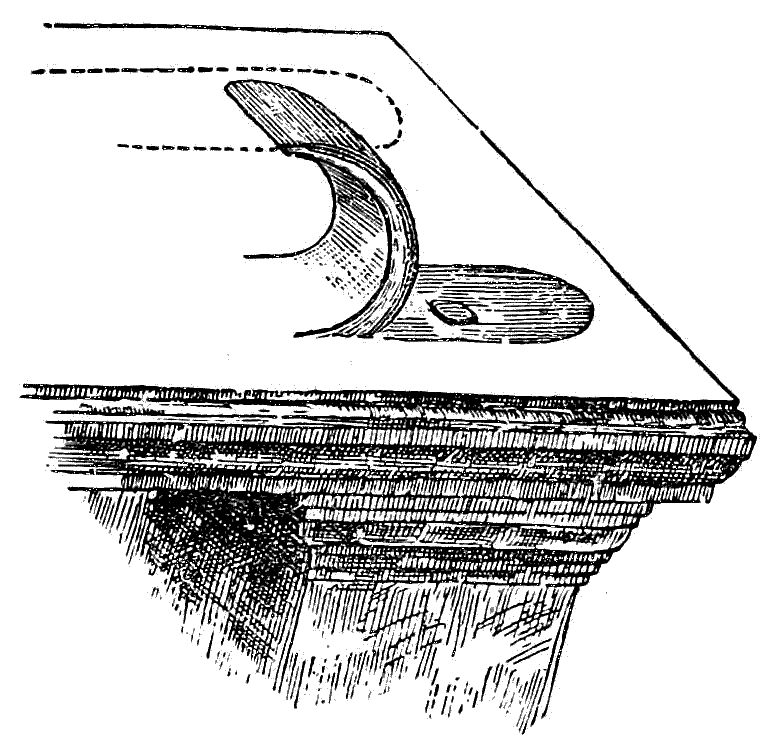
Fig. 2.
The cut being made and the “sliver” slightly raised as shown in both cuts, the screw or nail may be driven without disturbing either the “sliver” or the cut underneath. See that the head of either screw or nail be sunk beneath surface of recess, so that the “sliver” will fit back in its place without obstruction. Now take properly prepared glue and, after warming the “sliver” and recess with a warm cloth, cover the underside of “sliver” and the wood underneath, seeing that the glue is not too thick; press down the “sliver” in place, then rub with the face of a hammer until the glue holds; then leave until dry, when the whole may be dressed off and finished. Another way is to glue the “sliver” down and then take a flat piece of pine about an inch thick, and glue over the “sliver,” rubbing the pine block to and fro until the glue takes. The block is left on until dry and solid. The pine block may be split off, and the face of the wood dressed clean and finished. In hardwood finish for interior housework this latter plan of fastening up stuff is often resorted to.
When the work has been made secure by any or all the methods described, the next thing to be considered is the smoothing and final finishing, and these two processes as here defined, pertain to all sorts of wood, hard or soft, that is intended to be finished in the natural colors or stained. In order to obtain a fine and substantial finish the work must either be smoothed fine with a plane, scraped with a steel scraper, or rubbed down with the finest glass-paper. For very hard or irregular grained wood, such as is made into veneers or employed for the finer kinds of work, the cleaning-off process consists first in planing the surfaces with a toothed plane, having a serrated edge like a comb, this tool scratching away the high places and leveling the surface without pulling or splintering the wood, as a common knife will do unless very carefully adjusted and worked. After tooth-planing, the surfaces are scraped with a steel hand scraper until the scratches made by a tooth plane are removed, and the surface is then finished by rubbing with glass-paper of different finenesses.
Straight-grained hard woods can be cleaned off by planing with a common smoothing plane, and then scraping and rubbing them with glass-paper. Soft wood requires only careful planing and glass-papering, but if scraping is omitted great care must be taken in planing, or else the plane marks will show by reflection when the surface is polished, varnished or painted. I have known of cases where the finishers were wrongly accused of improper execution of the work because the finish, after being exposed to the changes of temperature occurring in a year, became impaired on account of the appearance of fine cracks running with the grain, differing from those caused by the improper application of varnish, which always runs across the grain. Among other reasons for this premature impairment, one is that the fine fibres become affected; sandpapering the wood lengthwise or with the grain will loosen these, but will not break them off. The application of the filler will force them down into the pores, the filler making them adhere perfectly tight for some time; but the changing of the temperature expands and contracts the wood, thus causing the fibres to loosen and work out, making their appearance in fine cracks and impairing the finish.
This fault most frequently occurs in open-grained wood especially when employed in the common class of cabinet-work which is transferred to the finishing-room directly upon leaving the machinery where it has been sandpapered lengthwise by a set of cylinders under heavy pressure, and should be guarded against with great care. “This sandpapering,” finishers will generally say, “is a matter for the cabinet-maker or the carpenter; daub it over and let it go.” It is immaterial to them how the finish holds out after leaving their hands; but I find it is well for a finisher to do his duty by at least insisting upon having the work lightly cross-sandpapered with paper with No. 1. or No. 1½ paper. This process will loosen the fibres at both ends; consequently, they will fall off, or, if they do not do so, they should be dusted off previous to filling.
There is one more source of injury which should be guarded against with great care, and that is finishing over wet timber; nor should steam, water or dampness in any form be allowed to come in contact with the smooth dry surface, as it will raise the grain, making redressing by the joiner a necessity.
In their natural state all woods are more or less porous consisting of bundles of hard fibres, with interstices filled with a softer substance. These constitute the grain, and as the hard or soft parts predominate, the wood is said to be hard, fine, or close-grained, or soft and open-grained. To fill these softer parts, or pores, and give to the whole an even, uniform surface, hard, and capable of a brilliant polish, is the object of the finishers’ art. This hard, firm surface was formerly gained by the successive application of several coats of varnish, at least three preliminary coats being required to fill the pores; the inequalities were then reduced by fine sand or glass-paper, and several additional coats laid on, the last, after becoming thoroughly hard being polished if desired. In this operation, however, a great quantity of varnish is absorbed by the open pores of the wood, and it is consequently so expensive that it is now seldom used. Recourse is therefore had to various plans to render the wood non-absorbent before applying varnishes, and certain compounds called fillers are largely used for this purpose. These I will endeavor to describe, and give the methods of application in the following section.
WOOD-FILLERS AND WOOD-FILLING.
In woods employed for house and cabinet work there are two distinct natures, therefore different treatment is required in finishing. First, there is the coarse or open-grained wood, having its surface perforated with innumerable pores or cells. In order to obtain a smooth and even finish, these pores should be filled up to a level with the hard grain, or, as the grainer would term them, the “lights” of the wood. Next we have the fine or close-grained wood, which, like the preceding, also contains these pores, but they are of a very fine character, and simply sealing them up with a liquid filler will enable one to produce a fine smooth finish, which we shall consider farther on.
I will now return to the open or wide-grained wood which requires more attention and care than the closer-grained wood, if same results are expected. There are many things that will serve the purpose of fillers and make pretty fair work; among these may be mentioned, china clay, silver white and corn starch; the best of which is probably the last named. This is well adapted to the work being equally useful with light, or when colored with dark wood; one fault with it, is that it never hardens. China clay—the English is the best—makes an exceedingly good filler; it is light in color, very fine and dries as hard as cement.
There are an hundred ways of preparing fillers for use, and nearly as many different materials for making them; I would recommend however, that wherever it is possible, that Wheeler’s patent quartz filler be used; though I am aware, that in many cases, it may not be advisable to use it, and to meet these rare conditions the following mixtures may be substituted.
A filler should be so mixed that the greater portion of the vehicle will penetrate into the wood, leaving the pigment on the surface to be rubbed into the pores and still retain enough combining property to form a hard and impenetrable surface. This depends entirely upon the proportions of the vehicles employed, and, as different pigments require different quantities of vehicle, I seldom mix filler by actual measurement unless it be in large amounts. I proceed with the mixing by filling my pot two-thirds full of the dry pigment, then add boiled linseed oil, producing the consistency of putty, then dilute with about one part japan and two parts turpentine. Should it be required to keep the wood as light as possible, replace the boiled oil with raw, using a smaller quantity, but a little more japan. For all light wood the light japan should be preferred, although there are many who never use anything but the common brown. Naphtha can also be employed in place of the turpentine, somewhat reducing the expense; but, as naphtha evaporates much faster, it prevents the operator from covering an extended surface without running the risk of having it dry hard. This causes difficulty at “rubbing it in” and wiping off the surplus, although “wiping off” should not proceed until the filler has flatted—or, at least, “set.” This to a certain extent the operator can accelerate or retard by omitting or adding a small quantity of oil, keeping in view the fact that the smaller the quantity of oil used, the lighter colored, but the less durable, will be the finish.
Oil is sometimes used as a filler, but its use is not recommended; applied directly to the wood, its effect is to swell the fibres, or “raise the grain,” which remains in that condition until the oil becomes entirely dry or disappears. During this time the fibres are gradually shrinking, and consequently moving or checking the varnish. The qualities essential to a good filler are that it shall readily enter the porous portion of the wood, and shall very soon harden and render the wood impervious to the varnish, which should lie smoothly upon the surface, giving brilliancy and effect to the natural beauty of the wood; and that it shall not raise the grain of the wood; and that it shall not change the color of the wood. These conditions are satisfactorily fulfilled by few of the home-made fillers ordinarily used in shops, and while I give a number of receipts, my readers are advised that they will obtain better satisfaction, at less cost by purchasing some of the patent fillers now coming into general use. In these fillers very little oil is used and a large amount of dryers, so that the wood becomes perfectly dry and hard in a few hours preventing any swelling or shrinking of the fibres of the wood after the varnish is applied. The following fillers should be allowed to dry until quite hard. A period of about eight hours is usually sufficient, but it is better to let the work stand for twenty-four hours before touching it with glass-paper. In applying a filler it should always be borne in mind that the substance of wood consists of a multitude of small tubes lying side by side. These tubes or cells are not continuous from top to bottom of the tree, but are comparatively short and taper out to points so that they are thickest in the middle. Most of the common woods have the walls of these tubes so thin that liquid is readily absorbed by them and carried into the substance for some distance. Different kinds of wood differ much in the shape and arrangement of these cells. In filling the pores the first step is taken in providing an absolutely smooth surface. We trust mainly to mechanical force in rubbing in, aided by the absorptive powers of the wood. Formerly successive varnishings and rubbings and scrapings took much time and when they were done, the final finish had still to be applied, but the whole process has now been simplified, by using fillers.
The careful workman will not leave “great daubs” of superfluous filler here and there on the work, but will see that all corners and heads and quirks of mouldings are well cleaned off before it gets too hard to remove easily, and should there be any nail holes—which there ought not to be—he will have them filled with properly colored putty or cement and nicely smoothed down before he makes any attempt to put on his finishing coats.
Among the many home-made fillers I have endeavored to select the best.
Walnut Filler.—For Medium and Cheap Work.—10 lbs. bolted English whiting, 3 lbs. dry burnt umber, 4 lbs. Vandyke brown, 3 lbs. calcined plaster, ½ lb. Venetian red, 1 gal. boiled linseed oil, ½ gal. spirits turpentine, 1 quart black japan. Mix well and apply with brush; rub well with excelsior or tow, clean off with rags.
Walnut Filler.—For Imitation Wax Finish.—5 lbs. bolted whiting, 1 lb. calcined plaster, 6 oz. calcined magnesia, 1 oz. dry burnt umber, 1 oz. French yellow, 1 quart raw linseed oil, 1 quart benzine spirits, ½ pint very thin white shellac. Mix well and apply with a brush. Rub well in and clean off with rags. Before using the above filling give the work one coat of white shellac. When dry, sandpaper down and apply the filler.
Walnut Filler.—For First-Class Work.—3 lbs. burnt umber, ground in oil, 1 lb. burnt sienna, ground in oil, 1 quart spirits of turpentine, 1 pint brown japan. Mix well and apply with a brush; sandpaper well; clean off with tow and rags. This gives a beautiful chocolate color to the wood.
Filler for Light Woods.—5 lbs. bolted English whiting, 3 lbs. calcined plaster, 1 lb. corn starch, 3 oz. calcined magnesia, ½ gallon raw linseed oil, 1 quart spirits of turpentine, 1 quart brown japan, and sufficient French yellow to tinge the white. Mix well and apply with a brush, rub in with excelsior or tow, and clean off with rags.
Filler for Cherry.—5 lbs. bolted English whiting, 2 lbs. calcined plaster, 1½ oz. dry burnt sienna, 1 oz. Venetian red, 1 quart boiled linseed oil, 1 pint spirits of turpentine, 1 pint brown japan. Mix well, rub in with excelsior or tow and clean off with rags.
Filler for Oak.—5 lbs. bolted English whiting, 2 lbs. calcined plaster, 1 oz. dry burnt sienna, ½ oz. dry French yellow, 1 quart raw linseed oil, 1 pint benzine spirits, ½ pint white shellac. Mix well, apply with brush, rub in with excelsior or tow, and clean off with rags.
Filler for Rosewood.—6 lbs. bolted English whiting, 2 lbs. calcined plaster, 1 lb. rose pink, 2 oz. Venetian red, ½ lb. Vandyke brown, ½ lb. brandon red, 1 gallon boiled linseed oil, ½ gallon spirits of turpentine, 1 quart black japan. Mix well, apply with brush, rub in with excelsior or tow, and clean off with rags.
Another.—Stir boiled oil and corn starch into a very thick paste; add a little japan, and reduce with turpentine, but add no color for light ash. For dark ash and chestnut use a little raw sienna; for walnut, burnt umber, add a small quantity of Venetian red; for bay wood, burnt sienna. In no case use more color than is required to overcome the white appearance of the starch, unless it is wished to stain the wood. The filler is worked with brush and rags in the usual manner. Let it dry forty-eight hours, or until it is in condition to rub down with No. 0 sandpaper without much gumming up, and if an extra fine finish is desired, fill again with the same materials, using less oil, but more of japan and turpentine.
Another.—Take three papers corn starch, one quart boiled linseed oil, two quarts turpentine, one-quarter pint japan; cut in half the turpentine before mixing; it will not cut perfectly otherwise. For dark woods add burnt umber to color. When nearly dry rub off with cloths. The above mixture must be used fresh, as it is of no value after it is four or five days old. The cloths used in rubbing as above mentioned should be destroyed immediately after use, as spontaneous combustion is likely to ensue from the ingredients employed.
Preparation of Wood for Staining.—As a filler of wood to be stained, apply French plaster of Paris, mixed as a creamy paste with water, and after rubbing in, clean any surplus off; or use whiting finely powdered, or white lead slacked with painters’ drying oil, and used as a filler. Another process is that of oiling then rubbing crosswise to the grain with a sponge dipped in thin polish composed of melted beeswax, resin, and shellac, and smoothing the surface, when dry, with pumice-stone, or fine glass-paper. Embody the work a second time with thicker polish, or a mixture of polish and varnish. The rubbers will work easily with half the quantity of oil which is ordinarily used. This second body should be rubbed very smooth with moist putty.
In the use of any filler, care must be taken in the selection of color, for the employment of a light colored filler on dark wood or vice versa would result in gross defacement, as the lighter color would show at the pores of the wood in the one case, and the darker in the other. Therefore, to avoid this the filler should be as near as possible the color of the wood to be filled.
As a general thing, paint manufacturers who do not make fillers a specialty use opaque colors to stain their filler, as it requires a less quantity. This will do sometimes, but not always. But those which give to the wood a clear and bright appearance, and therefore produce the best results, are stained with transparent colors; those chiefly employed are burnt umber and sienna, Venetian red, Vandyke brown and charcoal black, the charcoal being ground fine in oil, while the others can be used dry and according to the following recipes with good results:
In mixing any or all dark fillers the same pigments used for the light (previously described) should be kept for a basis, with sufficient coloring to stain it to the desired depth of shade.
Filler for Walnut is very often stained with burnt umber; this is reddish in hue and gives to the wood a pleasing effect. Others use Venetian red darkened somewhat with lamp black; this is rather opaque, and tends to deaden the color of the wood. There is another article—namely, Vandyke brown—which gives fair results. In order to obtain a rich effect, the filler should be made considerably darker than the wood when new.
Fillers for mahogany, cherry, California redwood, and other woods of similar shade, should be stained with burnt sienna, as they should be finished very clear. It is well to know that charcoal black, and Venetian red will give the desired shade for any dark-colored wood in common use or for all colors in antique, but it does not show up quite as clear as some other combinations.
For rosewood, charcoal as a stain will suffice, and for vanilla or Brazil-wood the use of rose-pink will give good results.
The methods of mixing these fillers are quite numerous. It is impossible to give the proportions definitely, owing to the strength of the colors or the transparency of the chief ingredient, but one cannot go astray by following the preceding rules.
Mix the light pigment to a paste with boiled oil, which must be well stirred up. Then in another pot mix a quantity of the colored pigment with turpentine or naphtha; and when thoroughly “cut,” or dissolved, add sufficient of it to the light to give the shade required. After this is obtained, dilute with turpentine or naphtha and japan, as directed in mixing light filler. This applies to all colors except black, which is seldom obtained finely ground unless in oil, and properly thinned down.
There are many finishers and firms who exclusively use manufactured fillers, and in consequence meet with many difficulties as to the shade they require, as different manufacturers use different colors to stain their filler. But this difficulty can be overcome by a few experiments with the above-named stains.
As the foregoing gives pretty nearly all the fillers in general use with the exception of some of the manufactured mineral preparations of which I will have more to say further on, I will now proceed to describe the method of application, and for the greater portion of this description, and other matters in this work, I am indebted to Mr. R. A. A. Bahre’s papers on the subject contributed to House-Painting and Decorating, a monthly magazine published in the city of New York.
The secret of this is to do the work well, quickly and economically. These points are dealt with in the following:
Have your filler mixed to the consistency of ordinary lead paint; then apply to the prepared surface of the wood with a pound brush, or, what is still better, a 3-0 or 4-0 oval chisel varnish brush. In applying the filler it is not necessary to cover all the small beads and carvings; and if the filler be light better avoid coating them at all, and if dark or antique stain them with a little of the filler, much reduced with spirits of turpentine. For this purpose have at hand a small pot with a small fitch or sash tool.
By not filling the beads and carvings, the varnish is not so liable to run down in them, although sufficient remains to produce a finish equal to the balance of the surface.
After enough surface has been covered with the filler, so that what has been first applied begins to flatten, the process of wiping should immediately begin, using for that purpose either a rag or a handful of waste or Excelsior. If the wood is very open-grained, waste is preferable. With a piece of this that has previously been used and is pretty well supplied with filler, rub crosswise of the grain, rather rubbing it into the grain than wiping it off. After the whole surface has been gone over in this way, take a clean piece of waste or rag (never use Excelsior for wiping clean) and wipe the surface perfectly clean and free from filler, using a wooden pick the point of which has been covered with a rag or waste to clean out the corners, beads, etc. It is well to give these picks some attention, as a person once accustomed to certain tools can accomplish more and better work than with tools that feel strange in his hands; therefore, each finisher should furnish his own pick. As to their construction, these are best made from second-growth hickory, which can be procured at any carriage repair shop, such as old spokes, broken felloes, etc. They are made eight inches in length, half inch oval at one end and tapering down to the point at the other. Sharpen the oval end like a cold chisel, then smooth with sandpaper, which should also be used to sharpen the tool when the same becomes worn dull.
This picking out of the filler from beads, etc., can be accelerated by the use of a picking brush manufactured especially for that purpose, but it is not advisable to use this on very coarsely grained wood, as it scrubs the filler out of the pores.
There are several fillers used which do not require this picking and scrubbing. One is a liquid filler used chiefly for carriage finishing; but it can be used successfully on butternut, bird’s-eye maple, curly maple, satinwood, hickory, etc. It is made from gum and oil. Another is a filler made from finely-ground pumice stone, mixed as other fillers. It is applied with a brush, and must be left to dry at least twenty-four hours; it is then sandpapered smooth, when an oil varnish is applied, rendering it completely transparent. This last can be used only upon light wood.
The workman, as a matter of course, will understand that different woods, require slightly different treatment, and the finer-grained woods, among which are the pines, maples, cedars and poplars, of different varieties, and birch, cherry, beech, sycamore, white box, satinwood, etc., require no filling, not that a filling would prove detrimental to the finish—except upon stained work or white holly, which in order to maintain a clear color should never be filled—but, from the condition of all fine wood, it is superfluous, and only causes unnecessary labor and expense. At this point it will be convenient to pause to consider the subject of mineral or prepared wood-fillers.
I think I have prepared the mind of the reader to receive the fact, that of all the several manufactured preparations in the market I think that Wheeler’s patent filler made by the Bridgeport Wood-Finishing Company, is decidedly the best and the most economical to use, for many reasons, the chief one being its certainty of action. A great deal of time and money have been wasted in attempting to make good fillers, to no purpose, and a great variety, as I have shown—of substances as chalk, plaster of Paris, corn starch, etc., etc., have been mixed with various vehicles and rubbed into the wood with but indifferent success. Most of these compounds labor under the disadvantages of forming chemical compounds with the oil and consequently they shrink very much on drying, so that though the surface may appear smooth when they are first put on, waves and hollows make their appearance as they dry. These waves having round edges, are difficult to fill, the second coat building up as much or more upon the level spaces as in the hollows. It sometimes seems almost impossible with these fillers in the latter coats to make the hollows hold any substance, the filler clinging chiefly to the surfaces.
I have thought it necessary to show how the ordinary or home-made fillers act, and fail in order to show by contrast how much easier it is to work efficiently with the mineral fillers. The mineral quartz, when mixed with oil, probably shrinks less in drying than any other similar known mixture. If a surface of wood be covered with this and then rubbed, the sharp and angular particles of the silica imbed themselves in the pores of the wood, closing them up, while the oil cements them fast. This is the foundation of Wheeler’s wood-filler, and which we recommend for use by all wood finishers. When the pores have been filled with the silica, and are cemented fast by the proper mixture of gums and oils, the difficult part of the work is done.
After a good surface has been made upon the article it is ready for the filler, which is to be selected according to the color desired. In putting the filler on it is thinned with turpentine until about like flowing varnish, and is applied with a brush. Only so much of the surface is covered as can be cleaned off before it hardens. When it has set so that the gloss has left the surface, it is at once rubbed off with “excelsior” or shavings, going across the grain with the strokes. If the filler dries too fast or too light a little raw linseed oil may be used in it.
For a nicer job the filler is rubbed in with a rubber, made by gluing a piece of sole or belt leather on the face of a block of wood and trimming the edges flush with the block. The rubbing is done after the filler has set and before it is cleaned off. If it dries off too light, a little white japan may be added on nice work. The light colored filler should be used on all work where light and dark woods are used together. The filling, it must be understood, is done by the silica, which will often be found in the shape of a sediment in the bottom of the mixture. Eight hours is generally considered a sufficient time for the filler to dry.
When the work with the filler is done the surface of the wood ought to be like so much ground glass. Such portions of the wood as show a solid grain need very little filler. On Georgia pine, after the filler is dry, a little rubbing in the direction of the grain with very fine sandpaper is an advantage. If the filler has been properly used the desired results will be obtained with little labor.
The wood is now in a condition to receive the final coatings. Whether the work is to be polished or “dead finished,” do not employ shellac or “French polish.” If a “dead” surface is wanted, wax finish is easily put on, and as easily rubbed to a good surface. F. W. Devoe & Co. prepare a wax finish, which is a convenient preparation of wax and gums, and can be applied with a brush and then rubbed down with a woolen cloth, tied up to make a hard rubber, until a fine lusterless surface is obtained. With mahogany and similar woods this greatly improves the color of the wood. When this has dried, which will be in the course of a few hours, the work is ready for use. The wax finish, like many of the furniture creams, has the advantage that it can be put on in a few minutes at any time to brighten up work when it has become dull. A piece of work prepared in this way, after four operations, will present as fine an appearance as the best cabinet work found in the furniture stores.
The materials which have been described, it will be noticed, are both manufactured articles. The prepared filler is indispensable; the wax finish can be made by the mixing together, by the aid of heat, white wax and spirits of turpentine until they are of the consistency of thick paste. Another wax finish is made of beeswax, spirits of turpentine and linseed oil in equal parts. The addition of two drams of Alkanet root to every twenty ounces of turpentine darkens and enriches the color. The root is to be put into a little bag and allowed to stand in the turpentine until it is sufficiently colored.
An altogether more durable surface can be made by a little change in the treatment. When the wood is filled instead of applying the wax, take some hard oil finish, a preparation manufactured by Messrs. Berry Bros., of Detroit, Mich., and put it on with a brush precisely like varnish. The coat should not be too heavy, especially on vertical surfaces, and the brush used ought to be a good one. This material gives a most brilliant polish. By rubbing it down with a woolen cloth and pumice-stone powder it can also be made dull. Hard oil finish does not spot with hot or cold water, is slightly elastic and is not injured by pretty severe soaking in water. It gets hard in twelve hours or less in warm weather and over night in winter time. It is one of the best surfaces which can be used, and has the advantage of working very well in the hands of one who is not an expert in the art of finishing wood or handling varnish. It will make a very fair surface applied direct to the unfilled wood, in which case it is a good substitute for shellac.
Wax finish has the advantage that scratches can be easily repaired without sending to the cabinet-maker or the painter. Here a word of advice to the carpenter who does any work of this character may save him some trouble and make way for the further use of the same kind of finish. When the wood-work of a house is treated in this way, be sure and leave a little bottle of the wax polish with the housekeeper, with directions as to the method of using it. In sending out a “what-not,” book-case, or any other article of similar kind, put up a little bottle of the polish and show the owner, or, preferably the lady of the house, how to repair any little scratch and make the work look “as good as new.” The fresh appearance of the work will be a good advertisement, while it will prevent complaints and dissatisfaction that often follow the use of work which, when injured, cannot be restored.
It may be said that either of the methods of finishing involves a great deal of labor. This is true; but the amount is not much greater than is needed for three coats of paint, and the cost of the paint would probably be more than the cost of the finish. The labor in one case can be of a cheap character, and in the other an experienced painter must be employed. The profit upon the “dead finish” can go into the pocket of the carpenter, while that of the painting must in any event be divided between the carpenter and painter, or belong to the latter altogether who is, after all the proper person to do the work.
I have now said about all that is necessary in the matter of “fillers” and “filling,” but, as sometimes happens, the old system of “sizing,” has to be resorted to for certain kinds of work, I give herewith a formula for its construction and use:
Size of different kinds is sometimes applied to the surface of wood to prevent absorption of the varnish. The kind of material used for the size is not important, the object being only to prevent absorption by a very thin coat of some substance not soluble in the varnish. For dark-colored wood, thin size, made by reducing ordinary glue with water, is generally used; but for lighter-colored surfaces a white size is used, which is prepared by boiling white kid or other leather or parchment-cuttings, in water for a few hours, or until it forms a thin jelly like substance, which is reduced with water to a thin consistency, and used in a tepid state. Sometimes solutions of isinglass or tragacanth are employed in like manner. Unlike the best fillers, sizes of any kind do not improve the finish, and are sometimes a positive detriment to it. They are used solely as an economy to reduce the quantity of the varnish needed; and their use is not recommended for the best work.
STAINING, FINISHING, VARNISHING AND POLISHING.
The following will apply to nearly all stained work with the exception that the coloring materials must be chosen to suit the results desired; directions for mixing and preparing will be found under the head of woods.
Staining, or dyeing, though not very modern, has grown in popularity of late. This is due not so much to the natural imitation of valuable wood as to the beautiful colors in which it may be produced—for example, the deep red, generally represented as mahogany, which forms a handsome and lively contrast with nearly any color or style of finishing. In house interiors, however, it has not been so extensively used as it has on furniture, owing to the preference for the light wood for house finishing. But, despite its handsome color, at the present time it is obliged to yield to the more artistic and substantial old oak, which, it is generally anticipated, will continue in vogue a greater length of time than did the stained work. An objection to stained work is that after it has been in service a comparatively short time the finish and stain wear off from those portions most exposed to severe usage. The appearance is thereby destroyed, and it cannot be restored by refinishing. Another objection to stains is that they fade, a fault to which all these bright colors are subject.
Whether this style of work is la mode or not, it will always remain in greater or less demand. A few details of staining will, therefore, be due. Now, if the object of staining is to imitate natural wood, it would be found desirable to procure specimens of the woods to be imitated. Excellent and most convenient specimens can be obtained at any scroll-saw supply house at a trifling expense. Commence by oiling and varnishing the specimen to bring out the color, or apply a darkener if an antique color is required. As a darkener for cherry, apply with a brush aqua-ammonia diluted with water according to the depth of color required. This is probably the best mixture for all red woods, as it develops the colors to their utmost intensity. Lime-water and lye (potash solution) are also frequently used, although lye should be used cautiously; for if applied too strong, it destroys the red color after developing it. Iron fillings or shavings boiled in vinegar produce a darkener for oak, and are frequently employed in producing the “darks” or shades in sixteenth century finish.
After darkening with a water solution the specimens should not be oiled, but after having thoroughly dried should receive a coat of shellac, and, when dry, a coat of varnish. Having the colors well brought out, they will be found of great utility in preparing a stain of accurate shade. Now, the secret in preparing a good stain is that it should be perfectly transparent, which may be produced in either oil or water colors. The latter, however, with a few exceptions, will be found to give the best results, for several reasons. In the first place, it penetrates deeper into the wood, thus producing a more substantial finish. Next, the wood employed is generally hard and fine, and by an application of water stain the grain is raised, whereby the “lights” or veins are more prominently brought out, imparting to the finish a more vivid appearance, which cannot be so effectually produced in oil colors. Still another advantage in water stain is the saving of time in its application; for when properly prepared, it can be used for dipping, which is the method practised in our cabinet shops for staining much furniture. It can also be applied with a brush, although good results by this method are accomplished only when skill and practice are exercised. In applying it a four or-five-inch flat bristle brush would be found the right size, enabling the operator to cover over any one part or section before the stain penetrates the wood. It will be found less difficult to apply oil stain uniformly with a brush, and it is, therefore, generally employed in staining softwood and especially the different species of pine, all of which absorb water stain in spots, giving it a daubed appearance.
The first thing to be considered is the receptacle or vessel in which the water or acid stains are to be prepared. This should be formed of a material which is unaffected by the corrosive action of acid. Porcelain-lined iron or glazed earthenware in the way of kettles or common stew crockery are commonly used. As the latter are often cracked by the heat required in boiling, it is safer and cheaper in the end to use porcelain-lined kettles.
I need not say that care and cleanliness are two very necessary qualities in the preparation and application of stains, for a good workman is always a careful and a clean workman.
In finishing “rubbing” may be considered one of the most essential qualities, since it gives to the varnish when laid upon the wood a degree of smoothness not otherwise attainable; for by the use of the brush alone minute furrows and ridges are left upon the plastic surface of the varnish, and although good varnish possesses in itself a high gloss, the gloss is not nearly so agreeable to the eye as the brilliant polish of which rubbing is the preliminary. The reduction of these ridges and furrows is accomplished by means of finely-powdered pumice-stone moistened with raw linseed oil, applied with a piece of haircloth or other coarse and fibrous material. For rubbing large flat surfaces the haircloth is sometimes folded over a block of convenient size, but this is not practicable for articles of small size or irregular shape. In rubbing, considerable force must be used, but the stroke must be steady, and as long as possible, and great care should be taken to rub the surface uniformly, as in case it is rubbed unevenly the varnish is liable to be worn away quite to the wood in some places, and the perfect smoothness that is the beauty of a good finish will thus be impossible. The edges especially are liable to be rubbed bare, and should be carefully treated. The crevices and hollows of carvings are rubbed by means of hard-pointed sticks of various convenient sizes. The rubbing should be continued until the entire surface appears perfectly smooth and free from marks of any kind. The surplus pumice-stone and oil should all be carefully removed from the surface by means of rags, and the work may then be cleaned up with a little sweet oil well rubbed in, and retouched with a cloth slightly dampened in alcohol, which serves to remove any remaining oil from the surface. If the article has veneered panels they are now ready for the final processes of “polishing,” or “flowing,” processes, whatever the kind of “finishing,” the workman should make it a point where possible, to have a suitable temperature. No good finishing can be done under 60°, and it is hard to get the temperature too high for this work. The wood should be warm and perfectly dry, and visitors, flies, dirt, dust and dampness should rigorously be excluded from the room while the work is in progress.
The word “shellacking” has become of late very common with finishers and is often applied to first coating or “sizing,” whether shellac be used or not. This, doubtless, arises from the fact of the general employment of shellac for first coating and up to the present time has proved the most suitable medium discovered for the purpose. 1 again quote from R. A. Bahre’s papers on this subject.
Before proceeding with the application of shellac, it will be necessary to investigate the condition of the surface of the wood, taking care that no successive application is made before the preceding one is perfectly dry.
The dry condition of water-stained work may easily be determined by the uniformly dead appearance it presents, especially in the corners and angles. A surface treated with oil stain, when dry, will impart no color to the finger if brought in contact, and is effected in twelve or fifteen hours according to the amount of japan used.
The condition of a filled surface cannot be so readily observed, for in wiping off the filler from the surface, the moisture is likewise wiped off, and the surface is dry to the touch. But let us examine the pores, which have become small receptacles filled to the brim with a fatty substance. We find that the bulk of the substance in these pores does not dry so fast as were it spread out in a thin layer upon an extended surface. When regard is not paid to this condition and the surface is prematurely coated, it will be but a matter of a short time before the effects will become manifest by the cracking of the varnish, caused by the varnish becoming dry before the filler. We shall have something more to say on this subject later.
The safest way to ascertain whether a filler has become perfectly dry is to drop, while filling, a few drops upon a board and let them remain until they become hard enough to resist the pressure of the finger nail. The length of time required will depend upon the amount of oil contained in the filler.
Upon acquiring this degree of hardness the filler in the work may be considered dry, and ready to receive the first coating. This coating, which should be employed on all first-class work, is an alcoholic solution of gum shellac.
Among the advantages of this solution are, first, that it dries very rapidly, thus preventing it penetrating and sinking into the pores. Besides levelling the surface, it forms a close impenetrable body for receiving the varnish. By reason of this property it is also used for sealing up the pores of fine grained wood by applying two coats. On account of its best solvent (alcohol), it is indispensable for developing, certain stains, especially the aniline and other water stains which do not contain lye or glue. Alcohol does not affect the stains nor the glue; for this reason an alkali stain should first receive a light coat of oil, while the glue stains require a strong glue size for their development.
The second advantage of shellac solution is its exceedingly hard drying qualities; as it dries in five or six hours sufficiently hard to sandpaper, and in eight or ten hours becomes so hard that the finger nail can make no impression upon it, the surface is then ready for the second coat. In addition to this, its quality of hardness makes it indispensable for the first coating of all resinous woods, especially the pines, of which it not only seals up the pores but prevents the exudation of the resin while it sandpapers as fine as satin.
In preparing shellac for general use, dissolve in a gallon of alcohol (ethylic alcohol, spirits of wine) four pounds of the orange or five pounds of the white shellac, using the white upon light wood if a clean or clear job is required, and the orange if the color is immaterial or is required to be darkened, as the cost of the orange gum is about forty per. cent. less. The clearness of the orange gum depends much upon its freshness, and it is therefore undesirable to prepare it until it is wanted for use, when the dissolving of the gum can be accelerated by warming and continually agitating the mixture. Wood spirit (methylic alcohol) also dissolves this gum and is frequently substituted for pure alcohol, its cost being about one-third; but on account of disagreeable odor and deleterious effect it is rejected for first-class work.
The application of shellac is to an experienced finisher the most agreeable and least difficult part of finishing; but to a beginner it is often most aggravating and discouraging, it being very difficult to prevent lapping or doubling up. Especially is this the case when the lac is darker than the wood, as, for instance, in shellacking pine shutters with orange shellac, when the attempt of the beginner usually results in a total botch. An experienced hand will produce a clear and even effect by proceeding in the following manner: Having in view the fact that the wood is very soft, he will dilute his lac somewhat with the spirits, to make it work free. Then, with a double-thick flat-chiselled bristle brush about two inches wide he will apply a very free coat to the closed slats, on the bar side, including the small ogee edge of the frame, taking care to daub none on the flat surface. Then, quickly turning to the other side and opening the slats, he will finish and lay off the sides, and, again closing the slats, proceed by coating them upon the plain (non-bar) sides, including the other edge of the frame. He will then return to the bar side, open, lay off and finish; then, running the brush up and down the bar, complete that portion of the work. It may be laid down as a rule that one section should be completed before another is started. When one portion is coated, proceed with the frame by coating the outside edges and then the centre rail, cutting the joints clean. Then begin at one end of the style and follow around until the starting-point is reached, being always careful to complete as you go on.
It is sometimes required to finish shutters in a hanging condition, but, on account of the speed required in applying the shellac, there is much danger of spattering the walls or windows. If, therefore, they are hung with loose joint butts, it will be found economical to remove them and finish them in a separate room.
We have thus far referred to the shellacking of pine shutters with orange shellac. If one has acquired proficiency in this point, all the remainder will come very easy to him, especially when using white shellac (transparent), which does not show the laps after varnishing. The whole secret of shellacking may be condensed in adherence to the following simple rules: First, to keep a wet edge to work to; second, always to work to a joint before stopping; and third, never to repeat with the brush after becoming partly set, thereby causing it to “double up.”
There are several substitutes for shellac, but the operator should remember they are only “substitutes,” and cannot compare with the “real thing” and only the man who takes his work at starvation prices, will use the “subs,” unless such be specified.
Oil shellac, which is used to a great extent, is generally supposed to be gum shellac dissolved in a volatile oil, and in quality virtually equal to alcohol shellac. This supposition is wrong however, for the gums employed are of an inferior sort, being chiefly taken from our pines and dissolved in turpentine or naphtha, and having a little linseed oil and chemical dryer thrown in. When dry it is very brittle, easily spoils and will not resist the action of water on the grain, and is utterly useless as a substantial finish. This so-called shellac, is applied in the same manner as varnish.
Glue size proves most effectual in holding out varnish, and while the work is new, it is not easily marred. In the course of two or three years, however, the glue decays, when the slightest bruise causes the varnish, size and all to give. For developing water-stains containing alkali it is quite effective.
“Hard oil finish” so-called, is simply an application of a quick-drying brittle varnish, that will polish with rubbing; for inside work it contains very little “oil” while that prepared for outside purposes, contains more “oil,” is more expensive, dries slower and is more durable.
It matters but little whether we employ shellac or a substitute, or even varnish for first coating. It should be allowed to dry and then receive a rubbing to take off all the grit or roughness which may have been caused by a little filler remaining on the surface or dust settled upon it before dry. Whatever it may be, it should be smoothed before applying a coat of varnish. For this purpose No. 0 sandpaper will be found the best adapted, but, as the ordinary sandpaper is very heavy, and therefore stiff, we are liable to cut through the edge in using it. Neither does it conform easily to mouldings and corners. It is therefore advisable to employ the thin paper especially prepared for the purpose; but if it cannot be obtained, the heavy should be split—that is, by detaching one or two layers of the back paper. This can be accomplished in the following manner: Hold one corner of the sheet between the thumb and forefinger; rub that corner briskly with a moistened finger of the other hand, and the layers will then become detached and can easily be separated by running the finger down the edge between the two layers. Then, holding the paper down upon a flat surface, the layers can be drawn asunder across the whole width of the sheet. By tearing the sheet once lengthwise and twice crosswise, we have pieces of a convenient size for use. As new paper scratches more or less, it will be advisable to rub the grit off upon another piece; then by moistening the back we are able conveniently to get into the corners without scouring the edges through. Should the sandpaper still scratch (which it frequently does when inferior stock is used for coating), haircloth will do instead, using the hair side on the surface. This can be obtained at any furniture repair shop.
A very important part of hardwood finishing is the varnishing. Simple as it looks, it is extremely difficult to properly lay on a coat of varnish, and experienced varnishers will tell us that this is so. Scarcely two varnishers work alike, and it takes time and patient experience with any particular varnish to learn its peculiarities. We cannot teach how the varnishing should be done, but we can give a few general directions that may prove helpful. In the first place, do not be afraid of your varnish; do not get excited if it threatens to give trouble. I have seen a carriage-painter tremble so when applying a strange varnish that he appeared as though in an ague-fit, and it is needless to say that it was a bad job. Apply the varnish quickly and freely, and do not work it much; the less varnish is worked after being applied, the higher will be the lustre. Remember this, for it is true and very important to know. Flow it on freely with a flat brush of suitable width, and use a badger or fitch hair brush; a fine elastic or half-elastic chiselled bristle brush is very good. I mention the badger and the fitch more because they will outwear any bristle varnish brush and of course are cheaper.
A pound or any other bristle brush will answer for varnishing grained or painted work, on which the varnish is generally scrubbed, but in varnishing natural wood it should be laid on so as to level the surface, for which purpose fine-haired brushes are necessary.
Having the surface of the wood filled and shellacked, we have a ground-work suitable for any class of work from piano polish to cheap one-coat work. In selecting the varnish for the latter—which is generally left in the gloss—use a “finishing” varnish; that is, a varnish retaining a bright gloss when dry. However, the varnishes with the brightest gloss are generally not very durable. When successive coats are to be applied either in oil—finishing—i. e., oil rubbing—or polishing, a varnish is required that dries hard, but not brittle, the latter especially being characteristic of cheap gum varnish, such as colophony—common pitch or rosin—poor copal, etc. If the varnish contains much oil, it will render it elastic, making it difficult to rub; and therefore a good rubbing varnish should be made either of amber or of copal, the former being especially adapted to the manufacture of polishing varnish, as the gum is susceptible of a very fine polish. Varnishes to suit almost any purpose are generally obtainable at the dealers. We never can expect good results if we put a hard varnish over an elastic one or apply a coat before the previous one is dry. These are the main causes for varnishing cracking. The same trouble also arises when varnish is applied too heavily, so that the coat forms an enamel on the surface, remaining soft underneath, and then drying very slowly. While drying, the surface enamel contracts, consequently drawing the cracks open quite wide.
It is impossible to lay down rules which by simply being read would make a practical varnisher of a person, as varnishing requires much judgment and practice, but a few “tips” may not go amiss; at any rate, they assist in completing the subject.
We will now enter a room that has been sandpapered as described previously, having a temperature of about seventy degrees. We sprinkle with water, not flooding the floor, as a very damp atmosphere would prove injurious to the gloss of the varnish, then with a painter’s duster carefully dust off all the work. This generally ends the preparation, but in order to remove all the dust it requires wiping off with a damp chamois skin; and when all is clean and dry, we are ready for the varnish. For a bucket or pot use one of the clean tin pails known as “two-quart-lunch pails.” Then, to prevent the varnish from running down the outside by scraping the brush over the edge, a bar should be soldered across the pail about ½ inch from the top and a little on one side from the centre. Manufacturers claim that varnish should be used just as it is sold, and we find that nearly all good quality of varnishes work freely without diluting, but how to obtain good results with some of their cheap stuff without diluting remains a mystery to finishers. If, therefore, the varnish is of a poor, thick quality, add turpentine until it spreads freely with your “fitch brush,” which, if the work is very complicated, should be two inches in width; and if the work be plain, a three-inch could be used to advantage. Varnish should be applied freely—or, rather, flowed on, and not rubbed out, or “skinned” on, as finishers term it. In applying the varnish, first run freely over a panel, then run over it crosswise. If there are projections rising with an angle, or any grooves or depressions, as in mouldings, they will retain more varnish than the flat surface, and to prevent running down in them it requires drawing out. This is done by stabbing the brush into the angles and at the same time drawing it out toward the flat surface; and when this is done, the whole length of the angle, we finish by laying off up and down. This should complete this portion of the work without being obliged to touch it again, and thus proceeding until a section of panels have been finished, when the frame should be gone over. In coating the panels the surface of the frame is very often daubed—in fact this is nearly inevitable—and to coat over this would form fat edges; so we shall again make it fluid by mixing it with the fresh varnish, and this is done by “pounding” it up well—or, as a painter would call it, “stabbing” it—when it can be evenly laid off. The amount a surface will hold without running can be ascertained only by experience and judgment; although much depends upon the way it is laid off, as a greater quantity can be applied if laid off up and down than horizontally, as the brushmarks give occasion for the varnish to “sag.” But if such should take place after the varnish is partly set, it could be stopped by stabbing with the brush rubbed out dry, although this will leave the surface pitted, but, at any rate, much easier to rub out than a run. The brushes, when not in use, should be kept in varnish or washed out clean, which can be done by rubbing them out well with kerosene and then washing them with soap and water until perfectly clean.
Should it be desired after applying one coat of varnish, to proceed with the oil finish, that is “oil rubbing or polishing,” we should first take into consideration the condition of our surface. Providing that one coat has filled the little depressions of the grain to a perfect level, we are prepared to proceed with the rubbing; but this levelling is seldom effected with one coat, requiring, as a rule, at least two coats for fine wood and three or four coats for coarse-grained woods. The main object, however, is to form a coating sufficiently heavy to prevent rubbing it entirely off from the elevations in getting it down to that in the depressions.
As to the best method of rubbing and polishing as much or more diversity of opinion exists than in any other branch of the trade. This is probably due to the scheming and experimenting of the so-called “rushers,” who get nervous at seeing a man take sufficient time to rub down a surface, and thus devise some new plan for hustling out the work, and generally, when the gloss is removed, the job is completed regardless of appearance. But nevertheless in all of these snide finishes there is generally a point or two of importance for us. We have for instance, a dead finish produced by adding wax to varnish. This is made by scraping the wax fine, putting it into a dish and covering it with a good turpentine japan placed over a fire to dissolve, but with a moderate heat. When dissolved, add twice its amount of varnish and apply with a fitch flowing brush. Although this does not produce a rubbed finish, it produces quite a clever imitation, and we can use it to advantage on the slats of shutters and on elaborately carved capitals, etc. It is not infrequently employed in floor finishing.
There is a method practised which removes the gloss from the varnish by rubbing with a mixture of oil and pumice-stone applied with a furniture scrub brush, or, for a large flat surface, a commercial stencil brush—No. 12 or 14 is frequently used—dipping the brush into the mixture and scrubbing it on to the surface; three or four scrubs are generally sufficient, depending particularly upon the cleaning off with wadding completely to remove the gloss. Unless the varnish has been very cleanly applied and is perfectly level, it does not amount to much, for it does not smooth the surface.
Others, again, first sandpaper the surface with fine sandpaper, then rub it a trifle with oil and pumice, using a piece of burlap or old felt boot for a rubber. The only way yet discovered by which to level the surface is to rub it down with felt. For this operation we provide ourselves with a set of rubbers which may be made as follows: First take a piece of white Spanish felt one inch thick and about 3x5 in size; split it in two, and keep one half for the large plain surfaces. Then again split the other half, obtaining two thin pieces, reserving one for mouldings, etc., to which it will easily conform. We now want some tools to get into small corners so we whittle sticks about six or eight inches long and in shape of a triangle, half round and oblong; then, cutting the ends square, glue a piece of thin felt upon it, allowing the glue to dry thoroughly before putting in oil. For getting around in the bottom of carvings, we whittle a stick of basswood bark, and, moistening it, stub the end to a pulp. A scrub brush will also be necessary to remove the gloss from the beads and around the edges of the panels, etc. The oil generally used for rubbing is golden oil, known as machine oil, although crude petroleum, raw linseed and cotton seed oils are often used, but none of the latter cut so rapidly or clean off so well as the golden.
Pumice-stone No. 0 is generally used, although some prefer No. 00 or 000, but these are quite fine, and therefore do not cut very fast. In applying the oil and pumice, some prefer dipping the rubber first into the oil, then into the powder, and thus convey it to the surface, while others apply the oil with a piece of wadding, then sprinkle on the powder.
To excel in rubbing, like all other branches of the trade, requires practice, always remembering that if the rubber is allowed to lag over the edge while drawing back and forward it will rub the edge through. And, furthermore, the work should always be rubbed lengthwise the grain, so if it be necessary at the ends of panels next to the rails, where it is generally inclined to be rough, to rub crosswise, it should be rubbed down crosswise, but finished lengthwise, to take away the scratchy appearance. Before attempting to rub, the varnish should resist the impression of the finger nail, or when rubbed before dry it will again flow, causing bright spots to reappear, generally known as “sweating,” and would require re-rubbing after becoming dry. An experienced hand could easily tell when his surface was sufficiently rubbed by raising the felt or edge and drawing a clean streak the length of the work, and if the surface has lost its pitted appearance the rubbing is complete and ready to be cleaned off. This is accomplished easier if done directly, not allowing the oil to soak and soften the varnish, which causes the surface to appear mottled and smeary.
In cleaning use fine softwood sawdust, moistened a trifle to prevent scratching; and when the bulk of the oil is removed, the corners picked out and the work dusted it is again wiped off with wadding or waste, splitting the sheets of wadding to get the soft inside, then with the point of a pick and the wadding the beads and corners are carefully freed from all particles of oil and pumice. Should there be sags and runs or wrinkles which the ordinary rubbing did not remove, they should be rubbed out with pumice and strong soapsuds, then rubbed over a little with the oil again.
It is often required, in finishing a job, to form a contrast by polishing the raise of the panels, thus producing a rich and elegant finish.
In polishing as well as rubbing the hustlers have their schemes. One scheme commonly practised is, after the ordinary oil rubbing, to rub the surface to be polished with a bunch of raw cotton moistened with about equal parts of sweet oil and alcohol, the oil and spirits being put into a bottle and well shaken before moistening the cotton. Although this may be a hustler’s scheme, an experienced hand with it can produce elegant results. In hand polishing proceed somewhat differently. First complete the oil rubbing, omitting the parts to be polished, then proceed by rubbing those parts with pumice and water, using pumice for that purpose, levelling the surface as much as the coating will permit, then cleaning off with damp chamois frequently rinsed in clean water. We then apply a coat of polishing varnish, which, when dry, is again rubbed down with pumice flour and water, using a fine but soft piece of felt; and when perfectly smooth, it is carefully cleaned off, so that none of the pumice remains upon the surface, as this will scratch and destroy the polish. It is then rubbed again with rotten-stone and a piece of chamois leather, using the lump of rotten-stone and changing the rubber by rubbing it over the lump three or four times, then rubbing the surface quite briskly, for in this rubbing is where the polishing really is done. This powder then is allowed to dry upon the surface, and then with a short circular motion with the ball of the hand we proceed to rub off the powder, frequently wiping the hand upon a rag free from all other dust or pumice-stone. Then, if the varnish was of a superior quality, the polish is complete; but should the varnish contain cheap gum or a too great amount of oil, it is nearly impossible to produce a bright polish, although in this case the method first mentioned would prove quite effective—viz., that of using an old silk handkerchief to rub with in place of the cotton.
In the finest sort of general work, get a good quality of carriage varnish, and be sure and, do not mix either oil or turpentine with it, as it is prepared and put up for immediate use and specially prepared to meet special needs. Two coats of varnish are usually sufficient when the filling has been complete. When the first coat is dry, rub it down with pulverized pumice-stone and water—in some cases simply with curled hair, which removes the gloss and makes a good finishing-coat possible. The rubbing accomplished, wash and dust off well; then apply the finishing-coat of varnish. If a “polished” surface be required, the last coat must be rubbed down as before with pumice-stone and brought to a mirror-like surface with rotten-stone and water. Clear up with a little sweet oil, and afterward with a cloth dampened with alcohol. A “dead finish” is produced by rubbing the varnished surface with powdered pumice-stone and raw linseed oil, which gives a semi-lustrous finish of great beauty and durability. Another method of polishing hardwood is described as follows: Take a long piece of list or coarse flannel and roll it up in a wad like a roll of rope, and over this wrap a soft piece of linen several times doubled up; sew it on tightly and form a sort of handle by tying up a round wad. Then put into a saucer some shellac varnish, into which dip the flat side of the wad until it becomes saturated. Pouring a few drops of boiled linseed oil on the face of the wad, rub the work briskly and lightly in a circular direction, doing a small space at a time until the whole surface is gone over. Repeat the operation, allowing each successive application to dry well, or rubbing dry and not putting on too much polishing-liquid at a time.
Observe cleanliness and care during these operations. Such parts as cannot well be reached with the wad polish with a bit of flannel. This will give a very durable polish, and the parts are readily brightened up at any time by means of flannel moistened with oil. Remember that in all these operations the utmost care and patience must be exercised if one would have a perfect job. Do not slight the work in the minutest particular. Take your time and do everything as it should be done, filling in well, rubbing down smoothly and dusting off carefully.
A term sometimes used by American workmen is somewhat misleading; I refer to the word “flowing,” as applied to varnishing. The term is given to the process of giving the work, after it has been properly prepared, a coat of varnish made expressly for that purpose, called “flowing varnish.” The process as so named, as given herewith is quoted from an English authority:
Veneered panels are usually finished that way. Some finishers, when the body-work is to be dead finish with flowed panels, coat the panels with the same varnish—shellac or other—used for the body, and rub them with pumice-stone and oil; in fact, up to the point of flowing make no difference whatever in the treatment of the body-work and the panels. Such treatment is not recommended; whatever varnish is used for the body-work, the panels should be coated with two or three coats of the best rubbing varnish; oil should not be used for rubbing, as, if the surface is at all greasy, the subsequent coat of flowing varnish cannot be evenly laid, therefore water should be used with the pumice-stone for rubbing, in place of oil. After the rubbing is completed, wash off with a sponge, and dry with a chamois skin. Let it stand for a day, and after freeing the work from all pumice-stone and dust, taking it to the flowing-room, which should be clean, dry, and free from all draughts of air, apply the varnish with a flat brush of suitable width, made of badger or fitch hair; lay the varnish on smoothly and evenly, leaving no marks of the brush. The quicker the varnish is put on, and the less it is worked, the better it will look. Let it stand in the room until it is hard enough to handle. Upholstered work should not be flowed until it comes from the hands of the upholsterer and is ready for the ware-rooms.
Varnish polishing is used when it is desired to give to the work a bright lustre, differing from the natural gloss, and resulting from a perfectly smooth surface produced by rubbing. The previously applied coats of rubbing varnish having been rubbed down with pumice-stone and water, one or more coats of polishing varnish are applied, rubbed down as before, and brought to a bright mirror-like surface with rotten-stone and water. Clean up with a little sweet oil, and afterward with a cloth damped in alcohol.
There are many makes of varnish in the market at the present writing, that are especially adapted for natural wood finish and which may be obtained from any respectable dealer. The most reliable manufacturers of varnish in the United States, whose preparations may be depended on to a dead certainty, do not number more than a half a dozen firms among which may be named Devoe & Co., of New York City, Murphy & Co., of New York, and Berry Bros., of Detroit, Mich. The Murphy Company make a transparent varnish that is extensively used in the trade. It is used for either a high polish or dead surface. It is recommended especially for developing the grain of natural wood; for durability in all temperatures, freedom from discoloration from soap, water or acids, a perfect adherence to the surfaces, preventing cracking, flaking or blistering, while acting as a good preservative of the wood or metal, preventing either decay or rust.
It is made in different qualities, adapted to interior finishing on walls, floors or ceilings in halls, bath-rooms or kitchens for dwellings, asylums and hospitals, and also for exterior work, such as front doors, vestibules, window castings, and protecting the wood from weather exposure.
The Berry Bros. of Detroit, also make a white varnish that possesses all the requisites of a first-class finishing material. The preparations of Devoe & Co. are so well known and so universally used, that only a bare reference to them is necessary. Doubtless there are other makes of varnish that answer equally well with those named.
I think I have now placed before the reader pretty nearly all that is worth saying on the subject of hardwood and natural wood finish, and have drawn largely from the best authorities extant; but it would not be wise to close this section, without giving as briefly as possible, a few rules on the now almost obsolete process of French polishing, as occasionally this method of finishing is employed for certain purposes:
French polishing is a method of varnishing by rubbing the varnish upon the surface of the wood instead of applying it with brushes. When varnish is applied simply with a brush, a comparatively uneven surface results, rendering necessary the subsequent process of rubbing and polishing, but by the method of French polishing, a smooth and continuous, surface hard and not easily scratched, is secured.
All the polishes are applied very much in the same way, and a general description will therefore be sufficient. To obtain a good polish with lac varnish on wood, the quantity applied must be very small, and must be rubbed continuously until dry. If the work be porous or cross-grained, it will be necessary to give it a coat of thin clear size previous to commencing with the polish; when dry, the surface must be smoothed with fine glass or sandpaper. The size fills up the pores and saves the polish, and also saves considerable time in the operation.
Make a wad of cotton-batting, covered with several folds of very new fine soft linen cloth; put the wad or cushion to the mouth of the bottle containing the preparation (or polish) and shake it sufficiently to damp the cloth; then proceed to lightly rub the work with circular motion; as the rubber becomes drier, the pressure may be increased, but care should be taken not to press too heavily when the rubber contains much polish, as a streakiness will result. The circular motion should be continued until the rubber becomes quite dry, when more polish may be taken upon it and the rubbing renewed. It should be borne in mind that the rubber should never be raised directly from the work, but should be raised with a sweeping motion; also that it should never for a moment remain quiet upon the surface; and that its motion should be as even as possible; neglect of these precautions will produce a rough surface wherever the rubber remains quiet or is improperly removed. The circular rubbing must be continued until the surface appears perfectly smooth and the pores are no longer visible. Be very particular to keep the cloth covering of the wad clean and soft; it is desirable to use a clean portion each time it is dipped in the polish. It is quite likely that in about twelve hours after the above operation the surface of the work will be lustreless, and the grain plainly visible, in that case proceed over the work again until the grain is thoroughly filled. French polishing is a process requiring particular care and skill, and considerable experience is necessary to produce good results.
Beginners will find that they will be more successful with a flannel rubber, made in the shape of a ball. Most polishers use wadding, which is more pliable and better to get in the internal angles or small mouldings. A bottle with a slit cork is the best to apply the polish to the rubber. In commencing, the rubber should not be rubbed quite dry, as you will never get any body on the work by so doing; but, as the shiny appearance advances, you must rub each rubber dry. Every time the rubber is wetted with polish it should be pressed in the palm of the left hand, which will equalize the polish. After the cover is put over, which should be some clean old cotton or print rags, the top of the finger should be dipped in linseed oil and applied to rubber-cover—just enough to keep it from sticking. As soon as the cover has a shiny appearance, it should be removed to a fresh place. As soon as the work has got a good body of polish on, it should be set away for at least ten hours, to allow for the polish to sink, which always takes place.
Before commencing to polish again, the work should be very carefully rubbed over with the finest glass-paper obtainable, taking care not to cut through the skin; then proceed as before. Be sure never to let the rubber stop in one place for an instant, as it will surely take off the polish to the bare wood and spoil the job. After the work has sufficient polish on, it should be allowed to stand three or four hours before spiriting off.
The same rubber will do; only use spirits. Just damp the rubber, and cover three or four times double with cover, and rub very lightly over the work; but care must be taken not to make the rubber too wet, or the work will be spoilt. The same process will answer for pine or deal, only no filling is required, but a coat of clean patent size, before applying the polish.
The ingredients for the above kind of work are quite numerous, but shellac, dissolved in alcohol, is the basis of all French polishes, and some finishers use thin shellac varnish without other admixture, slightly moistening the rubber with linseed oil to prevent stickiness and make it work smoothly. There is a great variety of admixtures and diversity in the proportion of ingredients, but the differences are not material. I subjoin a number of receipts.
First and Best.—To one pint of spirits of wine add a quarter of an ounce of gum-copal, a quarter of an ounce of gum-Arabic, and one ounce of shellac.
Let the gums be well bruised, and sifted through a piece of muslin. Put the spirits and the gums together in a vessel that can be closely corked; place them near a warm stove, and frequently shake them. In two or three days they will be dissolved. Strain the mixture through a piece of muslin, and keep it tight corked for use.
Next.—Take one ounce each of mastic, sandarac, seed lac, shellac, gumlac, and gum-Arabic; reduce them to powder; and add a quarter of an ounce of virgin wax; put the whole into a bottle, with one quart of rectified spirits of wine; let it stand twelve hours, and it will be fit for use.
Another.—Put into a glass bottle one ounce of gumlac, two drachms of mastic in drops, four drachms of sandarac, three ounces of shellac, and half an ounce of gum dragon; reduce the whole to powder; add to it a piece of camphor the size of a nut, and pour on it eight ounces of rectified spirits of wine. Stop the bottle close, but take care, when the gums are dissolving, that it is not more than half full. Place near a warm stove until dissolved.
Other French Polish Receipts.—1 pint naphtha, 3½ ounces orange shellac, ½ ounce elima. Darken with red saunders wood.
To one pint of spirits of wine, add half an ounce of gum shellac, half an ounce of seed lac, and a quarter of an ounce of gum sandarac; submit the whole to a gentle heat, frequently shaking it, till the various gums are dissolved, when it is fit for use.
Shellac, 6 ounces; naphtha, 1 quart; sandarac, 1 ounce; benzoin, ¾ ounce.
Three ounces shellac, ½ ounce of gum mastic pulverized, and one pint of methylated spirits of wine added. Let it stand till dissolved.
Twelve ounces shellac, 2 ounces gum elima, 3 ounces gum copal, 1 gallon of spirits of wine; dissolve.
The following must be well mixed and dissolved:—Pale shellac, 2¼ pounds; 3 ounces mastic, 3 ounces sandarac, 1 gallon spirits of wine. After the above is dissolved, add 1 pint copal varnish, 1¼ ounces shellac, ½ ounce gum juniper, ½ ounce benzoin, ½ pint of methylated alcohol.
A Good Polish.—To a pint of spirits of wine add, in fine powder, one ounce seed lac, two drachms of gum guaiacum, two drachms of dragon’s-blood, and two drachms of gum mastic; expose them, in a vessel stopped close, to a moderate heat for three hours, until you find the gums dissolved; strain the whole into a bottle for use, with a quarter of a gill of the best linseed oil, to be shaken up well with it.
This polish is more particularly intended for dark-colored woods—for it is apt to give a tinge to light ones, as satinwood or air-wood, etc.—owing to the admixture of the dragon’s-blood, which gives it a red appearance.
A Polish that Will Stand Water.—Take a pint of spirits of wine, two ounces of gum benzoin, a quarter of an ounce of gum sandarac, and a quarter of an ounce of gum anime; these must be put into a stopped bottle, and placed either in a sand-bath or in hot water till dissolved; then strain the mixture, and, after adding about a quarter of a gill of the best clear poppy oil, shake it well up, and put it by for use.
Prepared Spirits.—This preparation is useful for finishing after any of the foregoing receipts, as it adds to the lustre and durability, as well as removes every defect, of the other polishes; and it gives the surface a most brilliant appearance.
Half a pint of the very best rectified spirits of wine, two drachms of shellac, and two drachms of gum benzoin. Put these ingredients into a bottle, and keep it in a warm place till the gum is all dissolved, shaking it frequently; when cold, add two teaspoonfuls of the best clear white poppy oil; shake them well together, and it is fit for use.
This preparation is used in the same manner as the foregoing polishes; but, in order to remove all dull places, you may increase the pressure in rubbing.
Polish for Turner’s Work.—Dissolve 1 ounce of sandarac in ½ pint of spirits of wine; shave 1 ounce of beeswax, and dissolve it in a sufficient quantity of spirits of turpentine to make it into a paste, add the former mixture to it by degrees; then, with a woollen cloth, apply it to the work while it is in motion in the lathe, and polish it with a soft linen rag; it will appear as if highly varnished.
A French Polish Reviver.—Beat gum acacia and white of two eggs in a mortar until they amalgamate; then add half a pint of raw linseed oil and best vinegar, eight ounces methylated spirits of wine, one ounce hydrochloric acid and two ounces muriate of antimony. They are to be rubbed on the surface of the furniture until dry, and will give a brilliant and lasting polish.
It now remains to explain the several varieties of finishing in use; these are largely derived from the peculiar qualities of the different varnishes used. Polishing varnishes, which are very hard and durable, are so called because their surface can be brought to a high lustre by rubbing with the proper materials. Flowing or finishing-varnishes contain more oil than polishing-varnishes, dry more slowly, and are softer, but their peculiar qualities are brilliancy and durability, fitting them for work requiring a brilliant gloss, such as veneered panels. Rubbing-varnishes are those that dry sufficiently hard to admit of being rubbed to a smooth surface. Turpentine varnishes, being the cheapest variety, are employed for cheap work, such as common chairs, bedsteads, &c.
Dead Finish is a term applied to the finish produced by the reduction of any of the rubbing varnishes with powdered pumice-stone, and raw linseed oil, the surface thus produced being left in the semi-lustrous state by omitting the polishing process. It is now more used than any other for body-work, shellac varnish being generally employed because of its adaptation to the requirements of fine cabinet-work, and its properties of quick and hard drying. Copal, anime, and amber varnishes are also used, but are slower drying. The number of coats required depends somewhat upon the quality of the filler, but usually three coats, and sometimes less, are amply sufficient.
Varnish Finish.—For Cheap Work.—One coat of filler or stain followed by one coat of cheap turpentine varnish without rubbing. In this class of work the brilliancy of the gloss and covering qualities of the varnish are principally considered. The cheaper turpentine varnishes have a brilliant gloss, and dry very hard, but the gloss is not permanent, and after drying the gum is very brittle and easily cracked and broken. The gum is principally common resin.
Wax Finish.—Mix together, with heat, white wax, and spirits of turpentine to the consistency of thick paste; when cold, apply it to the work with a rag; rub on heavily so as to fill the pores of the wood; remove all wax from the surface with a wooden scraper made in the shape of a carpenter’s chisel; smooth off with a bunch of soft rags by rubbing hard and quick for a few minutes; finish with a little French polish applied with a cotton pad. For table tops and all large flat surfaces, allow the wax to remain on, and finish with a warm iron by passing it lightly and quickly over the work until the wax is made smooth and the surface is sufficiently polished. This is not considered a desirable finish, as it is not durable, and water spots it very easily.
The brushes required for varnishing are of many kinds and sizes and a description of even a portion of them, is out of the question in a small work of this kind; however a few remarks concerning them may not be out of place. For spirit varnishes, camel’s-hair pencils and brushes are used, the sizes of which vary from one-quarter to three-quarters of an inch diameter, according to the size of the work. When the surfaces are very large, flat camel-hair brushes are used; but from their comparative thinness they scarcely contain a sufficient quantity of varnish to preserve the brush uniformly charged in passing over a large surface. Turpentine and oil varnishes require less delicacy; and flat brushes, made of fine soft bristles, are generally used, or sometimes ordinary painting brushes are employed, but they are rather harsh, and, owing to the adhesion of the varnish, the hairs are apt to be loosened, and come out. Brushes should always be kept perfectly soft and clean, and therefore should never be laid aside when through work, without cleaning. For this purpose turpentine is best; the brushes can either be washed out quite clean in it, dried on a cloth, and laid aside, or the bristles can be partially immersed in turpentine and allowed to remain in it until wanted for use. Warm water and soap will also serve to clean the brushes. If, however, the brushes are laid aside without being thoroughly cleaned, they will certainly be ruined by the hardening of the varnish.
Varnish pans can be procured at any varnish shop. They are constructed of tin, with a false bottom; the interval between the two bottoms is filled with sand, which being heated over the fire keeps the varnish fluid, and it flows more readily from the brush. There is a tin handle to them, and the false bottom slopes from one end to the other, which gives sufficient depth when the varnish is low. They should also have a wire fixed across the top to wipe the brush against. An ordinary preserve jar is frequently used for containing the varnish, and is sufficiently suitable; but it also should have a wire or string stretched across the top, for reducing the quantity of varnish taken up by the brush. The quantity of varnish poured into the jar should be sufficient to nearly cover the hairs of the brush in order to keep it soft. Too small a quantity of varnish is liable to thicken rapidly by evaporation, which should at all times be prevented as far as possible, by keeping the vessel closely covered when not in actual use.
The Various Woods, their Stains and Finish.—The foregoing rules and instructions apply, in a great measure to all woods that are to be finished in natural colors or stained, but under this head it is intended to take each wood separately, with regard to coloring, and other matters not before mentioned, that may be considered necessary to insure good work.
It should not be forgotten, when speaking of hardwood finishing, that some of the prettiest woods used, are not “Hard” but soft woods among which may be mentioned pine of various kinds, poplar, cedar, redwood, hemlock and basswood. When some of these are finished in their natural state or stained to imitate harder woods their beauty is much enhanced and they become deserving of more than a passing notice. Pine when properly prepared, is in my opinion one of the most useful as well as one of the prettiest woods that Nature has given to this continent, and hemlock which is a much despised wood, when properly prepared and finished in the natural state, or slightly “Mahoganized,” makes the richest of panels for doors, wainscot or other house finish. As oak and mahogany are rivals as to which is the better and handsomer woods for finish, I will commence this section with those woods, giving oak the preference.
Oak.—We have in this country over forty kinds of oak nearly every one of which may be used for some special purpose, those most used for building finish and for furniture however are only few, among which are the white oak, (Quercus rulia), rock oak (Quercus primas murticola) and black oak (Quercus tindoris). All of the above named oaks are capable of being handsomely finished, the white and black oaks being the best and the red being next.