INDEX. (continued 2)
Reading edition
Per Yard.
1 coat on new work 8 to 10 cents
1 coat on old work 10 to 18 cents
2 coats on new work 18 to 20 cents
2 coats on old work 20 to 25 cents
3 coats on new work 25 to 28 cents
Brick walls, 2 coats 20 to 30 cents
Penciling 10 to 15 cents
PRIMING AND GLAZING SASH.
Per Light.
10 × 14 and under 5 to 6 cents
12 × 16 7 to 9 cents
14 × 24 10 to 12 cents
18 × 24 15 to 18 cents
24 × 30 20 to 25 cents
30 × 40 35 to 50 cents
For old work where the old putty is in the sash, multiply the above figures by 3 or 4. When called out to the house to set a light or two charge for time and material. Most work of this kind is done at least 30 per cent. below the above prices.
I quote below a price list for sign painters, from a very complete report on painters’ prices and measurements, generally, by one of the ablest of local associations of master painters and decorators:
JAPANNED TIN SIGNS.
Gold. Plain.
3 × 14 inches $1.25 $ .75
6 × 8 inches 1.50 .75
8 × 10 inches 1.75 1.00
10 × 14 inches 2.50 1.50
11 × 17 inches 3.00 2.00
11 × 17 inches, 3 lines 3.50 2.55
14 × 20 inches 4.00 2.50
14 × 20 inches, 3 lines 4.50 3.00
18 × 24 inches 6.00 3.50
18 × 24 inches, 3 lines 7.00 4.00
Frames additional.
GLASS SIGNS ON WINDOWS AND DOORS.
In Silver or Gold Per Foot.
Letters up to 6 inches in height $ .75
Letters 6 to 10 inches in height 1.00
Letters 10 to 14 inches in height 1.50
Shaded, one color, 25 per cent. extra.
DRUM SIGNS.
Gold. Plain.
10 × 14 inches $ 3.50 $ 2.50
11 × 17 inches 4.00 3.00
14 × 20 inches 5.00 3.50
18 × 24 inches 7.00 5.00
20 × 24 inches 8.50 6.50
24 × 30 inches 10.00 7.00
30 × 30 inches 12.00 8.50
30 × 48 inches 15.00 10.00
The above include moulding and urns and putting up.
Drilling holes in iron extra.
MUSLIN SIGNS.
Per Foot.
Up to 1 foot high, black 8 cents
1 to 2 feet, black 10 cents
2 to 3 feet, black 12 cents
Colored one-half extra.
Muslin furnished.
Frames extra.
OIL CLOTH SIGNS.
Per Foot.
Up to 1 foot 20 cents
1 to 2 feet 25 cents
2 to 3 feet 30 cents
Oil cloth furnished.
Frames extra.
BOARD SIGNS.
Including three coats of paint and lettering.
Gold. Plain.
6 inches × 4 feet $ 4.00 $ 2.50
8 inches × 6 feet 5.00 3.50
10 inches × 8 feet 6.00 4.00
1 foot × 12 feet 7.50 5.00
1 foot × 15 feet 8.50 5.00
14 inches × 16 feet 8.50 5.00
14 inches × 18 feet 9.00 6.00
14 inches × 20 feet 9.50 6.00
16 inches × 16 feet 9.50 6.00
16 inches × 18 feet 10.00 6.00
18 inches × 18 feet 10.00 6.00
18 inches × 20 feet 12.00 7.00
18 inches × 24 feet 15.00 7.00
18 inches × 30 feet 18.00 8.00
Board extra.
Irons and putting up extra.
Shading, 25 per cent. additional, one color.
WALL SIGNS.
Two coats of paint and lettering. Extra coat, 1 cent per square foot additional.
2 × 16 feet $ 6.00
2 × 20 feet 7.00
2 × 24 feet 8.00
2 × 30 feet 10.50
3 × 16 feet 8.00
3 × 20 feet 10.00
3 × 24 feet 12.00
3 × 30 feet 14.00
4 × 16 feet 9.00
4 × 20 feet 12.00
4 × 24 feet 13.00
4 × 30 feet 15.00
6 × 16 feet 12.00
6 × 20 feet 14.00
6 × 24 feet 16.00
6 × 30 feet 18.00
8 × 16 feet 14.00
8 × 20 feet 16.00
8 × 24 feet 18.00
8 × 30 feet 20.00
10 × 12 feet 10.00
10 × 16 feet 13.00
10 × 20 feet 16.00
10 × 24 feet 19.00
10 × 30 feet 22.00
12 × 16 feet 14.00
12 × 20 feet 18.00
12 × 24 feet 20.00
12 × 30 feet 25.00
14 × 20 feet 20.00
14 × 24 feet 24.00
14 × 30 feet 28.00
16 × 24 feet 26.00
16 × 30 feet 39.00
20 × 24 feet 30.00
20 × 30 feet 35.00
20 × 40 feet 40.00
21 × 30 feet 37.00
24 × 36 feet 42.00
24 × 40 feet 48.00
30 × 40 feet 60.00
30 × 50 feet 70.00
30 × 60 feet 80.00
SHOW CARDS.
1 sheet, 22 × 25 $ 1.50
1 sheet, 14 × 22 .75
1 sheet, 11 × 14 .50
The above prices are based upon white lead at 7 cents per pound and wages at 33½ cents an hour.
MIDSUMMER PAINTING.
All things considered, which is the best time of the year to do outside painting? Spring and fall, did you say? Well, yes. I know nearly all painters think so, and the people outside the trade are almost, if not quite, unanimous in holding the same opinion. But why? Do the winds of March, the frequent showers of April and May add very much to the pleasure and profit of doing outside work in spring? Do the soaking rains, which come along about the time of the vernal equinox and drive you off your job for a week or two and watersoak your unprimed work, add much pleasure to your recollections of spring painting? Do you remember anything about the clouds of midges and thousands of little moths which filled the air, ready and willing to decorate your paint with their little bodies on every still, warm mid-day in April and May? Of course, we are speaking now of climatic conditions from our own standpoint, the great Northwest, which may also be true in the Middle and New England states. The mornings and evenings of spring and fall are apt to be cool—often frosty; then the oil stiffens and the paint rubs out hard and goes on slow, and we lose time and work harder. Practically, I favor midsummer for outside work, because the temperature is more uniformly warm and the paint spreads easily and evenly at any time of day, and as a rule the rains are less frequent and give a longer warning of their approach. The little black flies are not so plentiful in the hot days of summer as they are in spring and early fall. They are either dead or seek the shade of trees and grass. The dew is all gone in summer before seven o’clock a. m., and does not commence to fall until after quitting time. A carpet of grass and other vegetation covers a large portion of the ground in summer, holding down the dust. The winds are not usually so high and gusty in summer as they are in the spring and fall. In the warm days of summer your work is more apt to dry quickly, cleanly and evenly; and when you “knock off” from work at six p. m., and the sun is yet two hours above the horizon, you know that your last ground stretch will soon be out of the way of dust and rain. In the hot weather of summer the pores of the wood are all open, and the oil, which is then soft and thin, goes farther into the wood than in spring and fall, when the weather is cool. There are, it is true, some fine days in the fall for outside work, but the rainy season of the autumnal equinox and the frosty nights of the later months often retard your work and mar the finish of your job. One objection urged against summer painting is the flies, but really are the flies which injure paint any more numerous in midsummer than they are in spring and fall? It is true the festive house-fly is in his glory in the summer, but, as a rule, he is too smart to get stuck in outside paint. To get inside is his ambition, and the molasses-cup and sugar-bowl are his objective points. If the house-fly is an objection in the summer, it certainly is a greater one in the fall, for in September and early in October they are thicker, saucier and more familiar than at any other time of year; then they want not only to get at the sugar, but to get in and warm.
A correspondent asks: “Does the reader know from practical experiment that one season is better than another for applying outside paint?” I suppose the writer means the effect upon the wearing qualities of the paint and the permanency of the color. I have been experimenting for a practical solution of this question for my own satisfaction and guidance, and have come to the conclusion that paint put on the outside in the hot weather of summer will wear as well and hold its color as long as paint put on in the cooler days of spring and fall. I know the idea that paint dries too fast in hot weather is almost universal, but I think it grows largely from the fact that a quick-drying paint is not as good for outside as a slow dryer; but you must remember that there is a great difference between a quick-drying paint and drying a slow paint as quickly as the ingredients will admit of. Linseed oil dries or hardens by absorbing oxygen from the air, and that process goes on more rapidly in hot weather than in cool weather, because the air in hot weather is in a condition more freely to part with its oxygen, or because the oil is in a better condition to receive it, or both. In other words, a warm atmosphere hastens the process of absorption and a cool air retards it, but in either case the result is the same: the air gives up enough of its oxygen to solidify the oil. Now, the question arises, can any difference be discovered (chemical or otherwise) in the composition of the paint, whether dried in warm or cool air? From a business-point of view, I have long advocated summer as a good time to paint outside, and have usually succeeded in converting customers to my views upon the subject, and as a consequence have not often had a dull time in midsummer. We painters in the country know how unpleasant and unprofitable it is to have all the work of the year rushed upon us in the spring and fall, and I think if painters generally could convince themselves by practical experiment that, all things considered, summer time is the best season of the year to do outside work, and advocate the same to their customers, backed by argument and practical illustration, there would soon be less need of complaint about a dull season in midsummer.
TO REMOVE PAINT.
1. An expeditious way is by chemical process, using a solution of soda and quicklime in equal proportions. The soda is dissolved in water, the lime is then added, and the solution is applied with a brush to the old paint. A few moments are sufficient to remove the coats of paint, which may be washed off with hot water. The oldest paint may be removed by a paste of the soda and quicklime. The wood should be afterwards washed with vinegar or an acid solution before repainting, to remove all traces of alkali.
2. Wet the place with naphtha, repeating as often as required; but frequently one application will dissolve the paint. As soon as it is softened, rub the surface clean. Chloroform mixed with a small quantity of spirit ammonia, composed of strong ammoniac, has been employed very successfully to remove the stains of dry paint from wood, silk, and other substances.
3. To remove paint from floors.—Take one pound of American pearlash, three pounds of quickstone lime. Slake the lime in water, then add the pearlash, and make the whole amount about the consistency of paint. Lay the mixture over the whole body of the work which is required to be cleaned, with an old brush; let it remain for twelve or fourteen hours, when the paint can be easily scraped off.
TO SOFTEN PUTTY AND REMOVE OLD PAINT.
1. Take three pounds of quickstone lime; slake the lime in water, then add one pound of American pearlash; apply this to both sides of the glass and let it remain for twelve hours, when the putty will be softened, and the glass may be taken out without being broken. To destroy paint, apply it to the whole body which is required to be cleaned; use an old brush, as it will spoil a new one; let it remain about twelve or fourteen hours, and then the paint may be easily scraped off.
2. To remove paint from old doors, etc., and to soften putty in window frames, so that the glass may be taken out without breakage or cutting, take one pound of pearlash and three pounds of quicklime, slake the lime in water and then add the pearlash, and make the whole about the consistency of paint. Apply to both sides of the glass and let it remain for twelve hours, when the putty will be so softened that the glass may be taken out of the frame without being cut, and with the greatest facility. To destroy paint, lay the above over the whole body of the work which is required to be cleaned, using an old brush, as it will spoil a new one. Let it remain for twelve or fourteen hours, when the paint can be easily scraped off.
3. Paint stains on glass.—American potash, 3 parts; unslaked lime, 1. Lay this on with a stick, letting it remain for some time, and it will remove either tar or paint.
TREATMENT OF DAMP WALLS.
There are two classes of damp walls, first where the water comes in from the outside from defective roofs, bad gutters, defective pipes, and where it comes through the walls from the ground, as in basements. In the other class we may include walls which are dampened by condensation of moisture, in places shut off from the general artificial temperature of the room, behind stationary furniture. Such walls may dry out during hot weather, or they may be kept damp by a growth of mold or fungus.
When water comes in from the outside, it is impossible to keep paint or paper on the wall in good shape. Look around for the places where the water comes in, point it out to the owner, and if he fails to stop the leak have it understood that the work is done at his risk; or, what is better, refuse to do the work; because, when a job comes off, or turns out badly, you will take the blame generally, no matter whether it is your fault or not. A job may be made to last awhile by a waterproof coating, or by sheathing with thin lumber, but it is only a question of time when the lining material will become water-soaked and spoil the paint or paper, to your discredit. I have usually been too busy to take jobs of this kind. If the water can be cut off, the next thing is to dry the wall, which you can do at the surface only by setting a stove near it, or with the flame of a paint burner; then, after all your trouble, the water, which remains in the wall, if of brick or stone, may find its way to the surface, and destroy your work. Sheet lead cemented to the wall will answer a good purpose for a time, but the dampness will finally destroy the cement and let the metal loose.
Battening out for lath and plaster is the best for basement or damp stone walls, but that is the plasterer’s work, and is rarely ever done except in private residences.
Battening and canvasing is next best; nail your battens up and down 18 inches apart. Have the canvas stitched in sheets the right size to cover the large blank spaces of the wall. Then stretch and tack it on the battens, and give it a coat of glue and alum size.
When dampness is caused by condensation the best remedy is to remove the cause and dry the wall.
TO PAPER ON A BOARD PARTITION.
When paper is pasted on boards, it must crack, when the lumber shrinks. If you paste cloth over the cracks, it must crack, if the cracks open further than the cloth will stretch. When you tack cloth on a partition and size it, if the size goes through the cloth and sticks it fast to the boards, it will be likely to crack when the lumber shrinks. For a good job I would advise that you first cover the partition with paper tacked on, then when you size the cloth, it will stick to the paper, and not to the boards. I have met with uniform success in this way; because the boards are left free to shrink and swell without breaking the cloth or paper. I like to sew the cloth together with a running seam in pieces large enough to cover all broad spaces, turn the smooth side out, stretch well, and fasten the edges only; drive the tacks an inch from the edges of the cloth, so that you can fasten them down smoothly with paste. When a man has been unwise enough to put a board partition across one end of an otherwise fine room, and is willing to pay for his folly: first, take measurements of the blank spaces, and sew together some fairly strong unbleached muslin, stretch on frames, and give it a coat of glue and alum size, and whiting; when dry, carefully fit each piece in its place and tack it an inch from the edges and fasten the edges down smooth with strong flour paste. Tack only at the edges, and if you are careful to butt edge the different pieces over the doors, etc., you can make a nice smooth job in this way. By using this method the paste will not stick the cloth to the wall. Use tinned tacks to prevent rust.
SANDPAPERING.
This is a job none of us like very well, but since it must be done, it is worth while to be able to do it to the best advantage. The first thing to look for is good paper. To test the strength of the sand, rub two pieces together, and if the sand don’t fly off, it is good in that respect; next see if the paper is tough and will not tear easily. Chalk the back of your paper before you double it and it will not slip. Don’t lose time using old, worn-out paper. New paper will, of course, cut faster than old paper, and the difference in the time gained by using sharp paper will pay for the new paper twice over. Using old dull paper is like trying to save money by using an old stub brush. Better use up fifty cents’ worth of paper than to fool away dollars’ worth of time trying to save money by using old paper.
If you have old, hard paint to cut down, which dry sandpaper will not touch, keep the work wet with benzine, and you will be surprised to see how fast the sandpaper will cut the paint. To put on benzine use a small spring-bottomed can, such as is used for oiling machinery. You can use any grade of sandpaper, and it will not soak up or gum. No. 1 paper is the best for this purpose. A good deal of time may be lost where scrapers could be used to much better advantage. A broad, flat scraper to shove endwise is always in order, and a few narrow ones with various shaped ends to fit in headings, moldings, etc., are a great help.
A STENCILED BORDER.
This makes a nice finish for a painted or kalsomined room. To make it look at its best, paint a stripe as wide as your stencil in a pleasant contrast to the paint on the room and put the stencil on that in soft harmonizing colors.
REPAINTING SCALED WORK.
To repaint a job which has commenced to scale, without taking off all the old paint, is very uncertain work, but if you have to try it, have it understood in writing, or before witnesses, that it is done at the owner’s risk. First scrape off the loose paint, then go over the job with raw oil; put it on freely and let it stand until dry; then scrape off all the paint loosened by the oil, and coat up with strictly pure white lead and oil. Avoid zinc, and mixtures of zinc, and barytes, on jobs of this kind; because they are more or less liable to crack, and pull off more of the old paint. White lead and oil lightly tinted will hold it if anything will. Use raw oil and a little good japan.
TO MIX WATER COLORS.
Light weight colors which will not mix well with water may be easily mixed to a stiff paste with molasses or sirup, then mix in glue size for a binder and thin with water.
TO SIZE MUSLIN FOR LETTERING.
Use a thin size of white glue in water, or a thin starch paste. For a sign to stand weather, dissolve white wax in turpentine by heat. Melt the wax in a kettle, then take it outside and by degrees add sufficient spirits of turpentine and make a thin size.
One ounce of wax to the quart of turps is about right. Put it on warm with a brush.
ANOTHER FOR WHITE WORK.
Slake a little good, fresh lime in hot water and mix a size with skim milk. Then strain through cheese cloth. This size is, when dry, insoluble in water and will hold lettering as long as the cloth lasts. May be tinted.
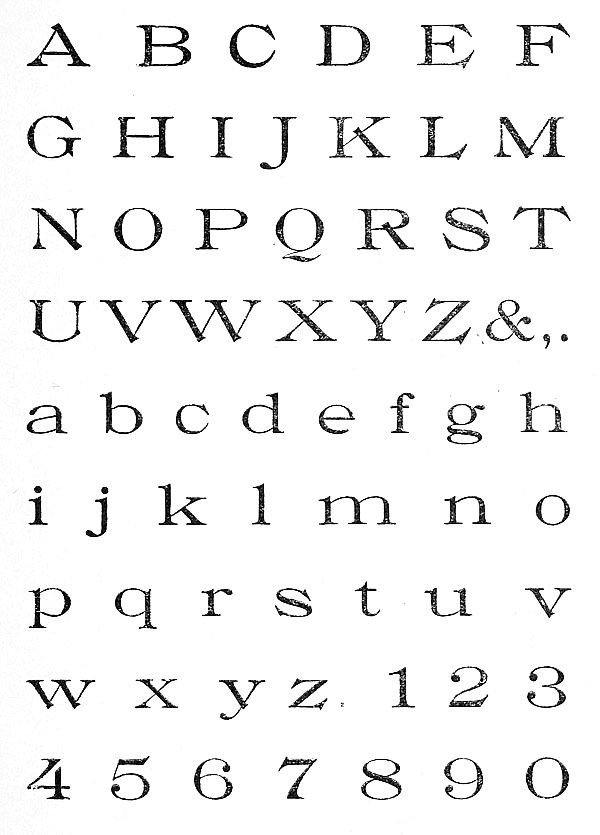
No. 4. OLD STYLE EXTENDED.
A B C D E F G H I J K L M N O P Q R S T U V W X Y Z & , . a b c d e f g h i j k l m n o p q r s t u v w x y z 1 2 3 4 5 6 7 8 9 0
TEST OF THE PURITY OF WHITE LEAD.
The following is an infallible and simple commercial test of the purity of white lead:
Take a piece of firm, close-grained charcoal, and near one end of it scoop out a cavity about half an inch in diameter and a quarter of an inch in depth. Place in the cavity a sample of the lead to be tested, about the size of a small pea, and apply to it continuously the blue or hottest part of the flame of the blow-pipe; if the sample be strictly pure it will, in a very short time, say two minutes, be reduced to metallic lead, leaving no residue; but if it be adulterated, even to the extent of 10 per cent. only, with oxide of zinc, sulphate of baryta, whiting or any other carbonate of lime (which substances are the principal adulterations used), or if it be composed entirely of these materials, as is sometimes the case with cheap lead (so-called), it cannot be reduced, but will remain on the charcoal an infuscatible mass.
A blow-pipe can be obtained from any jeweler at small cost. An alcohol lamp, star candle, or a lard oil lamp furnishes the best flame for use of the blow-pipe. This test is very simple and anyone can very soon learn to make it with ease and skill.
POLISH TO RENOVATE VARNISHED WORK.
One quart good vinegar, 2 ounces butter of antimony, 2 ounces alcohol, 1 quart oil. Shake before using.
BRONZES—COLORS.
White, Silver, Flesh,
Light Gold, Dark Gold, Rich Gold,
Lemon, Orange, Fire,
Copper, Carmine, Crimson,
Lilac, Violet, Brown,
Light and Dark Greens.
BLACK VARNISH FOR IRON.
Asphaltum, 2 pounds.
Boiled linseed oil, 1 pint.
Spirits turpentine, 2 quarts.
Melt the asphaltum with the oil in an iron kettle. Stir well before removing from the fire. When partly cool add the turpentine and a little good japan.
TO FREE BENZINE FROM ITS OFFENSIVE ODOR.
To deodorize benzine, add 3 ounces quicklime to the gallon of benzine; shake well. Let the lime settle and pour off and filter the benzine.
PAINT TO PREVENT WOOD EXPOSED TO THE GROUND FROM ROTTING.
Take of linseed oil, 4 parts; whiting, 40 parts; rosin, 50 parts; clean sand, 300 parts; heat together in a kettle until the rosin melts; then add 2 parts sulphate of copper; the mass to be well stirred, and thinned to workable consistency with linseed oil.
RECIPES FOR BLACKBOARD SLATING.
Dissolve 1 pound shellac in 1 gallon 95 per cent. alcohol; then add ½ pound best powdered ivory black, 5 ounces finest emery flour, 2 ounces ultramarine blue; mix well and keep air tight. When using stir frequently. If thick enough to show brush marks, add more alcohol; work quick with a fine brush.
TO MAKE A BLACKBOARD ON COMMON PLASTER.
Stop all cracks and holes with plaster paris mixed in glue size. When dry sandpaper until all is smooth; then paper the wall with white blank wall paper, butt the edges, put on with strong paste, and be careful to rub out all blisters. When dry prime with oil paint, then sandpaper with fine paper, and put on two coats of above slating. This makes an excellent blackboard. Boards which I made in this way twenty years ago are in good shape yet, and will last for years to come with an occasional repainting.
CHEAP SLATING, BUT GOOD.
Mix lamp black, 4 parts; ultramarine blue, 1 part, by weight, in turpentine, with sufficient good japan and a very little oil to bind it, then add one part by weight of fine pumice stone. Have it thin enough to flow on and not leave brush marks.
WATERPROOF OIL RUBBER PAINT FOR CLOTH.
Melt 2½ pounds of india rubber in ½ gallon of boiled oil by boiling. If too thick, add more oil; if too thin, add more rubber, and a little japan to dry it. Apply warm.
TO CLEAN PAINT.
Have some whiting on a plate, then dip a piece of flannel in warm, soft water and squeeze nearly dry, then take up some of the whiting by dipping the flannel in it, and rub the paint until it looks clean, then rub dry with a soft cloth or chamois skin.
GOOD QUICK STAIN FOR A BRICK CHIMNEY.
For red stain, take Venetian red, 2 parts; yellow ochre, 1 part—both dry—and mix with skim milk. For yellow stain, use water-lime, tinted with yellow ochre. Mix as above.
Skim milk when mixed with common quicklime, Portland cement, or Venetian red, is converted into an insoluble binder, which renders the mixture waterproof, so that it will not wash off when wet; neither will it rub up when dry. Other pigments can be added, by way of coloring, up to 25 per cent., without affecting the insolubility of the paint.
For a brick wall, which has not been rubbed or painted, Venetian red toned down with yellow ochre, beats any glue and acid mixture for durability.
TO CLEAN DOOR PLATES.
Put on with a rag a weak solution of ammonia in water, and rub to dryness.
TO CLEAN VARNISHED PAINT.
In a gallon of water, boil a pound of wheat bran, and wash the varnish with the water.
SLOWING THE DRYING OF PAINT.
In wall painting or otherwise, especially in hot weather, if the paint dries so fast as to show laps in spite of your best efforts with the brush, the addition of a little cotton seed oil will make the paint dry slower without hurting the gloss; or if you are using flat color, and it dries too fast, a little cotton seed oil will make it dry slower, and not make a gloss. You can, by a little experiment, determine how much of cotton seed oil to use in each case.
FINE BRONZE FOR METALS.
Red aniline (fuchsine), 20 parts; purple aniline, 10 parts; 95 per cent. alcohol, 200 parts; acid benzoic, 10 parts. Dissolve the colors in the spirit in a porcelain vessel in a water or sand bath; add the acid and boil until the mixture changes from a greenish color to a beautiful bronze color. Lay it on the bright metal with a brush.
REPAINTING BLISTERED DOORS.
When the paint commences to blister or scale on a door, it is very liable to keep on blistering and scaling from time to time, as long as any of the old paint is left on the door, no matter how carefully it may be repainted, because in most cases whatever caused the paint to scale off in spots, weakened the entire coat of paint on the door, making it liable to raise up, or come off in other places, whenever exposed to any extra strain, such as sun heat, or the drying of new coats of paint or varnish over it; hence, to have a sure thing on painting a scaled or blistered door, take off all the old paint. Put on a thin prime of pure white lead and linseed oil; use the priming sparingly and rub it out thin; let the prime dry and coat up with lead and oil paint, mixed with good body; put in a little turps and spread the paint out thin, so it will dry solid; rub each coat in the same way; give each coat time to dry solid. For work to be varnished, prime as above, and coat up flat. I think blistering is often caused by flowing on too much paint having too much oil in it, in proportion to the pigment, hence it does not dry solid, the oil is softened and expanded by heat, and the coating, which is more of an oil skin than a body of paint, lets go its hold on the wood and puffs out in a blister to make room for the softened and expanding oil skin. If painters will mix their paint with good body, and use more elbow grease in rubbing it out, they will have less trouble with blisters.
FIREPROOF PAINT FOR ROOFS, ETC.
A recipe published thirty years ago in the Maine Farmer:
Slake stone lime by putting it into a tub to be covered to keep in the steam. When slacked pass the powder through a fine sieve, and to each 6 quarts of it add 1 quart rock salt, and water, 1 gallon; then boil and skim clean. To each five gallons of this add pulverized alum, 1 pound; pulverized copperas, ½ pound; then slowly add powdered potash, ¾ pound; then add hardwood ashes sifted, 4 pounds; now add any color and apply with a brush. This paint stops small leaks in roofs, prevents moss, is incombustible, and renders brick waterproof. It is durable as stone.
VARNISH FOR IRON.
Genuine asphaltum 8 pounds, melt in an iron kettle, slowly adding boiled linseed oil, 5 gallons; litharge, 1 pound, and sulphate of zinc, ½ pound; continue to boil three hours, then add dark gum amber, 1½ pounds, and boil two hours longer. When cool thin with turpentine to good working consistency.
BLACK VARNISH FOR IRON.
Genuine asphaltum (not coal tar imitation), 1 pound; lamp black, ¼ pound; rosin, ½ pound; spirits turpentine, 1 quart. Dissolve the asphaltum and rosin in the turpentine, then rub up the lamp black with linseed oil, only sufficient to form a paste, and mix with the others.
TO MIX DRY LAMP BLACK.
First cut it up in benzine or turpentine to a thick paste, stir well and add linseed oil; if the black is to be used as an oil paint, a little at first, stir well and you may add more. In this way you will have no trouble in mixing it with other paint, if you do it when the paint is rather stiff.
TO CLEAN BRASS.
One-half ounce oxalic acid, 3 ounces rotten stone, ¼ ounce gum arabic, each in powder; made into a paste with sweet oil. Use sparingly and rub dry with flannel.
DIPPING PAINT.
Grind dry colors in japan and turps, with only enough japan to bind the pigment. When dry varnish, use any pigment you like, or use bolted whiting and color as you like.
TO MAKE WAX FINISH FOR FLOORS.
Take 2 ounces pearlash and 2 pounds white wax. Slice the wax thin, and boil it with the pearlash in 2 quarts of water; stir until the wax is melted and unites with the water.
Put on the finish with a brush, and polish with cloth or plush.
This finish will be good only for light service.
SPIRIT VARNISHES.
There are numerous recipes which might be given here for making the fine elastic varnishes, but it would not be practicable for the painter to make them, even if he had the requisite skill and experience, but with spirit varnishes it is very different, and the painter can make them by a formula as well as an expert can. (For formulas for white and orange shellac varnish see article on wood finishing.) For inside work, where the family is living at the time the work is being done, the alcohol varnish is preferable. First, because it dries very quickly, and second, because it is free from sickening or disagreeable odors.
Below are several recipes for making varnishes, which dry hard and lustrous. The spirit used is wood or grain alcohol; in either case, the spirit should be 95 per cent. proof.
BROWN HARD SPIRIT VARNISH (SELECTED).
1. Sandarac, 1 pound; shellac, ½ pound; gum elemi, 4 ounces; Venice turpentine, 4 ounces; spirit, 1 gallon.
2. Gum sandarac, 1½ pounds; shellac, 1 pound; spirit, 1 gallon. After the gums are dissolved, put in rosin turpentine varnish, 1 pint. This makes a good varnish, not as quick drying as pure spirit varnishes.
A brown varnish may be made by mixing shellac, 1½ pounds; pale rosin, 1½ pounds; spirit, 2 gallons.
WHITE HARD VARNISH.
1. Sandarac, 2½ pounds; gum thus, 1 pound; spirit, 1 gallon.
2. Mastic, ½ pound; sandarac, 2 pounds; elemi gum, 4 ounces; spirit, 1 gallon.
3. Mastic, ½ pound; sandarac, 1 pound; turps, 2 ounces; spirit, 1 gallon.
These are all prepared by mixing and setting in a warm place until the gums are dissolved, then they are ready for use. Shake occasionally. For fine work strain carefully.
PURE WHITE VARNISHES.
1. Pale manila copal, 8 ounces; gum camphor, 1 ounce; mastic, 2 ounces; venice turpentine, 1 ounce; spirit, 1 quart.
2. Sandarac, 8 ounces; mastic, 2 ounces; Canada balsam, 4 ounces; spirit, 1 quart.
3. Sandarac, 8 ounces; damar, 4 ounces; gum thus, 8 ounces; manila copal, 8 ounces; elemi, 8 ounces; spirit, ½ gallon. This is a good pale article.
4. Gum thus, 8 ounces; gum benzoin, 4 ounces; manila elemi, 4 ounces; spirit, 1 quart.
VARNISH PAINTS.
These are made by mixing opaque pigments with almost any varnish, using sufficient turps to make them spread well.
GOLD VARNISH.
Shellac, 8 ounces; sandarac, 8 ounces; mastic, 8 ounces; gamboge, 2 ounces; dragon’s blood, 1 ounce; turmeric, 4 ounces; spirit, 1 gallon.
FURNITURE VARNISH.
Shellac, 1¾ pounds; sandarac, 4 ounces; mastic, 4 ounces; spirit, 1 gallon.
DAMAR VARNISH.
Damar, 1 ounce; sandarac, 5 ounces, mastic, 1 ounce; turps, 20 ounces. Digest at gentle heat until dissolved. If necessary add more turps to bring down to the proper consistency.
LACQUERS FOR BRASS AND TIN.
Pale gold lacquer.—Spirit, 1 gallon; orange shellac, 1 ounce; gamboge, ½ ounce.
Deep gold.—Orange shellac, 10 ounces; turmeric, 4 ounces; gamboge, 4 ounces; dragon’s blood, ½ ounce; spirit, ¾ gallon.
Brass lacquer.—Shellac, 14 ounces; turmeric, 4 ounces; annotto, 1 ounce; saffron, ½ ounce; spirit, 1 gallon.
LEATHER VARNISH (BLACK).
Shellac, 12 ounces; gum thus, 5 ounces; sandarac, 2 ounces; lamp black, 1 ounce; turpentine, 4 ounces; spirit, ¾ gallon.
Mix the ingredients, and give them time to dissolve in the spirit in a warm place. A shake-up now and then will quicken the process.
PAPER HANGER’S OUTFIT.
Bib overalls, large pocket in front, side pockets for rule and shears, long trimming shears, shorter wet shears, straightedge, paste board, plumb bob, rule, paper brush, paste pail, size kettle, step-ladders and rollers, some sandpaper, soft cloths and long blotting paper to use under your roller on seams, when needed, and a plank for scaffold, when papering ceilings. For common sized rooms two step-ladders are good in the place of trestles to hold up the plank. For butt edging I can recommend James Marks’ paper cutters. See description on another page.
PAPER HANGERS’ PASTE.
Beat up four pounds of sifted wheat flour in cold water sufficient to make a stiff batter; beat out all the lumps, then add enough cold water to make it like pudding batter. Then pour in a little hot water and stir, then pour in hot water fast, and stir until the paste swells and thickens, and turns darker. It is then cooked. To keep the paste from “going back” and staining the paper, add about two ounces of powdered or well pounded alum to the boiling water which you pour on the batter. This will make three-quarters of a common wooden pail full of paste. It will do better and go further if you let it cool before using. Turn a little cold water on the top to prevent it skinning over while you wait for it to cool. When ready to use it, thin with cold water, until it works easily under the brush, and according to the wall. A very rough porous wall needs a stout paste and plenty of it, while a hard, smooth wall should have the paste thinned and less of it. I have known paper to crack and fall off from a smooth wall, because too much or too thick paste was put on. Just enough to cement the paper to such a wall is best; a body of paste between the paper and plaster will decay and peel off, and take the paper with it. The other extreme must be avoided also. Some hangers prepare this paste without the alum.
If hanging paper on a glossy painted surface, leave out the alum and add one-half pint of nice clear sirup to each gallon of paste.
TO MAKE A PASTE FOR PAPERING OVER PAINTED OR VARNISHED WALLS.
In a kettle mix some flour in water in the same way as in the above formula, but make the batter thinner. To each gallon of the batter add one ounce of powdered resin. Set the kettle on a moderate fire, and keep stirring it until it boils and thickens, and the resin is melted into the paste. When cool, thin down with a weak solution of gum arabic.
LIQUID GLUE.
Fine glue dissolved in alcohol makes a nice binder for fine water colors.
TO CRYSTALIZE GLASS.
Lay the glass flat and flow heavy alum water over it. Let it dry.
SIZE FOR WALLS BEFORE PAPERING OR KALSOMINING.
One pound good white glue, 1 pound good bar soap, 2 pounds pulverized alum. Dissolve each separately in one quart boiling water, having first soaked the glue. Mix the glue and soap water, and then slowly add the alum water, stirring all the time. Add cold water to make one gallon.
STAIN OAK WOOD.
Wash with a solution of bi-chromate of potash and acid water. One ounce to a quart of water.
SIZING WALLS.
“Anybody can do it!” Yes, but it takes an expert to do it right. It is not a difficult matter to make paper stick to whitewash, but the whitewash splits as far in as the paste goes, and a part of it invariably sticks to the paper when it comes off and a part of it is left on the wall. As a rule, if you size whitewash with flour paste and let it stand a few days it will crack and roll up. Now, pure glue size does not have this effect upon whitewash, but, on the contrary, it not only acts as a binder, but as an intervening coat between the paste and the whitewash. In other words, the glue size will stick the whitewash fast without causing it to crack, and the paste will adhere to the glue size without bad effects upon either. Now, in order to bind the whitewash, the glue should penetrate as far as possible. Hence, the size should be put on warm, and the room should be warm, otherwise the glue will get cold and stiff like jelly before it has time to penetrate; hence it will remain on the surface instead of going into whitewash as a binder. The idea is to get all you can into the wall and leave as little as possible on the outside. Another thing to look after is the quality of the glue. Very much of the white glue found on the market is not genuine glue. Some of it is adulterated with starch and white clay, some of it is not glue at all. A glue which will dissolve in cold water is not good glue, or if it melts readily in hot water without being soaked an hour or two in cold water, it is not first-class. If it has a dead white look it is not good. Good glue should be glossy and semi-transparent, and should soften and swell in cold water, but not dissolve in it. When put into hot water without being first soaked in cold water, it should not dissolve at once, but form into a lump and resist the action of the hot water for some time.
HOW TO APPLY WHITE ENAMELED LETTERS TO GLASS.
An extract from a circular issued by the manufacturers of these letters:
Having thoroughly cleaned the window and freed it from grease, draw with white marking chalk on front of it the plan or arrangement of outline it is intended to adopt—straight or curved, as the case may be. A rule is used for marking the straight lines and a piece of twine for the curved lines. Now divide these guide lines up into as many spaces as there are letters to go on, carefully proportioning them. Then apply the cement to the back of the letters with a knife, laying on equally around both the inside edges. Place the letter upon the window in the space marked for it and work it up and down, back and forth, pressing against the glass, so as to expel the air and secure a good adhesion, and taking care to press equally on top and bottom of the letter, as otherwise there is a likelihood of breaking. It is advisable, in cementing larger sized letters than six inches, to leave the letters lay for an hour after placing the cement around the edges, and then to give another coat of cement and attach the letters immediately. The object is to prevent all the cement from working inside the concave parts of the letters. In affixing larger and heavy letters, small pieces of beeswax (or, in summer, sealing wax) should be employed to keep them in position until the cement sets. As soon as the letters are attached to the glass take a small stick of wood, sharpen it on the end and clean away all superfluous cement, keeping the end of the stick constantly wet. Particular care should be taken to leave no openings between the letters and the glass (especially around the top edges) which would allow water to get in between.
If wax has been used, remove it after a few days and clean with a rag. The sign is then complete for long service. The above method will answer equally well on any smooth surface such as stone, iron, marble, wood.
To make the cement, mix two parts of white lead ground in oil with three parts of dry white lead, and thin it down to the consistency of soft putty with some good furniture or copal varnish. Then take small parts of it and grind them on a stone or glass plate in the manner of painters grinding color with a bowl or palette knife. This is to be continued until the cement is entirely smooth and cornless, and then it is ready for use.
To remove enameled letters, the most convenient way is to scratch away around the edges all the cement you can from under the letters. Use for this purpose a very thin knife or a piece of thin sheet steel. You will soon reach the soft part of the cement; then cut away with a sawing motion and twist them off. Do not attempt to pry the letters off, or they may break. If the cement should be very hard, say after a number of years, use a little kerosene oil, which is applied on the top edges of the letters, so as to work in and soften the cement.
WALL SIZING FOR KALSOMINING.
There are many things about wall sizing, which depend largely upon good judgment for success, because the treatment must be varied according to the condition of the wall or ceiling. A good size is made of good white glue, ½ pound; alum, 1 pound.
Dissolve the glue in the usual way; that is, soak it in cold water until soft, then pour off the cold water and pour on the hot water; and stir until the glue is dissolved.
Dissolve the alum in hot water.
Then stir the glue, and put in the alum water. Thin the mixture with water to the right consistency to work well.
If one coat is not sufficient, give it two; or if there are porous places in the wall, touch them up.
In many cases a simple glue size is sufficient, but if you use the glue and alum size as above directed, you will be pretty sure of a good foundation for kalsomine.
One of the most difficult things to overcome in preparing ceilings for kalsomine is the water stain, which is liable to be invisible until developed by a coat of kalsomine. If you find water stains on a ceiling and suspect that there may be others which do not show, go over the ceiling with a thin wash of whiting mixed in clear water, which when dry will develop all hidden stains. To kill a bad stain, first put on a coat of oil, japan and turps, equal parts; second, put on a coat of good heavy shellac; third, give the spots a coat of flat lead. This treatment is for dark stains; for light stains a coat or two of shellac will stop the stain. It is best to put a coat of keg lead thinned with turps over the shellac, because kalsomine is liable to scale off from shellac.
On cheap work, if the stain is not too dark, it may be kept back by pasting a piece of paper over it. If the wall has been kalsomined it is always in order to wash off the old kalsomine. If the work has been whitewashed, either take it off or first give it a wash of strong vinegar, then a glue size, which, if put on thin and plentifully while warm in a warm room, is about the best size I know of for whitewash. I have often used it successfully when it was not practicable on account of the weakness of the ceiling or other cause to take off the old whitewash. Two thin coats of good glue size on firm whitewash makes as fair a foundation for kalsomine as can be made on old whitewash.
When it will not pay you to wash off the old kalsomine, a coat or two of the wall sizing described above will make a good foundation.
SIGN PAINTING.
To the beginner I will say: Learn the letters; get a variety of alphabets in your head; the more you have the better you will be prepared to do a pleasing variety of sign writing. A variety of letters arranged in alphabets are given in the following pages as a convenient means of reference for the painter who may desire to refresh his memory, as to the form of any letter represented, or to make a study of them with a view of acquiring a knowledge of the formation of letters generally.

No. 1. GOTHIC CONDENSED A B C D E F G H I J K L M N O P Q R S T U V W X Y Z & .
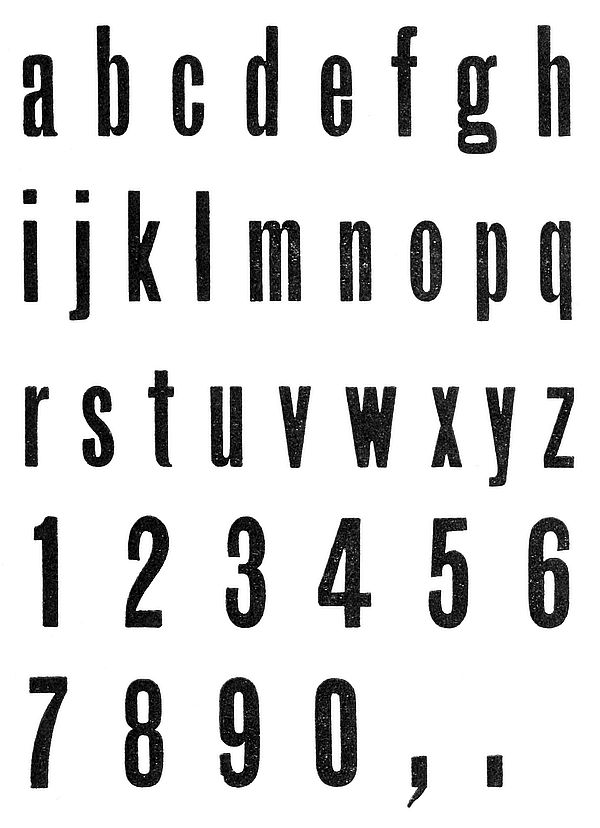
No. 1. GOTHIC CONDENSED—continued. a b c d e f g h i j k l m n o p q r s t u v w x y z 1 2 3 4 5 6 7 8 9 0 , .
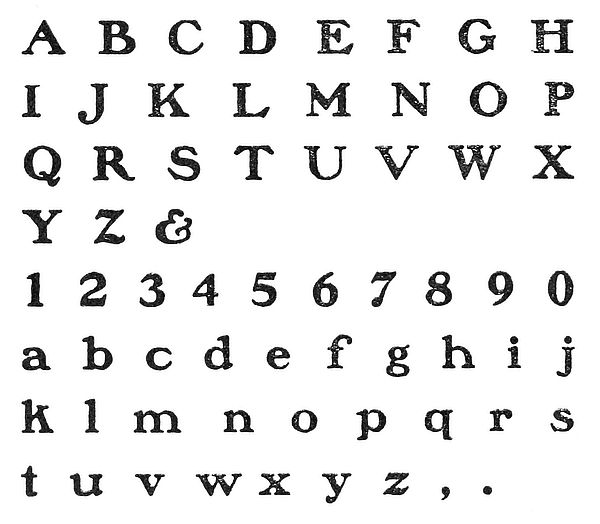
No. 2. BLANCHARD. A B C D E F G H I J K L M N O P Q R S T U V W X Y Z & 1 2 3 4 5 6 7 8 9 0 a b c d e f g h i j k l m n o p q r s t u v w x y z , .
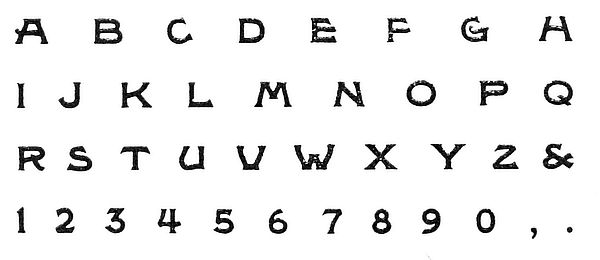
No. 3. ALASKAN. A B C D E F G H I J K L M N O P Q R S T U V W X Y Z & 1 2 3 4 5 6 7 8 9 0 , .
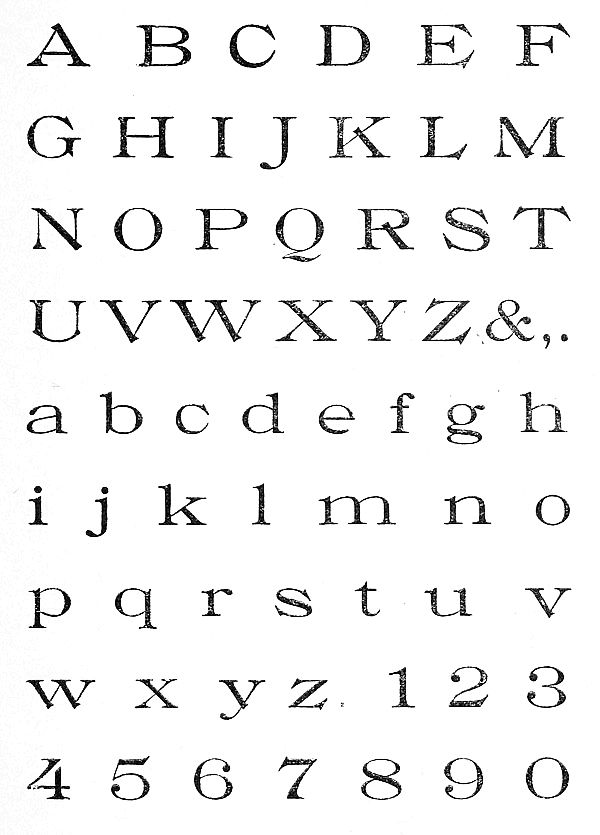
No. 4. OLD STYLE EXTENDED. A B C D E F G H I J K L M N O P Q R S T U V W X Y Z & , . a b c d e f g h i j k l m n o p q r s t u v w x y z 1 2 3 4 5 6 7 8 9 0
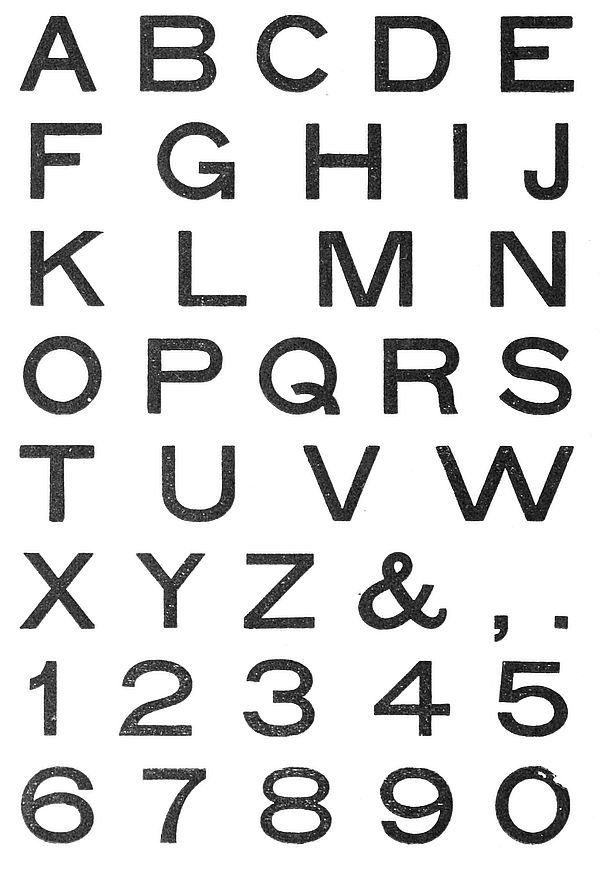
No. 5. LINING GOTHIC. A B C D E F G H I J K L M N O P Q R S T U V W X Y Z & , . 1 2 3 4 5 6 7 8 9 0
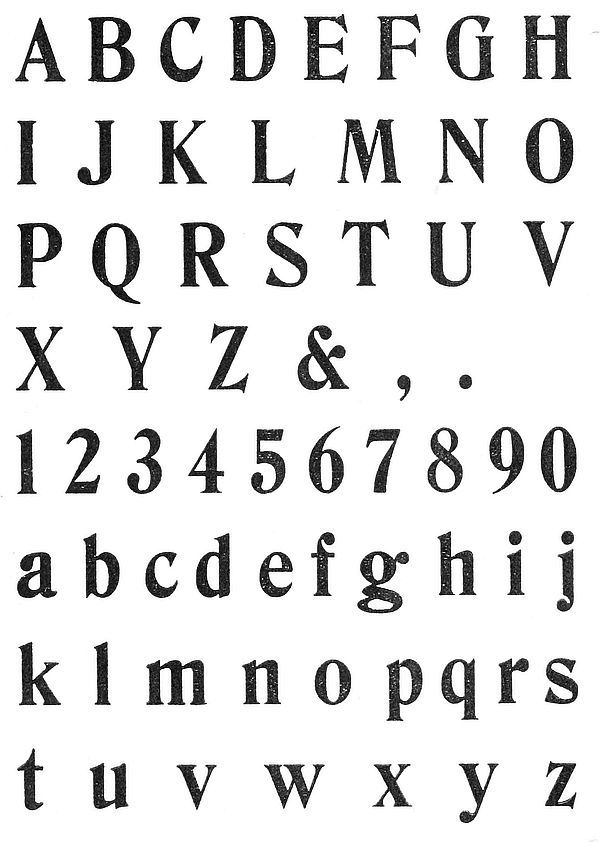
No. 6. CONDENSED DE VINNE. A B C D E F G H I J K L M N O P Q R S T U V W X Y Z & , . 1 2 3 4 5 6 7 8 9 0 a b c d e f g h i j k I m n o p q r s t u v w x y z
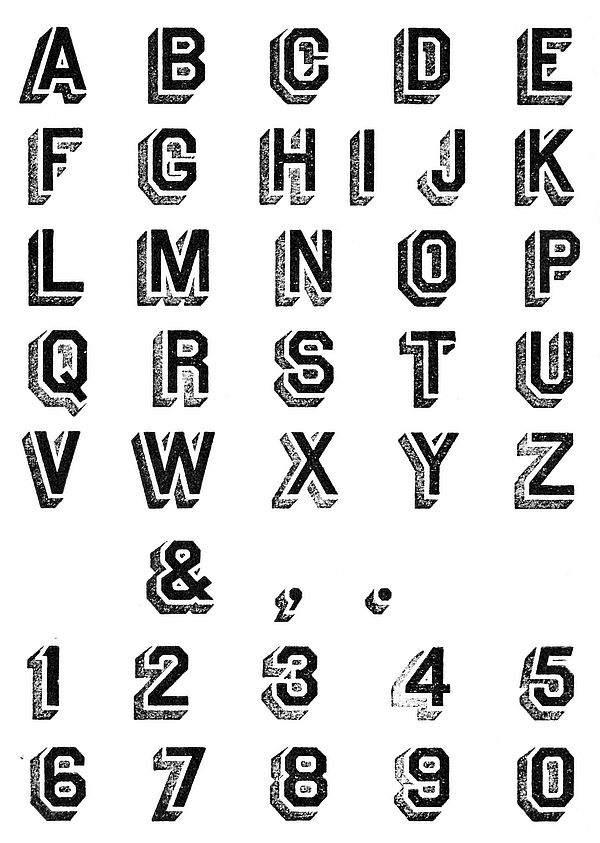
No. 7. GOTHIC SHADED. A B C D E F G H I J K L M N O P Q R S T U V W X Y Z & , . 1 2 3 4 5 6 7 8 9 0
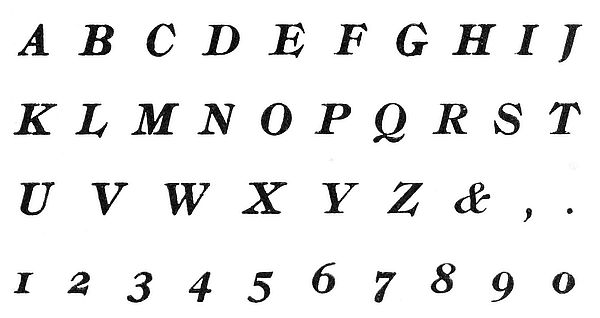
No. 8. RONALDSON SLOPE. A B C D E F G H I J K L M N O P Q R S T U V W X Y Z & , . 1 2 3 4 5 6 7 8 9 0
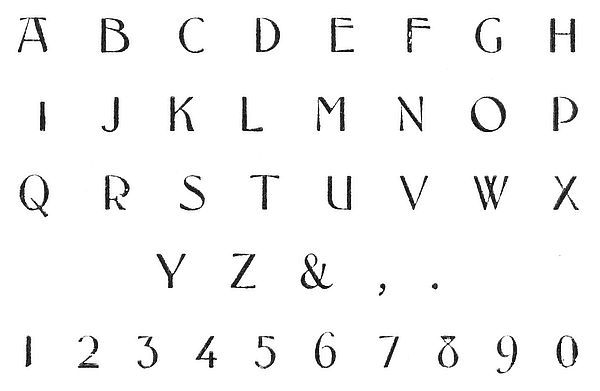
No. 9. FLORENTINE. A B C D E F G H I J K L M N O P Q R S T U V W X Y Z & , . 1 2 3 4 5 6 7 8 9 0
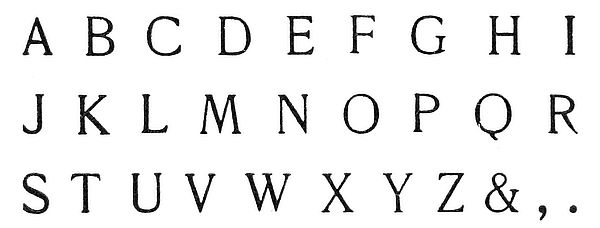
No. 10. FRENCH OLD STYLE. A B C D E F G H I J K L M N O P Q R S T U V W X Y Z & , .
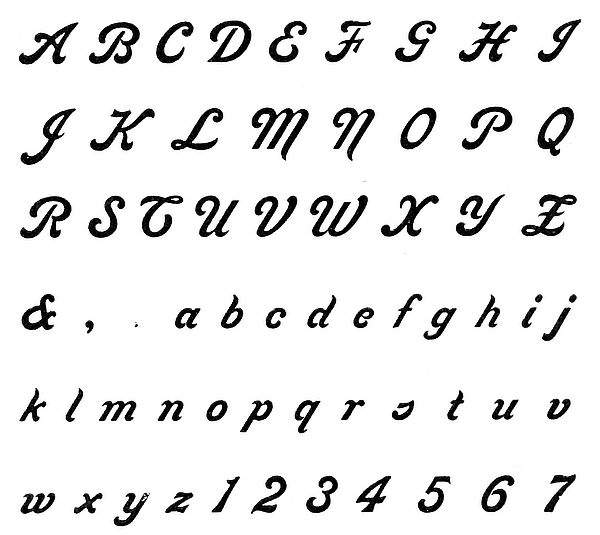
No. 11. LIVERMORE. A B C D E F G H I J K L M N O P Q R S T U V W X Y Z & , . a b c d e f g h i j k l m n o p q r s t u v w x y z 1 2 3 4 5 6 7 8 9 0
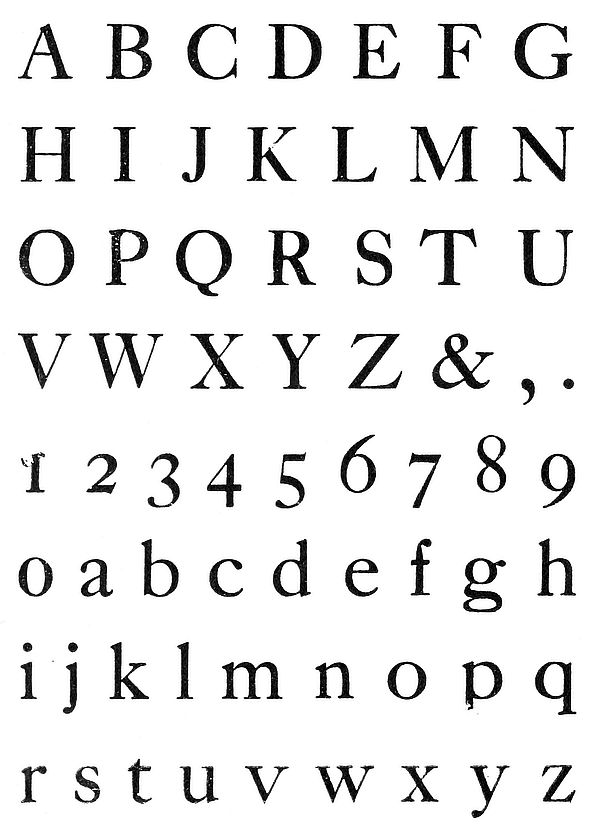
No. 12. CASLON OLD STYLE. A B C D E F G H I J K L M N O P Q R S T U V W X Y Z & , . 1 2 3 4 5 6 7 8 9 0 a b c d e f g h i j k l m n o p q r s t u v w x y z
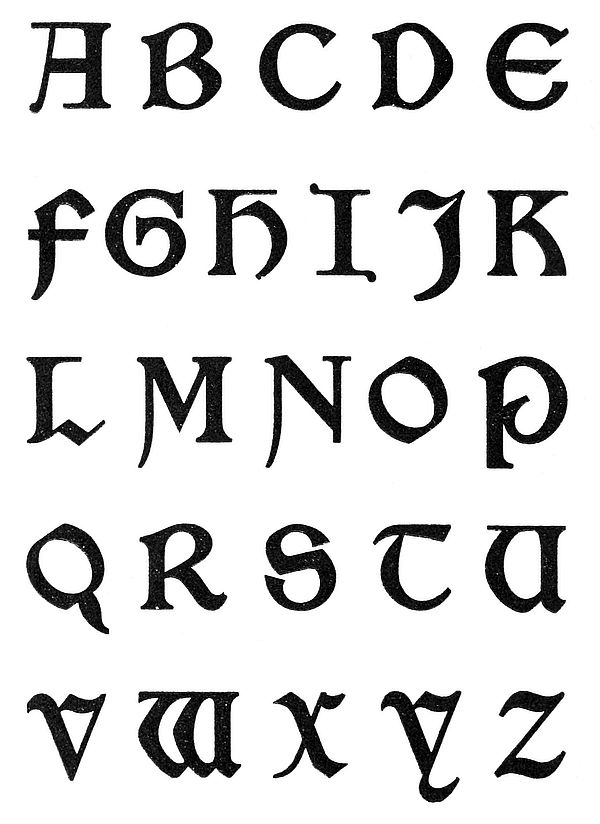
No. 13. SATANICK. A B C D E F G H I J K L M N O P Q R S T U V W X Y Z
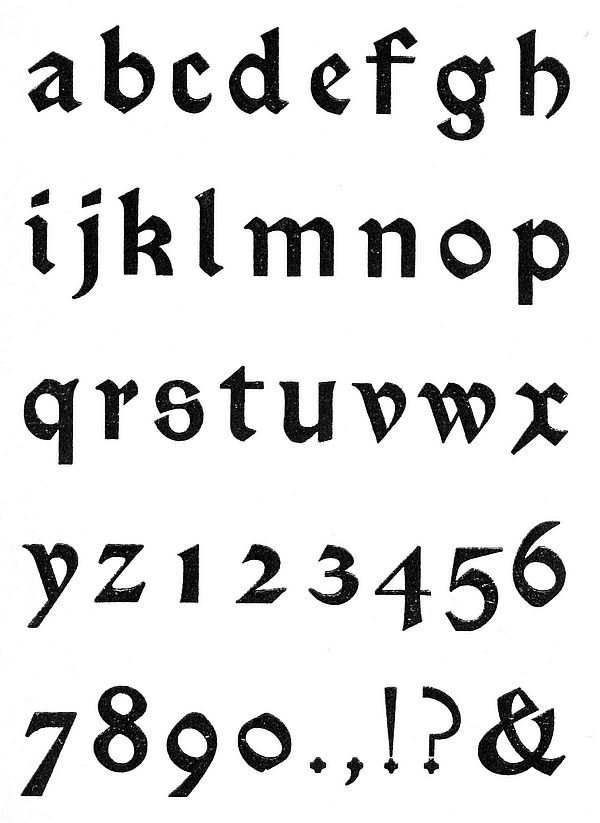
No. 13. SATANICK—continued. a b c d e f g h i j k l m n o p q r s t u v w x y z 1 2 3 4 5 6 7 8 9 0 . , ! ? &
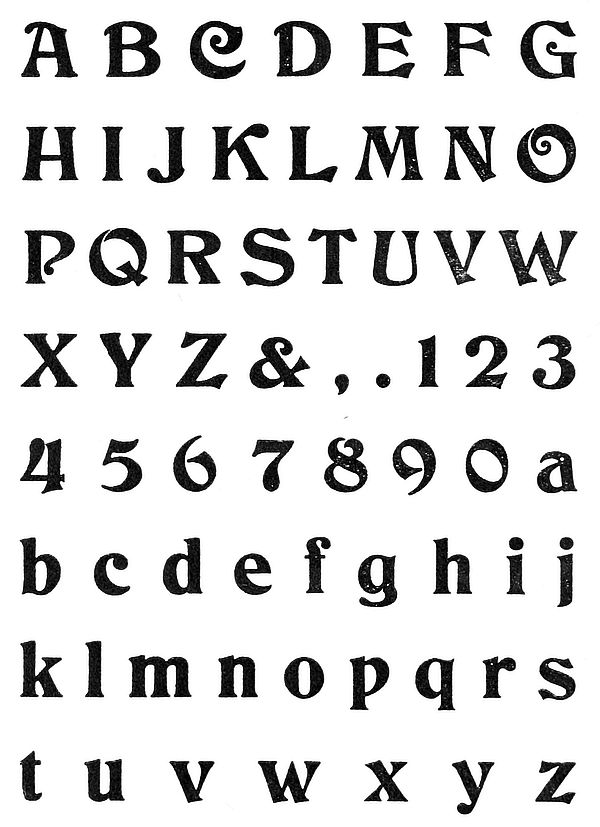
No. 14. COLUMBUS. A B C D E F G H I J K L M N O P Q R S T U V W X Y Z & , . 1 2 3 4 5 6 7 8 9 0 a b c d e f g h i j k l m n o p q r s t u v w x y z
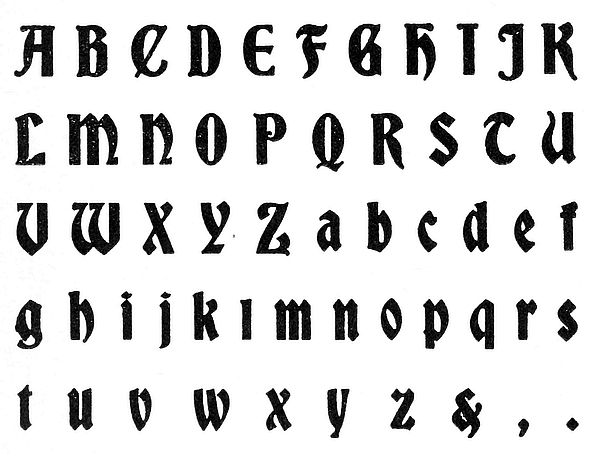
No. 15. BRADLEY. A B C D E F G H I J K L M N O P Q R S T U V W X Y Z a b c d e f g h i j k l m n o p q r s t u v w x y z & , .
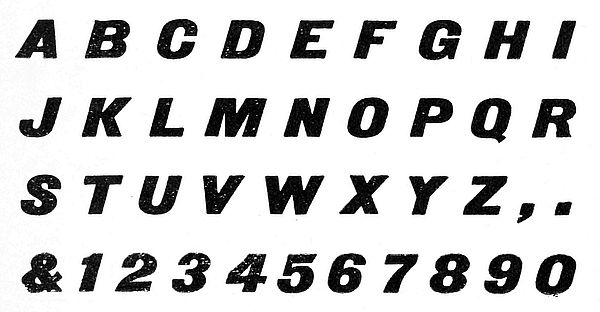
No. 16. DORIC ITALIC. A B C D E F G H I J K L M N O P Q R S T U V W X Y Z , . & 1 2 3 4 5 6 7 8 9 0
LIST OF PRICES AND MODE OF MEASUREMENT.
Prices for Painting and Glazing.
SQUARE MEASURE.
Plain weather boarding, close fencing, ledge doors, partitions, paling fences, etc. All common colors, viz.: White, light yellow, slate, pearl, light drab or cream color, for each coat, per yard 8 cents
Each coat of varnish 10 cents
PANEL WORK.
Flush panel work, panel doors, recesses, etc., the above colors, for each coat, per yard 10 cents
The same in two colors 12 cents
The same in three colors 14 cents
Striping after other work is finished, per foot, lineal measure 1 cent
For expensive or unused colors, per yard, additional 1 cent
For each coat of varnish, per yard 12 cents
For each coat of shellac, per yard 12 cents
BRICK WORK.
Per Yard.
First coat 15 cents
Second coat 12 cents
Third coat 10 cents
Penciling 15 cents
Mastic or cement, first coat 20 cents
Additional coats, same as brick.
INSIDE WALL PAINTING.
Per Yard.
First coat 12 cents
Second coat 10 cents
Third coat 8 cents
STOPPING AND CLEANING.
Ordinary puttying, charge price of first coat for the several kinds of work. Puttying longitudinal joints in ceilings, siding, floors, etc., to be charged from two to four times the price of first coat for the several kinds of work, at the discretion of the measurer.
SURFACING, STAINING AND VARNISHING.
Each coat surfacing 10 cents
Each coat stain 8 cents
Each coat varnish 12 cents
LINEAL MEASURE.
Pilasters, architraves, frames, jambs, base mouldings, etc:
——Each Coat——
Girth. Per Foot. Varnish.
1 to 4 inches ½c ¾c
4 to 6 inches ¾c 1 c
6 to 8 inches 1 c 1¼c
8 to 10 inches 1¼c 1½c
10 to 12 inches 1½c 1¾c
12 to 14 inches 1¾c 2 c
14 to 16 inches 2 c 2¼c
16 to 18 inches 2¼c 2½c
18 to 20 inches 2½c 2¾c
20 to 22 inches 2¾c 3 c
22 to 24 inches 3 c 3¼c
Larger dimensions taken in square measure.
Column mantels as above.
Panel jambs, door casings, etc., to be measured by the above rule.
Plain rosettes, add one foot to length.
Carved rosettes, add two feet to length.
Other carved or ornamental work at the discretion of the measurer.
MODE OF MEASURING.
Begin at wall, press line in all quirks to bead at edge of jamb casing for girth. For jambs take inner sash rabbet to corner bead, double the height and measure between jambs for length.
STRING BOARD, ETC.
Per Foot.
Plain, each coat 2 cents
Bracketed, each coat 3 cents
Carved, each coat 4 cents
Staff beads, each coat ½ cent
Edge of shelves, each coat ¼ cent
CORNICES AND COLUMNS—PLAIN.
Per Foot.
Girth, 1 to 2 feet, each coat 3 cents
Girth, 2 to 3 feet, each coat 4 cents
Girth, 3 to 4 feet, each coat 5 cents
Girth, 4 to 5 feet, each coat 6 cents
Plain caps on columns, add to length two feet.
Ornamental caps on columns, add to length four feet.
CORNICES WITH BRACKETS.
Per Foot.
Girth, 1 to 2 feet, each coat 4 cents
Girth, 2 to 3 feet, each coat 6 cents
Girth, 3 to 4 feet, each coat 8 cents
Girth, 4 to 5 feet, each coat 10 cents
Girth, 5 to 6 feet, each coat 12 cents
Larger dimensions in proportion.
Dental cornices, same price as brackets.
MODE OF MEASURING.
For girth, begin at top, press line into all quirks and over each member to the bottom, and to the length add one-half the medium girth of the brackets multiplied by their number.
PRIMING OR TRACING AND GLAZING SASH.
EACH SIZE, PER LIGHT.
Priming Old Glazing
or New and Glass
Tracing. Glazing. S.S.
8 to 10 × 12 to 14 $0.01¼ $0.05 $0.20
12 × 16 or 18 .01½ .08 .35
14 × 24 .02 .10 .40
18 × 24 .03 .14 .50
D.S.
24 × 30 $ .05 $ .18 $1.00
26 × 36 .06 .20 1.30
30 × 36 .08 .25 1.65
36 × 40 .10 .30
40 × 44 .12 .35
40 × 50 .14 .40
40 × 50 .16 .50
50 × 60 .18 .60
50 × 70 .20 .75
These prices do not apply when called out to glaze one or two lights.
For back puttying add one-quarter, and for bedding add one-half, to the above rates.
In new glazing cost of glass not included.
All breakage at the risk of the owners, if glass is furnished by them. To all bills of glass furnished by the trade 20 per cent. will be charged additional.
PLATE GLASS.
Sizes same as table above, at same prices. Sizes above to 90 square feet, 5 per cent. on net cost delivered; 90 to 108 square feet, 8 per cent.; 108 square feet and upwards, 10 per cent.
Removing old glass, same as above. The owner to pay cost of taking up large glass above first floor.
Unless otherwise provided for, glazier puts glass in at his own risk of breakage, but cutting will be at owner’s risk.
SANDING.
First coat of sand equal to two coats of paint, in addition to paint.
Second coat of sand equal to three coats of paint, in addition to paint.
GRAINING—SQUARE MEASURE.
Per Yard.
Plain oak $0.40
Plain walnut or ash .70
Plain satinwood or maple .70
Plain mahogany or cherry .70
Shaded oak .50
Penciled oak or ash 1.00
Penciled chestnut or cherry 1.00
Penciled walnut 1.00
Rosewood 1.00
Oak root 1.50
LINEAL MEASURE.
Girth. Graining. Varnishing.
1 to 4 inches, per foot $0.03 $0.00¾
4 to 6 inches, per foot .04 .01
6 to 8 inches, per foot .05 .01¼
8 to 10 inches, per foot .06 .01½
10 to 12 inches, per foot .07 .01¾
12 to 14 inches, per foot .08 .02
14 to 16 inches, per foot .09 .02¼
16 to 18 inches, per foot .10 .02½
Other members in proportion.
Graining edges of shelves, per foot, 1½ cents.
Graining sash, double the price of plain painting.
MARBLING—SQUARE MEASURE.
White, per yard $0.75
Other kinds, per yard 1.00
Varnishing, each coat, per yard .12
LINEAL MEASURE.
All members ——Per foot——
from Marbling. Varnishing.
1 to 8 inches girth $0.08 $0.01
8 to 10 inches girth .12 .01¼
10 to 12 inches girth .16 .01½
12 to 14 inches girth .18 .02
14 to 16 inches girth .20 .02¼
Larger members in proportion.
CLEANING AND KALSOMINING.
Ceilings and walls, per yard $0.16
Plain cornices, 1 to 2 feet girth, per foot .02
Plain cornices, 2 to 4 feet girth, per foot .03
Add to the above for each color, if more than one, 1 cent per foot.
DEDUCTIONS.
The price of any work measured and not specified in this list shall be fixed by the measurer.
The measurer is hereby authorized to deduct from 5 to 20 per cent. from the price of any work that in his judgment is not first-class.
FEES FOR MEASURING.
Jobs amounting to $150 or less 5 per cent.
Jobs amounting to over $150 and less than $500 4 per cent.
Jobs amounting to over $500 and less than $1,000 3 per cent.
Jobs amounting to over $1,000 2 per cent.
Sign Painting.
FACIA SIGNS.
Gold. Plain.
12 feet long $ 8.00 $ 4.00
14 feet long 9.00 4.00
16 feet long 10.00 5.00
18 feet long 12.00 6.00
20 feet long 15.00 7.00
24 feet long 16.50 8.00
Above includes two coats of paint.
BRASS SIGNS.
3 × 14 inches $ 3.50
4 × 20 inches 5.00
6 × 8 inches 4.00
6 × 12 inches 4.50
8 × 14 inches 5.00
10 × 14 inches 5.00
12 × 17 inches 6.00
14 × 20 inches 7.00
18 × 25 inches 10.00
24 × 30 inches 15.00
Sill signs, per square foot 3.50
Square signs, per square foot 3.00
TO MAKE HARD PUTTY.
For Carriage Work.
Mix equal parts of dry __________ and keg white lead with equal parts of rubbing varnish and gold size japan; mix thoroughly and pound well.
For Hurried Work.
Mix dry white lead with equal parts of rubbing varnish and gold size japan. Keep hard putty covered in water when not in use.
TO MAKE AND APPLY KALSOMINE.
Soak one pound good white glue in cold water until soft, then pour off the cold water, and dissolve the glue in hot water. Mix twenty pounds of good whiting in water to a thick paste; dissolve one pound of alum in water, and add it to the mixture. Before mixing the glue and whiting, put in your tinting colors, which should be ground in water. Test your color by dipping in a piece of paper and letting it dry. After you put in the glue, test in the same way to see if there is enough glue to bind it well, then set your kalsomine aside to get cold.
Thin to good workable consistency with cold water.
Have in enough glue to hold it from washing up when you have to put on a second coat. Too much glue will cause the kalsomine to go on hard, and crack and scale off when dry. If it dries too fast, add two ounces of glycerine to one gallon of kalsomine. Have good staging, and two men for a good sized room. Use good kalsomine brushes, and work fast. Lay on the kalsomine freely; the beauty of the work will depend upon how you lay it off, and level it up. Put it on not as you would paint, all one way, but work your brush in all directions, until your work is level, then carefully lay it off with light strokes.
For a white job put in a little blue. If you have never done a job of kalsomining, and have no one to aid you, practice on the wall in your shop or any other place, until you get the knack of it. Cover a small space and see how it comes out.
Always finish lightly with the point of your brush. If an edge dries, stop and wet it with a clean brush and clear water; if careful you can join to it without showing “laps.” If you find you have missed any spots wet the edges in the same way, and carefully touch them up with kalsomine. If you find after all your precautions, a water stain has come through your kalsomine, wet the place with a solution of sugar of lead, made in proportion of 1 ounce sugar of lead to 1 quart of rain water; it may kill the stain. See article on wall sizing and water stains, page 39.
Rough places in plaster take more color than a smooth wall, hence they are liable to show spots; so it stands you in hand to make such places smooth as possible; to do this take off the rough sand with sandpaper and knife or trowel on a thin coat of plaster paris, or give the rough places an extra coat or two or size. Fill all cracks and holes, and give the filling time to dry before putting on the size, because otherwise it will take more color than the balance of the wall and your work will look spotted.
In the kalsomining season have some large tubs and mix up as much whiting in hot water as you will need for several days. Add your color, glue, size and alum to as much only as you want for immediate use. In hot weather I use liquid glue.
LIQUID GLUE FOR KALSOMINE AND WALL SIZING.
For use in hot weather, a liquid glue which will not decompose and smell badly is very desirable to the workmen and the inmates of the house.
No. 1. To make such a glue fill a bottle a little more than half full of broken up good white glue, and fill the bottle with common whisky or equal parts of alcohol and water. Let it stand a few days and it will dissolve the glue; this glue will keep for years. Keep the bottle corked.
No. 2. Melt your glue in the usual way, thick as you will want it for any purpose, then put in ½ or ¾ ounce nitric acid to each pound of glue used; enough to give the glue a sour taste, like vinegar. The acid keeps it in a liquid state, and from spoiling. If you melt the glue in an iron kettle pour it into a wooden vessel, before you add the acid, otherwise the acid will act on the iron and blacken the glue. When wanted for use it can be thinned as desired with cold water; a cask full of this made up and kept air tight so the water will not evaporate will be found very handy to draw from, when you want a little in a hurry for glue size or kalsomine. When you make it up in this way put in at least 1 ounce of acid to the pound of glue to make sure it will keep liquid, so you can draw it from the cask.
Acetic acid will answer the same purpose as nitric acid, but it will take more of it and make the liquid glue more expensive.
TO PREPARE AN OLD WALL FOR PAINT OR PAPER.
First cut out all the cracks V shape, clean out the holes and bevel the edges same as the cracks. Then fill with fine plaster paris mixed with thin glue size. Fill with care; when dry, sandpaper the filling smooth and level. If the wall is sandy or rough, sandpaper it smooth as you can. If the holes are large, have a plasterer stop them, if you can; if you fail in that, and the job must be done soon, fit in thin boards, fill around the edges with plaster, and paste on cloth, or extra paper; but to do a nice job you must insist on having the large holes plastered. If the hole is up out of reach, and too large for you to fill, cement the edges with plaster, stretch a piece of cloth, or extra thickness of paper over it, and it will look all right, because the paper will shrink tight when it dries. If you find places where the clinches are broken, and the plaster is loose, press the plaster back to its place if you can, and cut small holes through the plaster and turn small broad headed screws into the lath even with the plaster and cement around the screws with plaster paris.
If it is a smooth wall with rough, sandy patches, sandpaper down the patches a little below the level of the wall, sweep out the loose plaster, give a coat of glue size, and knife or trowel in a coat of plaster paris mixed with glue size or vinegar, and when dry, sandpaper until smooth and level.
There are several points to be considered and provided for in filling cracks in a plastered wall preparatory to painting. First, are the edges of the cracked wall level? To determine this, lay your rule across the crack, and if you find the plaster on one side of the crack higher than the other, it shows that side of the wall has sprung out of place, because the laths are loose or the clinches are broken. The first thing on the program is to get the highest edges back to “place.” Failing in that, the next best thing is to raise the other side. If that scheme don’t work, the next method is to use sandpaper on a block and rub down the highest side with a wide bevel to match the lowest, otherwise your filling will be at an angle more or less acute with the general surface of the wall, and cast a shadow or reflect the light according to which way the light falls upon it, and the place where the crack was will “show” in spite of your best efforts to conceal it. If you find one edge of a crack higher than the other, gently press against it, and if it goes back to place, cement it with plaster paris wet up in clear water, and it will set in three minutes hard enough to hold the plaster in place. If the loose edge will not go back by gentle pressure, lay a piece of board over it and push hard as you dare to and not crush the plaster. If it is still obstinate, drill out a piece and insert a bent wire or other instrument made on purpose, and see if you can feel the obstruction and remove it. Failing in this, see if you can raise up the lower side to a level with the highest and cement it fast. If the last scheme is too much for your patience and ingenuity, resort to the block and sandpaper, and rub down the high side with a wide bevel to match the other. The next point is to prevent the paint near the edges of the crack, and on the filling which we put in, from drying flat while the balance of the wall bears out a gloss. To do this we must find out the cause of the “flatting” near the edges of the crack and over the “filling.” If we examine into the matter, we will find that when the wall cracked the plaster adjacent was more or less fractured and made more porous than the uninjured portions of it. Hence, more oil is drawn from the paint near the crack than where the wall is solid. Now, for the remedy: With a small pointed brush wet the edges of the crack with linseed oil until they will take no more in. Let the oil dry, and fill the crack with plaster mixed with thin glue size, but have the top of the filling one-sixth of an inch below the surface of the wall. Let the filling dry, and with a fine pointed brush paint over the top of the filling and the edges of the crack. Let the paint dry, and finish filling with hard putty. Let the putty dry, and sandpaper the job smooth and level. If you have to bevel the highest edge with sandpaper, first fill the beveled portion with oil. Let the oil dry, and fill the pores with hard putty, because the part beveled with sandpaper will be more porous than the balance of the wall. Treat and fill all small holes by the same method. Filling cracks in this way is a little tedious, I admit; but it is the only way that I know of to stop a crack in plaster, so it will stay stopped and not show after it is painted.
HOW TO PAINT A PLASTERED WALL.
Prime with lead and raw oil, tinted like succeeding coats. Have the prime thin, not more than five pounds of white lead to the gallon of oil; add a little benzine or turps to make it more penetrating. If the room is cool, warm up your prime before you add the benzine or turps. The idea is to have it penetrate as much as possible; brush the prime well into the wall. If it is a sand wall, brush off the loose sand. If it is a smooth one, putty coated or hard finished wall, see that there are no lumps or grains of sand left on the surface. It is a good idea to pass the hand over the wall to feel the lumps, and to knock off lumps and grains of sand by going over the work with sandpaper.
For second coat use glue size, made as directed on another page.
Third coat. Mix so as to dry with a gloss, have the body fairly thick, and spread it well out. Mix with 3 parts linseed oil to 1 part turps.
Fourth coat.—If this coat is to be flat, mix it thick enough to cover well; mix mainly with turps, if the weather is hot, or from any other cause the paint don’t work well, add a little linseed oil. For an egg shell gloss, use about 1 part oil and 3 parts turps.
If the wall is to be finished in stipple, mix the last coat half oil and half turps, rather thick, and add a little japan. To stipple strike the paint evenly and continuously with the square end of a large brush, made for the purpose; a new clean duster will do. Let the stippler follow the painters. The coat of glue size saves two coats of paint. It is put on after the prime to keep moisture and air from the glue, otherwise it would be liable to decay.
Use boiled oil in all coats except priming coat. Have only enough difference in the color of the different coats, so you can see where you have painted, and not leave holidays; especially in rooms where the light is not very good.
Some painters advocate (especially on hard finished wall) a good filling of clear linseed oil, before any paint is put on to keep the surface from fire cracking.
It is risky business to paint a new hot wall; in such cases if it must be done before the lime has become somewhat neutralized, give it a coat of vinegar, and let it stand a day or so before you put on the prime. The vinegar will neutralize the lime and not hurt the priming.
TO PREPARE A ROUGH SANDY WALL FOR PAINT OR PAPER.
If you have a rough brown mortar wall to paper and want to make the job look smooth as possible, first go over it lightly with No. 2 paper to knock off the loose and most prominent grains of sand; then with No. 2 paper rub down all “cat faces” and trowel marks; level up all hollows with plaster paris wet up in thin glue size or vinegar, and you will be ready to put on the lining paper. This paper should be soft and porous so that it will quickly absorb paste and not blister; good white blank wall paper having but little color will answer very well for this purpose. Start in to hang it with half a strip in width so as to break joints with the next coat; use sufficient paste to make the paper stick to the wall; butt the edges and be sure when the paper is dry that there are no loose places. Right here is the turning point of your job for “good or for bad.”
Pound the lining paper down so closely that all the prominent grains of sand will show through, and be sure to make it stay there until dry. When the lining paper is dry, go over it with good sharp No. 1½ sandpaper and cut out all the prominent grains of sand which show through the paper, being careful to rub no more than is necessary to take out the sand; the idea being to cut through to the prominently projecting grains of sand, and rattle them out. Some walls will need a second coat of lining paper and another sandpapering, before they are smooth enough for anything like a fine job. If the owner refuses to stand the expense of putting on lining paper, glue size the wall, and when dry, knock off the prominent grains of sand with sandpaper and knife in plaster paris putty on the rough places. In either case, take extra pains with portions of the wall where there are side lights, which always magnify rough places. Sandy walls may be leveled and smoothed somewhat with a coat of kalsomine to hold light bodied paper.
Make a kalsomine of good white glue, 1 pound to 15 pounds of whiting and half a pound of alum. Dissolve the glue and alum in the usual way. When the kalsomine is dry, give the surface a thin coat of glue size to stop the suction. Let the glue size dry, then put on the paper; use light paste, and be sparing of it as you can and make the paper stick. I have often noticed that too much or too little paste is used in paperhanging; some walls and some papers require more paste than others. Too much paste on a smooth wall, or too little on a rough one, makes bad work. If you use a roller for seams have it covered with short plush. To paint on a wall covered with lining paper as above described, first put on a coat of glue size.
TO PAINT OVER NEWLY PLASTERED CRACKS IN WALLS.
When the painter has to paint over holes and cracks in walls recently filled by the plasterer, he will be likely to have to deal with plaster made in part of fresh lime. In such cases, it is always best to soak the newly plastered places with strong vinegar, to kill as much as possible the caustic properties of the lime. Put on the vinegar plentifully and let it soak in; when dry, give the new plaster a coat of size made of linseed oil, japan and turpentine; when dry, put on a coat of white shellac before painting.
FLASHED GLASS SIGNS.
Flashed glass is clear on one side and colored on the other; the colored glass forming only a thin film on one side of the clear glass. We can make elegant signs on this glass by etching the letter through the colored portion of the glass, making the letters clear and the background colored; or by etching out the background and leaving the letters colored. Lay out the letters on paper, and place it under the glass as a guide to work by; then, with asphaltum varnish cover the background and leave the letters free and clear; in other words, “cut around them.” If you want a clear background with colored border and colored letters, cover the letters and border and leave the background free and clear. Then melt some beeswax, and when it begins to cool, take up a small portion of it with a putty knife and scrape it off on the edge of the glass, and repeat the operation until a wall or dam is made all around the glass, to hold the acid you are about to put on the glass, from running off; then pour on a little hydrofluoric acid, and it will etch out the colored glass not covered by the asphaltum in about one hour; then you can pour the acid back into your bottle, to be used again. Next wash the glass by pouring water over it; then scrape off the wax, and take off the asphaltum with turpentine. Some painters use a varnish made by melting together equal parts of paraffine and asphaltum and thinning to working consistency with turpentine.
FLUORIC ACID, TO MAKE FOR ETCHING PURPOSES.
You can make your own fluoric acid (sometimes called hydrofluoric) by getting the fluor spar, pulverizing it and putting as much of it into sulphuric acid as the acid will cut or dissolve.
Druggists through the country do not keep this acid generally, but they can get it in the principal cities. One ounce will do at least fifty dollars worth of work. It is put in gutta percha bottles or lead bottles, and must be kept in them when not in use, having corks of the same material. Glass, of course, will not hold it, as it dissolves the glass, otherwise it would not etch upon it.
LIQUID WOOD FILLERS FOR CHEAP WORK.
Corn starch and cheap varnish are the principal ingredients of many cheap wood fillers; the corn starch is mixed with the varnish and thinned with turps until workable. You can experiment on this idea.
Corn starch in shellac in proportion of 1 pound to the gallon doubles its capacity as a filler. I have made and used a filler for cheap work in this way: Pale rosin, 2 pounds; boiled oil, 1 gallon; japan, 1 pint. Melt the rosin in the oil, take the kettle outside, and add ½ gallon turpentine; stir and when cold add ½ pound of corn starch. Thin with turps until workable. Add more or less starch, according to the surface you want to fill. These mixtures are all the better if run through a paint mill.
ANOTHER PASTE FILLER.
Corn starch mixed to a paste with one part linseed oil, two parts each japan and rubbing varnish; thin to working consistency with turpentine.
CARRIAGE PAINTING IN THE VILLAGE SHOP.
NEW WORK.
Prime with white lead, mixed thin in oil, add a little japan and turpentine to make the paint dry hard and quick; when the priming is dry and hard, putty up with hard putty as directed on another page. Then follow with two coats of keg lead thinned with turpentine; add a little japan to make it dry hard, and a little oil to make it work well. Carefully mix and strain your paint. Give the body five coats of rough stuff, made as directed on page 144 and a guide coat, and when dry, proceed to cut down the rough stuff. For this purpose your tools will be several pieces of pumice stone, a pail of water, a large flat file, a good sponge and a chamois. Flatten one side of your stone for a grinding surface and have no thin edges, because they will keep breaking off and be liable to get under the stone, and scratch your work. Now, two of the most important things you will have to guard against is cutting through the rough stuff and lead coats, and scratching the surface. There is a great difference in pieces of pumice stone. Some are hard and full of flint like particles, which will scratch the work; others are softer and of more even grit; the light colored and fairly open grained pieces are the safest to use. You can tell a fast cutting stone by its open grain and lightness. The finer grades of German rubbing brick and English rubbing stone are also used in rubbing rough stuff. A stone with a broad surface is preferable for large surfaces.
Have small pieces to rub around the bolt heads and other places which are difficult to get at with the large stone. The practiced workman can tell the moment a stone begins to scratch, both by the sound and by the feeling to the hand, and you may train your ear and nerve to this degree of sensitiveness; until you do so, you will have to look sharp, and frequently rub your stone on the file, and clean off your work with a sponge full of water to see the condition of the work. Also by passing your hand back and forth across it to determine the condition of it, or if there is any large grit on it, liable to get under the stone and scratch. Rub until the brush marks are gone, etc., which your guide coat will show you. Use plenty of water while rubbing. Thoroughly wash the body inside and out. When dry, sandpaper lightly over the body to remove any grit which may be left on, and to clean out around the irons and panels, also to sand off the irons which you have not rubbed. Dust and wipe well, and when ready, put on a coat of drop black, ground in japan. In mixing your drop black, stir it before you add any turps, then add a little turps, and stir again until it is beaten to a smooth, soft paste; then add sufficient turps to make a workable paint, thin enough to go on easily with a camel hair brush, which for body work on buggies should be not less than one and one-half inches wide and double thick. Painters disagree as to the use of oil in this coat. I like to use a very little good raw oil, say a teaspoonful to a pint of color. It is a good idea to keep a brush on purpose to coat the inside of the body, because it is not usually made as smooth as the outside. Some practice putting on the color coat in the morning and the color varnish towards evening, but I prefer a longer time, say twenty-four hours at least, and more, too, especially when I use a little oil in the color coat. Rub the color with curled hair or hair cloth, dust well, and put on your color varnish; some say with a bristle varnish brush, but I prefer to mix it so I can use a camel hair brush. For this coat mix drop black to a workable paint with equal parts of turps and good body varnish. When this coat is dry, give the body a coat of good rubbing varnish, using a fine bristle varnish brush. Flow on a free coat, lay off to right and left, and finish with up and down strokes across the work. Never put a full brush at the lower edge of the body, because in that case, you will be apt to get a fat edge. Watch for sags or runs, which you can brush out, if discovered before the varnish sets. If a sag or run should get the start of you on this coat, and you see it after the varnish begins to set, squeeze the varnish out of your brush, wet the point of it in turps, and carefully work out the sag or run. Now, dust off the running parts, and put on a coat of color. Some say, have a little more oil in the color for the gear than for the body, but I would not advise the use of more. When dry, put on a coat of color varnish. When dry, rub down with hair or hair cloth, and your gear is ready to stripe.
To paint a wheel, paint one spoke at a time, paint both sides and the edge next to you, then take your brush in your left hand and paint the back edge, and so on, until the spokes are finished. Next paint the hub, then the outside and inside of the felly, then finish the gear, being careful to leave no laps. Use only fine lines for striping a buggy. On the springs, bars, spoke faces, hubs and tongue is all the striping needed. Orange chrome, red, gold, bronze and light green, all harmonize with black, and either may be used for striping a black rig. When ready to varnish, set your gear on trestles. Varnish the wheel with a fine bristle varnish brush, and flow on a full coat. When done with a wheel, set it running on the spindle, and commence the next, and start it off again two or three times, while working at the next wheel, and so on with all the wheels; by this method you may avoid runs, and be able to flow on a fuller coat than you otherwise could. For a finer job, give the gear a coat or two of clear rubbing varnish, and rub each coat down with curled hair or hair cloth. For a cheap job, rub down the body with hair cloth, but for a finer one, rub it out with finely powdered pumice stone in water. For this method, you will need a pail of clear water, some finely powdered pumice stone and a felt pad. The object of this work is to take the gloss off the rubbing varnish, and leave a smooth coat for the finishing varnish. The particular knack is to rub just enough, and then stop; a little too much will cut through, and spoil the job; and not enough will not give you the best possible foundation for your finishing coat of varnish. Keep the work washed off as you go, so you can see defective places, and rub them out. When done rubbing, the next thing is to wash the body perfectly free from grit. Your water brush comes in play here to wash around irons, etc., where the pumice might lodge; then with a pail of clear water, rinse the body and wipe dry with a chamois skin. Right here is a good time to give the inside of the body a coat of color varnish, and to put on your transfers, if you use any. Some painters use a barrel for a body stand, but one made on purpose, of boards, is better. You want to look out for dust in every stage of the work, but right here you must be especially careful, because you are about to put on the finishing coat, which can neither be sandpapered nor rubbed down. You will learn from experience, if not before, that you cannot rely altogether upon the dust brush to free your work from dust and specks. A large soft dry chamois kept for the purpose, and never wet, can be used to advantage to wipe off the dust left by the brush. A hand bellows is very effective in taking dust out of corners where the brush or wiper cannot be worked. When you have done all you can with the brush and wiper, rub the work over with your hand and the sensitive nerves of your fingers will detect any specks which may still adhere to the surface. Some other essentials to a good job of varnishing are a clean room, free as possible from dust, clean brushes, and cups, and the person of the varnisher so dressed that he will not shed material for specks. Have one cup to hold your varnish and another to wipe your brush in. Use good varnish and never try to varnish a body with the temperature below 70 degrees F. Have a quill sharpened to a point to pick out any specks which you may discover on your work, because it requires very favorable conditions, and a mighty slick workman to prepare and varnish a body, and not have it show at least a speck or two. Use a fine chiseled bristle brush and know that it is absolutely free from specks before you commence. Now, when you are ready, don’t be timid or try to see how far you can make your varnish go. Keep in mind from the start that the nearer level—that is, a uniform thickness—you can have your coat of varnish the less liable it will be to sag or run. Put on your varnish with a full brush, laying it on right and left, and brush as level as you can, then finish with up and down strokes, being careful to chisel off the surplus at the lower corner to avoid a flat edge. Note—A friend of mine, after laying on his varnish right and left, finished with diagonal strokes across the surface at an angle of 45 degrees, then crossed it again at the same angle in an opposite direction. He had uniform good success.
For an extra fine job, give the work more coats of rubbing varnish, and rub each coat with curled hair, or hair cloth; or you may knife on a coat of putty made of keg lead and equal parts of turps and japan; rub it well in with the flat blade of the knife, and when it sets or flats, scrape off all surplus. Sandpaper when dry. This may go on in the place of third lead. You may, when the job requires it, knife on a coat of hard putty, work it down smooth, let it dry and cut down with sandpaper.
OLD WORK.
There are so many degrees of badness in repair work, that it is not possible to cover the entire ground in a work of this kind. They run all the way from the touch up and varnish job, to the cracked, scaled and almost paintless old rigs. For a touch up and varnish job, at least one which is in decent shape for such work, wash the body, give it a rubbing down with fine powdered pumice stone, clean off and carefully putty cracks, dents, etc., if any; then touch up with color, using a small camel’s hair pencil, and cover only where necessary. When dry, give a full coat of body varnish. For a better job, give the body a coat of black rubbing varnish (provided the body is black), then finish with a good coat of wearing body. The gear may be treated the same as the body if in like condition, but if the felloes are worn bare, lead them up and color as you would new work, then touch up the balance and varnish.
The great plague of the paint shop is cracked work, which is otherwise solid. Where the varnish is hard but peeling, take it off with ammonia; to do this, take a side of the body at a time, pour out some ammonia in a cup, and put it on with a clean brush kept for the purpose. Keep the side wet, until you can slice off the varnish with a putty knife; if it fails to come off, you must keep it wet longer. If the varnish is dead and soft, sandpaper down to a solid foundation, then if cracks show sheet up with quick hard putty made soft enough to put on with a brush, and scrape off with a knife when set. When dry, sandpaper and if the cracks are not full, give it a second application of putty in the same way. Then for a cheap job give it a coat of color varnish, a coat of rubbing and a coat of body varnish.