Take care of your clothing
Reading edition
Shine your shoes
Daily care will improve the looks of your shoes and will help make them wear longer. Clean and polish your shoes. Wipe them off with a clean (wool) cloth and brush away the loose dirt before you put them away. When they need polishing, use one of the many good polishes that are on the market. Select the kind that is best for the leather in your shoes. Follow the directions given with the polish.
Shoes become damp from perspiration when you wear them. Wearing socks will protect the lining. Allow your shoes to dry thoroughly between wearings. Filling the toes of your shoes with tissue paper will help absorb the moisture.
Examine your shoes for signs of wear. Keep the heels straight and do not wear the sole through before having it repaired. Have all rips mended as soon as they appear.
Do not place wet shoes near heat or in the sun to dry. When they are dry, clean and polish them to make them look like new.
Your dress is only as pretty as the shoes you wear with it. Are you proud of the care you give your shoes? Keep a record of the care you give your shoes in your record book.
Sew on buttons
To help mother care for the family clothing, why don’t you take the responsibility of replacing buttons on shirts and blouses for the family. Make a game of it with other members of your club. Have a button contest. Give yourself a point for each button you sew on. The club could plan to give a prize to the girl who sews on the most buttons during the club year.
Keep a record of the buttons you sew on, something like this:
Date Article of clothing Points—or number of buttons
Record the total in your record book.
Use buttons to trim your bedroom slippers. Select one flat, medium-sized one or three small ones. Arrange them on the toes of your slippers to make an attractive trim.
How to sew on a button
1. Make a small knot in double thread (15 inches long). Fasten to article where center of the button is to be placed. Take two or three stitches over the knot.
2. Sew the button in place with one or two stitches. See that the stitches run in the same direction as the buttonhole.
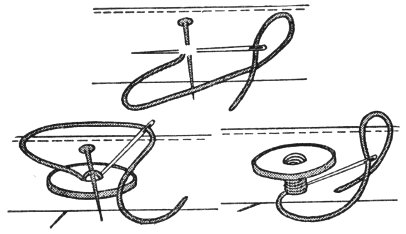
3. Place a pin on top of buttons under the first stitches. This makes a shank. Continue to sew on the button. Take as many stitches as necessary to hold the button securely. When the stitches are in place, remove the pin. Lift the button away from the article. Wind the thread tightly around the stitches, as shown, and fasten the thread on the back by taking three or four stitches, one on top of the other.
3