Figures and Diagrams.
Reading edition
FIG. AND DIA. I.

This figure shows the front and the back views of the normal form, as adopted in this work. It illustrates the slopes of the shoulders, and the measurement of said slopes on the angle of 135 deg., and each separate shoulder slope on an angle of 22½ deg. from the side of the neck. It also illustrates the pants bases, on the angle of 7½ deg., and shows the reason why the top of the front of a pants waist is thrown forward of the front base line. It shows the front pants base ⅝ sidewise of the center of the body, and runs down parallel to the inside of each leg. This figure is calculated to be in such a standing position that the ankles are 1¼ inches apart, so that ½ of that distance is ⅝ of an inch to the center, hence the ⅝ to be thrown forward of the base, on top of waist, as the smallest amount for any form.
In front of the center of the figure will be seen another dotted line, which is marked 1¼ from the base, which is intended to show the front of a pants for a fuller waist, or for a more forward leaning waist. This addition may be the most that can be allowed for a forward-leaning waist, and may also be considered to be the most that can be allowed for a medium large waist, as to such forms which require a made up waist of 40 inches, but whose seat measure is only 40 inches. Forms which measure 42 seat and require a waist of 44 made up, may have 1½ allowed in front of the base, and a 46 seat which requires a waist 50 inches made up, may be given 2 numbers, as shown in Dia. XX, but 2 numbers may be considered the most which any pants will require.
The position of the front pants base, on the front line of the angle of 7½ deg., must be considered, as it will be, when the pants are on the body, that is, running parallel to the front of the leg, which is forward on top of the waist, and which slope may again be called 7½ deg. From this line, most of the normal forms carry the top and front of waists a trifle backward, but it is very little, and we will call such waists even on that line, in order to make a standard.
Now, it must not be supposed, that when a waist grows larger in proportion, that it grows, or spreads very much forward of that line. Whenever the waist grows larger, the body becomes more erect, in order to keep in balance, and the relation between the front of such a waist, and the line running parallel to the front of the leg, change very little, and Dia. XX may be considered to be large enough at that point for almost any form. On the other hand, we find large-waisted forms which do not carry their fronts of waists in front of that line at all, though their abdomen may curve outside of it. Such pants may be cut with a normal front of waist—but with a trifle more curve over the center of the abdomen, and plenty full at the side so that the forepart is thrown forward from the side, forming another curve over the oval front on the same principle, as the back is thrown backward from the side, to form the curve over the seat.
There is an endless variation of such forms, and it is fortunate for cutters that a trifle more or less will not kill a pants. The difference in Dia. XIX, XX and XXI is not so great that a great mistake would be made. All the small diagrams were made with the top of front of waist thrown forward of the base 1¼, but as they are used for illustration only, and as there are a great many pants which require it, they have been left that way. Otherwise they are the same as Dia. XIX, XX and XXI.
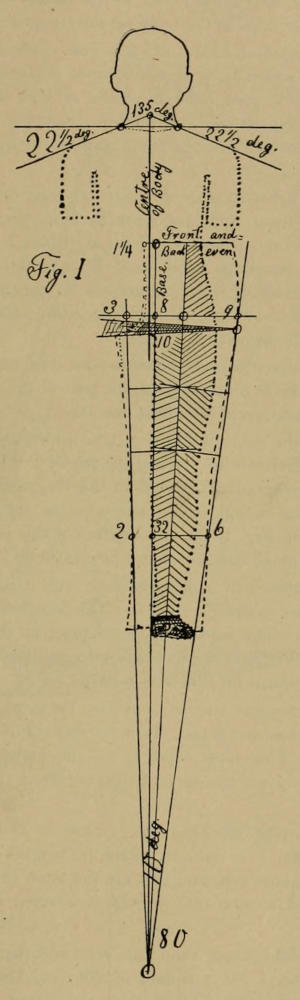
Fig. 1.
FIG. II.
Fig. II illustrates the side view of the angle of 135 deg. as applied on the draft, and shows the reduction of the square in front and below the waist, as well as the addition behind and below the waist. The diagram on this figure is a simple vest, on the square of 17½, and hence the under arm cut is 3¼ at the circle.
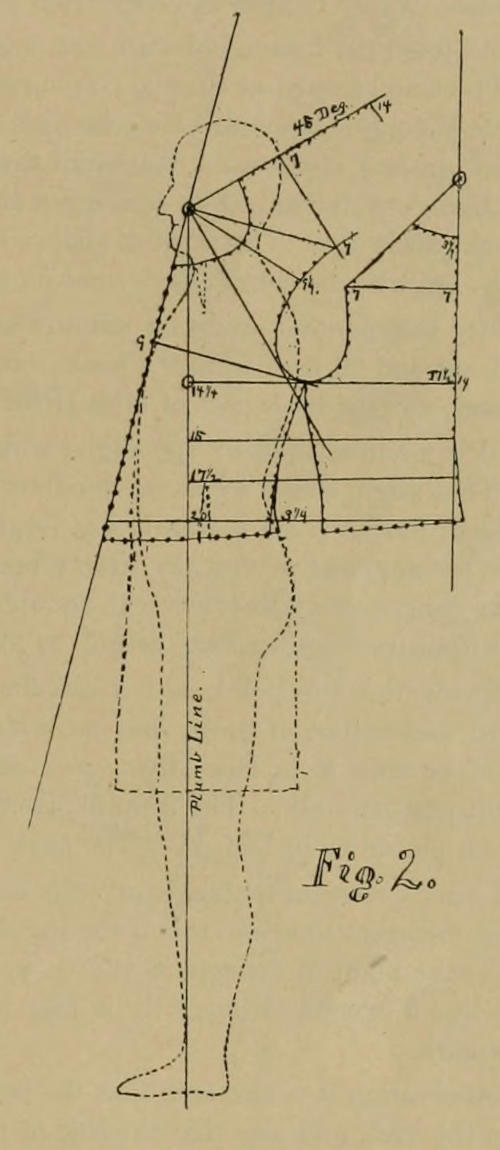
Fig. 2.
DIA. I.
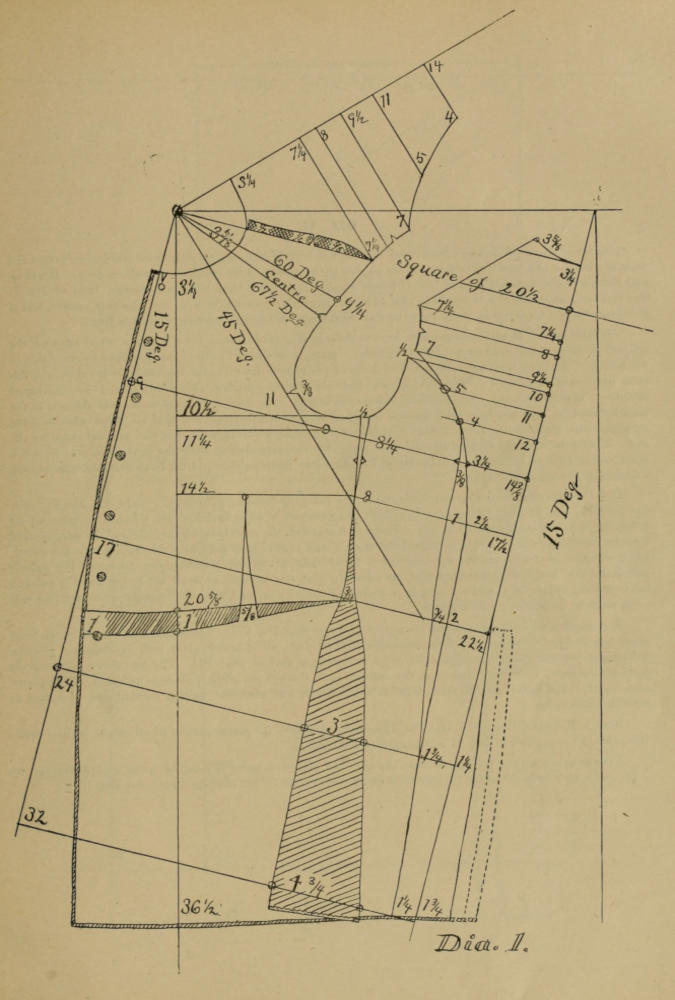
Dia. I is intended for illustration only. It is on a square of 20½, and the ½ is intended for the extra seam which the frock coat requires. The center of the back and center of the front run in the same direction as they must run when on the body. It also illustrates the spring over the hips as the body actually requires it.
The gore between the side-piece and back illustrates what may be buckled up on a vest. The front represents a straight single-breasted coat, as worn by the military or clergy, and may be depended upon if placed as in Dia. II. The front of such a coat must have a large gore in the center, which gore must be made at least 1¼ to 1½ inches, seams included, and must start well up above line 15, and the edges cut oval, not hollow; and the canvas and all padding and lining must be cut and worked in the same way, in which case the front requires no drawing in. The stay is put on close merely to keep the edge from stretching.
Above line fifteen the button-holes are cut, and the buttons are set plumb on the front line, but below line 15 the button line turns backward as shown. To meet the collar in front, nick one seam back of the front line, for military, but for a clergyman’s coat place the nick ¾ back of said line. The top of the skirt laps 1 inch in front of the forepart, and drops ½ inch on the bottom of the front. The standing collar must be a straight piece, and its width depends upon regulation. For a clergyman’s coat the standing collar should not be less than ¾ inches nor more than 1 inch, made up. The front of such a collar may be run straight upward with a line parallel to the front line of 135 deg., but may be shaved backward on top according to regulation or taste.
The place for the shoulder straps on military or society coats is the spot between the lines represented by 60 deg. from the front and 60 deg. from the back, which space of 7½ deg. represents the top of the shoulder. For practical purposes, use the back part of Dia. II for such a coat, and shape the front like Dia. I.
This Dia. I is made to show all the angles which start from the point of 135 deg., and which are required for a coat or vest. That angle which forms the shoulder seam, and which is also marked square of 20½, is 45 deg. from the center of back, but for some reason it was forgotten to be so marked. The lines of this diagram may be used to draw the angles for any coat or vest, by simply making them long enough for the size required, the same as in Dia. XII-A. Drawn long enough to cover both shoulders, as shown in Fig. I, the outside lines of this angle of 135 deg. is to be used to measure the shoulders as well as to draw all the other lines, or angles for drafting.
A circle drawn from this point, with a half diameter of 8 inches, will be large enough, and it may be cut out of solid paste-board, but better, of tin or zinc on which the lines are correctly drawn. The location of the forepart and shoulders is the same as in Dia. II, or any other diagram. The back and the sidepiece on the square of 20½ are in a different position only. The front is just as good as any diagram can be made for a military or for a clergyman’s coat, when placed as in Dia. II. The back and the sidepiece is for illustration only.
That back which rests on the angle of 135 deg. is in all respects correct, but the back which rests on the sidepiece has one incorrect line, and this is the line forming the shoulder seam. It is correct at the armhole, but should run up to the point of the square of 20½, so that all three lines meet, and it will be found that from that point, down to line 9 over the front, will be 14⅜, but line 9 itself gives the correct distance from the top and back corner of the square.
By close observation it is also seen that the height of back above line 9 is only ⅜ more in Dia. I than it is in Dia. IV, or on the vest, and also that the side of the back of Dia. I is reduced again in length ½ inch by a gore from the armhole to the shoulder blade, all of which proves that both coat and vest are the same thing on the same square, and that the heights of back and front are the same, and in order that the vest is covered by the coat, the neckhole for the vest is cut ½ lower.
If everything is considered at the waist, the coat is only a trifle larger than the vest, and that, what the front of a coat has more than a vest, is used for the lapel. Though Dia. I has a square of 20½, and Dia. IV has only a square of 20, both have the same width when all the seams are sewed up. All of which shows that, as the coat must pass over the vest, the vest must be cut at least one size smaller than the coat, and I have found it correct. In other words: The difference between the breast measure over the vest, and that under the vest, is about 1 inch in the whole breast measure. Dia. I gives a good deal of information, though it may be useless for practical cutting.
Dia. I.
DIA. II.
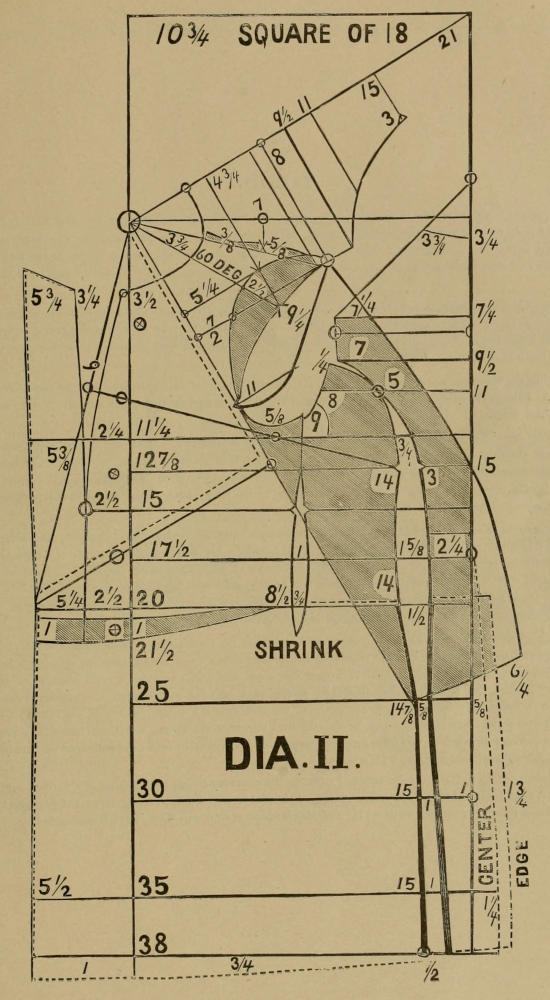
This is a plain double-breasted frock; and the diagram is plain and requires little extra description, except the front of the waist and lapel. The fore-part has no gore at the waist, and the reduction is made in front. It will be seen that the double-breasted front of Dia. II is only about 1 inch wider than the single-breasted front of Dia. I, and that the gore in Dia. I is balanced in Dia. II by the large gore between the lapel and fore-part upward, and if it is desired to cut a small gore at the waist, then all what that gore takes up must be allowed in front.
The lapel in Dia. II will roll anywhere down to the second or third button, but if a gore is cut at the waist the roll will go down to the waist seam; and if the collar is pretty well rounded in front the lapel may be run down to the bottom. All frock coats have the center of the back pretty well thrown out at the bottom of the skirt, and this extra width is again reduced between the back and front skirt, which operation allows that seam to be oval-shaped in order to fit over the seat. The frock coat, being open behind, must receive its oval form over the seat in the seam between the back and front skirt, because that seam is sewed together and will hold its shape, whereas if the roundness were placed in the center behind it would simply produce a curved edge, but not an oval shape for the seat. The lap between the forepart and the skirt represents the extra length over the oval chest, and for a full chest, and if the chest is not very full, the lap of 1 number may be reduced to ½ at the front edge, but must remain 1 number at the plumb line base.
Dia. II is intended for the normal form, and for the following measure; Breast, 35; waist, 32; hip, 34; seat, 36; length of legs, 32 to 33; form straight without being over-erect. The back and the sidepiece is intended for a close fit, or as fine work ought to fit. If a looser fit is required, the gores between the back and the sidepiece and between the fore-part and the sidepiece should be made a trifle smaller from the hollow of the armhole downward, which will give greater ease to the armhole and is better than to cut the armhole more forward. If a waist is prominent, say nearly as large as the breast, the underarm gore may be made as small as ⅛ to ¼ at line 17½ and run out to nothing at line 20; while a very large waist may require a lap of 1 inch, at the waist seam, starting said extra width at the bottom of the armhole.
This diagram shows the sleeve and the armhole different than Dia. VII. The armhole is cut out to the front sleeve base line and the sleeve and the armhole laps 2½ at 60 deg., all of which gives both armhole and sleeve a trifle larger and that armhole requires not so much stretching as that of Dia. VII. The top sleeve and armhole nicks are connected by a right angle from the center of back through the angle of 60 deg., and they will fit pretty close together, and in fact may be taken together on all sleeves and armholes, basting forward and backward to meet the other nicks.
Note: Elsewhere it is stated, that Dia. II must be considered the parent pattern of all others, which is quite true, though the armhole of Dia. II is larger than the others.
Further: In cutting the gore between the back and sidepiece, point 5 must be quite slightly touched by both, and it may be better to have ⅛ gore there on all coats except for the stooping form. See Dia. II B.
DIA. II.
DIA. III.
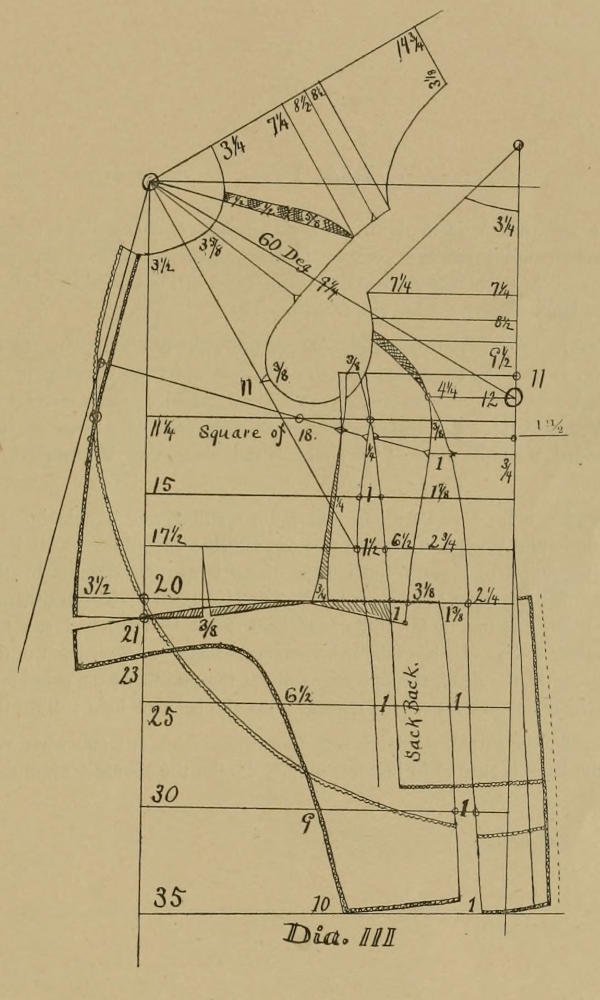
This diagram is also made for illustration only, for it would be too complicated for practical cutting. It is made for the purpose of showing the correct position of the back and sidepiece for cutting a sack coat without changing any balance in the armhole. The sidepiece is so placed that it will form a spring at the side of the hip, and the back and sidepieces are lapped over on top enough to balance one seam, leaving the sack as a three seamed garment.
The top of the back skirt and bottom of the sidepiece lap over, and which lap represents the extra length that the frock coat requires while passing closer to the hollow of the body. On the sack coat the spring over the hips is not used, nor is the larger frock coat gore behind, but between the two the sack seam is cut with a gore of about 1½ numbers at the hollow of the waist.
In placing the sidepiece in position, as in Dia. III, the back part of the sidepiece on the shoulder blade falls backward and enlarges the square ½, and for this reason the three-seamed sack coat has a square of 18, or the same as a five-seamed frock.
In turning the sidepiece down into the waist, the top of the sidepiece will fall down behind and form the spring between it and the skirt, and consequently the whole frock coat back shortens on top, or from line 9 upward; and for the further reason that the sack coat back is the wider, the height of a sack back appears still shorter, as seen in Dia. III and VIII, and is 13½. For further explanation as to why the back of a sack is shorter than that of a frock, see article on “Narrow and Broad Backs.”
All foreparts in Dia. I, II and III are in the same position, and all changes are made on the sidepieces and backs. Dia. III produces the closer-fitting skirt for a cut-a-way. All skirts are alike over the back, because all coats must fit the same over that portion of the body, but fronts of cut-a-ways must be closer than those of double-breasted straight coats. The lap of the top of the front of the skirt and bottom of the front of the forepart are reduced from the sidepiece forward, which takes away all surplus flow of the skirt. The gore in the fore-part is simply turned forward on a cut-a-way, while on a “Prince Albert” it stops at the waist seam.
The swing of the sidepiece in Dia. III is made at line 9 over the forepart and on the square of 20½. The break is made there, and the calculation is made from that point; and it is for this reason that an opening is made above line 9, which is about ⅜ at the height of the sack coat side seam, and is cut away on a frock coat, as a small gore, if the garment is cut in this position. But in a three-seamed sack coat the swing must be considered further back, or at the seam, consequently the opening is at the top of the sack coat side seam, which is cut out as a small gore between back and front and above line 11¼, or else the back armhole will be too wide, and show too much sleeve there. This gore may be made ¼ to ⅜ of a number, but which is obliterated when the sidepiece is turned so as to come in the position as shown in Dia. VIII-a.
After the cut for Dia. III had been made, I came to the conclusion that the opening of the frock coat sidepiece and forepart toward the armhole, could just as well be balanced in a sack, by cutting it as a five-seamer, and by making back and forepart even above line 11¼, and this was one reason why Dia. VIII B was added.
Dia. III
DIA. IV.
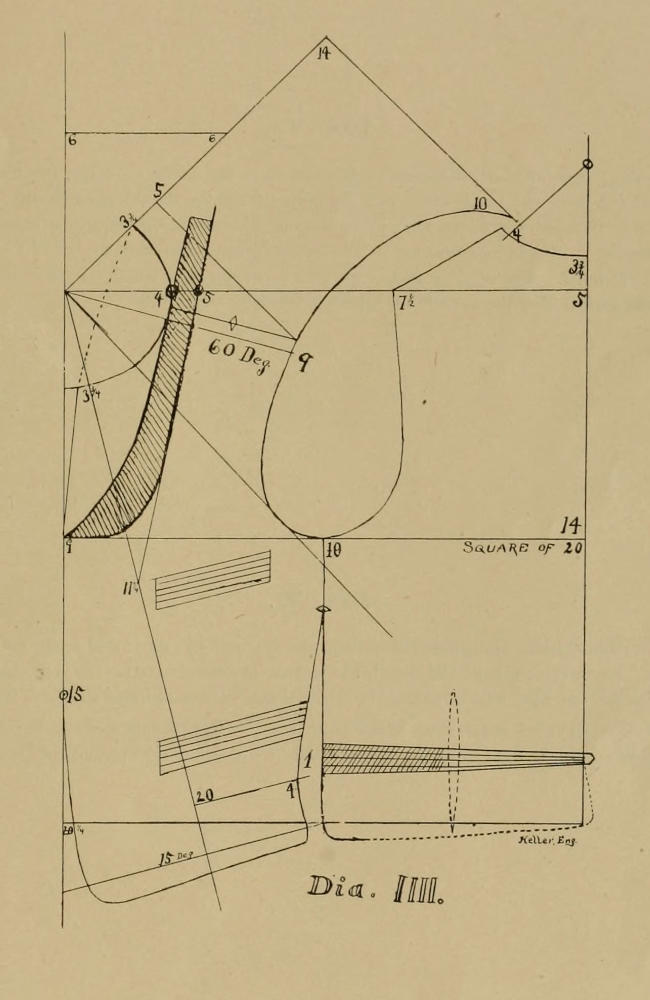
Dia. IV represents a vest, and is quite plain. It is on a square of 20, and in the same position as shown in Dia. I, front and back bases running parallel. From the front of the waist, or at the pit of the stomach, or where the body turns, the square of 20 is reduced to conform to the bend of the body, and from the back of the waist, or where the body turns, the back receiving what the front has lost.
Under the arm the normal form requires a reduction at the waist of about 1 in., and another in the middle of the back, as shown in Dia. I, between the sidepiece and back, but which may partly be taken off at the side seam and partly buckled up. A vest without buckle-straps should be cut with a gore in the back of say ½ inch, and as shown by dots in Dia. IV and XIII. All vests should be cut as though there were to be no turn-down collar, and if such a collar is to be added, a simple piece of the shape of the whole neck is attached, in which shape the front may be curved at pleasure.
The side of the neck as 4, is for a vest without a turn-down collar, and is calculated to lose one seam for the turn-in; and if the vest be bound this point ought to be 4¼, and if a turn-down collar is put on, said point should be fully 4¼, because nothing is lost by a seam, but instead there is an actual gain by the top-collar covering the seam, and for the purpose of illustrating Dia. V, VI, IX, Dia. IV has the shoulder seam cut on a straight line, and without lap or gore, and if cut just like it, the side of the neck must be stretched say about ¼ to ⅜ inches on each side, and close to the shoulder seam. If, however, the vestmaker can not be trusted to do the stretching right, it is better to allow about ¼ spring at the neck, starting at, or about the middle of the shoulder seam, or to cut the vest as directed at the end of the article on vests. In no case must the back be held full on the collar.
When finishing the neck, the side of the back is to be turned in, or cut off, whatever surplus length may be there, but the center of the back is turned in just one seam. Notch the shoulder seam as shown and baste up and down.
Dia. IIII.
DIA. V.
This diagram is also given for illustration only. It represents the centers of the front and back on straight lines, the neck-hole on the back and front, even, and the reduction of the shoulders at 45 deg., as it actually is to be reduced. The side of the neck represents Dia. IV as cut out 4¾, and would require a standing collar of ¾ to be sewed on. In this position a neck-band could not be cut on the forepart as shown in Dia. IV, because the shoulder seam would be too far in front. Though it is useless for actual cutting, it is worth its place in this work for illustration. It fully demonstrates that the so-called front shoulder point is a myth.
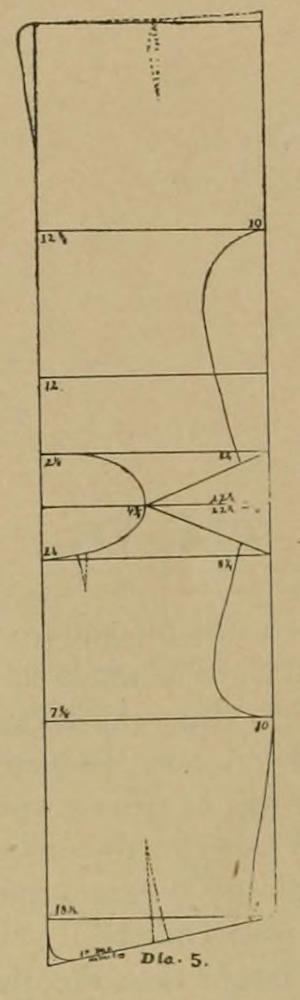
Dia. 5.
DIA. VI.
Dia. VI is also for illustration, and shows the vest on the angle of 135 deg., and again on an angle of ½ of 135 deg., or on 67½ deg. There the angle of 135 deg. is cut in two, or folded together, so that the center of the front and center of the back are one line, and wherever the front of the waist is reduced the back is enlarged.
The cut of the side of the neck is the same as shown in Dia. V, though one is shown as 3 2-4 and the other as 4⅜, but the calculations are made from different points. Dia. IV is the parent pattern of Dia. V and VI.
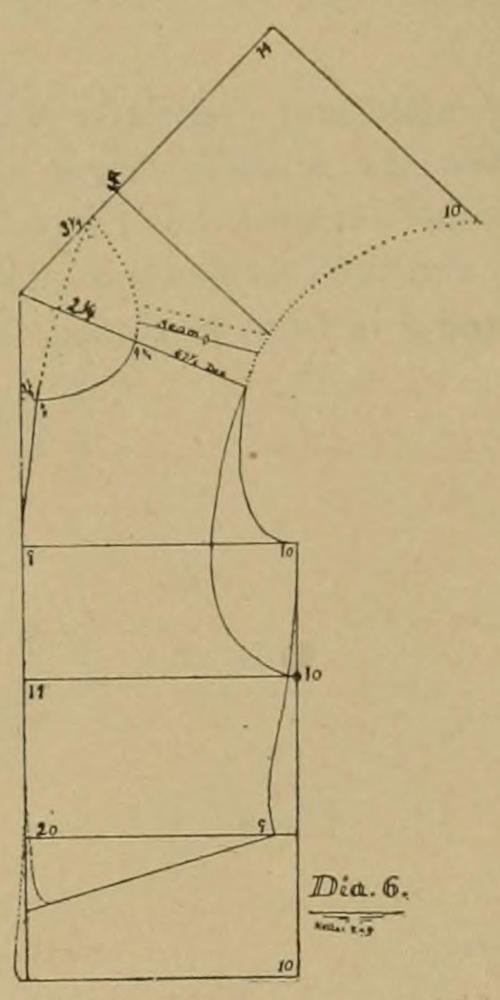
Dia. 6.
DIA. VII.
This diagram represents the sleeve system. On the top square line from the front base, or at 45 deg. from the back, the sleeve and the shoulder should lap about 2, or as much as possible to form a nice curve toward the front seam. A short top sleeve on the angles of 45 and 60 deg. will draw both the front and the back seams out of shape. A top sleeve is better too long at these points than too short, because the top sleeve can easily be reduced, but if that lap is too short, the back and the front seams will be drawn upward, and will be too long at the armhole, while at the hand the sleeve is that much too short. Whenever the under sleeve appears too long on either seam, it shows that the top sleeve is too short. At 60 deg. the diagram shows 2¼, which may be taken as the smallest portion to be given there, and may be made 2½. (See Dia. II.) The armhole and sleeve should lap 1 to 2 seams on the front sleeve base, and if the armhole is cut larger than the diagram, the sleeve must follow, which, of course, must change the lap at 60 deg.
The armhole, as it is shown in Dia. VII, is for a close-fitting armhole, but there is no law to prevent it from being cut further forward and downward, providing the sleeve follows. (See description of sleeve as shown in Dia. X.)
Note: Dia. II, II A and VIII B were made one year later and show the top connections of sleeve and armhole in a different way, and they also show the armhole larger all around. Stooping forms with prominent shoulder blades require their armholes still further forward, but I have never found a stooping form who required his armholes more than ⅝ in front of 45 deg., and such forms should have the back that much wider. The armhole ⅜ back of 45 deg. for the arms thrown back and ⅝ in front of 45 deg. for the arms thrown forward may be considered the limit for both extremes.
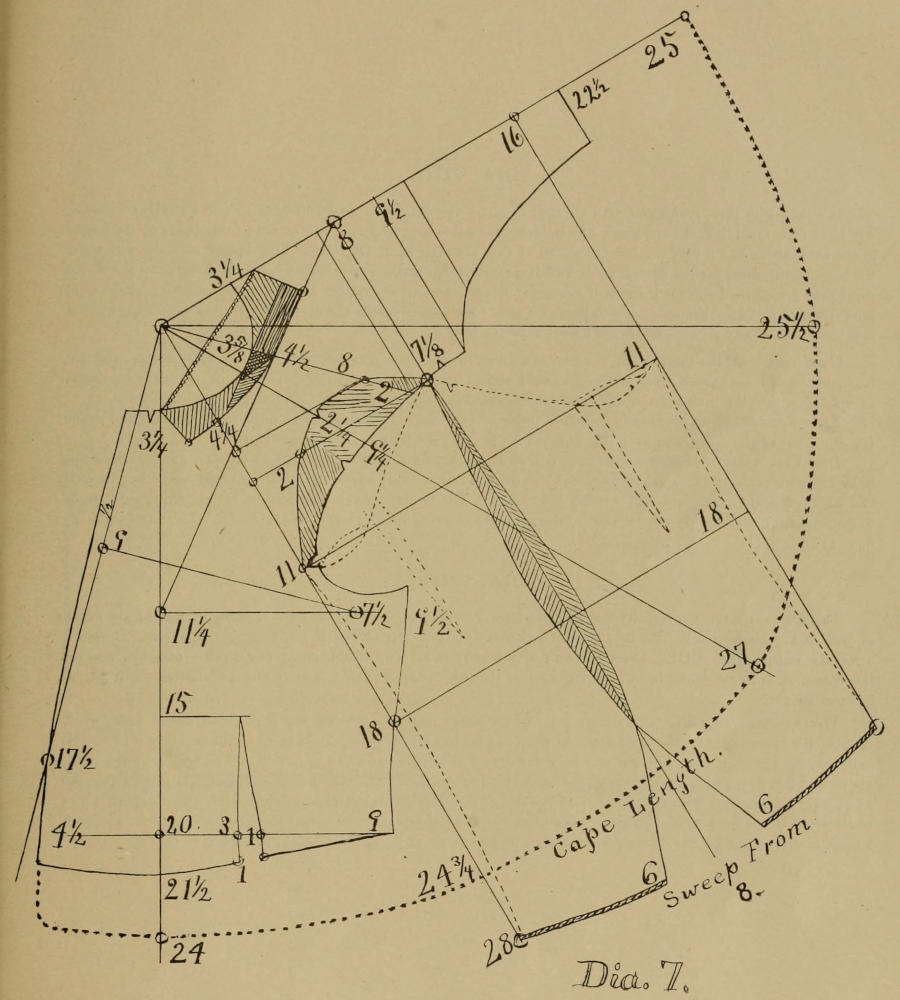
Dia. 7.
DIA. VIII.
Is a sack with three seams and with a straight front. As long as a cutter is able to cut a straight front, he will have little trouble to cut any shape of a cutaway for either sack or frock. As shown in the diagram, the height of the back above line 9 over the front is placed at 13½, the same as in Dia. III. This height of back will make the back plenty short for the normal form, and it may be called rather short, but any coat back is better ¼ inch too short than ¼ inch too long, for if short, it can easily be stretched at the center and over the shoulder blade, and such stretching, if done properly, will improve all such sack coats, because the center of the back as far over to the shoulder blade of any person are always longer than the sides.
On a frock coat, the shortness at the sides is reduced by a small gore between the top of sidepiece and the back, because of the curved seam, but on the more straight sack seam, said reduction can not so well be made, except by cutting the back shorter, and stretching it again behind, at, and as far over as the shoulder blade.
For a double-breasted front, add 1 inch to the front of Dia. VIII—cut a gore under the lapel, and add to the top and front of the lapel, whatever that gore takes up. Set the buttons back accordingly.
Dia. VIII is made for the same form as is Dia. II, that is for a slender form and small waist, and if the waist is to be more full, or the armholes are to be quite loose for working coats, reduce the gore between the fore part and back one half inch clear down, starting at line 11¼. The armhole is represented close-fitting, requiring it to be well stretched, but it may be cut forward to the base and in every respect made like Dia. II. The same may be done to Dia. VIIIa.
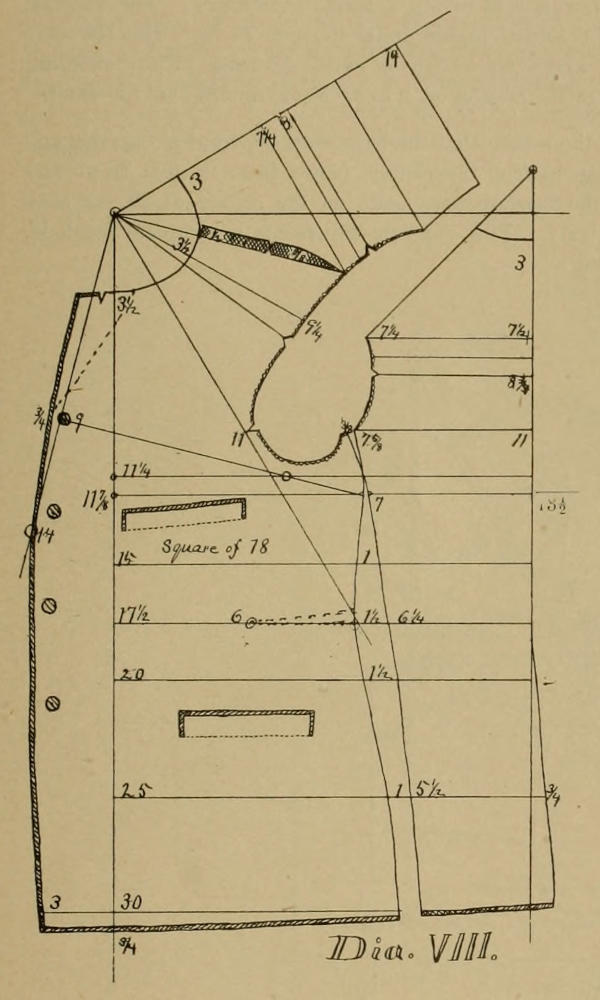
Dia. VIII.
DIA. VIIIa.
This diagram is made especially for the erect form, but may be used for the normal form by placing the depth of back at 12¾ above line 9. As the diagram is, it simply gives the result of the closing of the ⅝ fold, as shown across the waist in Dia. VIII. Erect forms usually require small coats in the back, and in the armhole, and for this reason, such forms should be cut one size smaller than the measure, and ½ inch should be allowed in front, to balance the size.
The front is given with a pretty large roll and the upper part may be used for a double-breasted sack, while meeting the front edge and the front angle in front of line 15 and by going forward 4 numbers at line 30. The gore between the back and sidepiece may be reduced to 2 at line 20 and to 1½ at line 30. The height of the back, above line 9 is 1¼ number shorter than on Dia. VIII, and which is accounted for as follows: The fold across the waist which is obtained from above is ⅝, and the side of the sidepiece is stretched upward ⅝ on the forepart, all of which requires the back to be 1¼ shorter above line 9. If the sidepiece is stretched less, the back must be so much longer, and for a good many forms ⅜ stretch may be plenty, in which case the height of back is to be 12½.
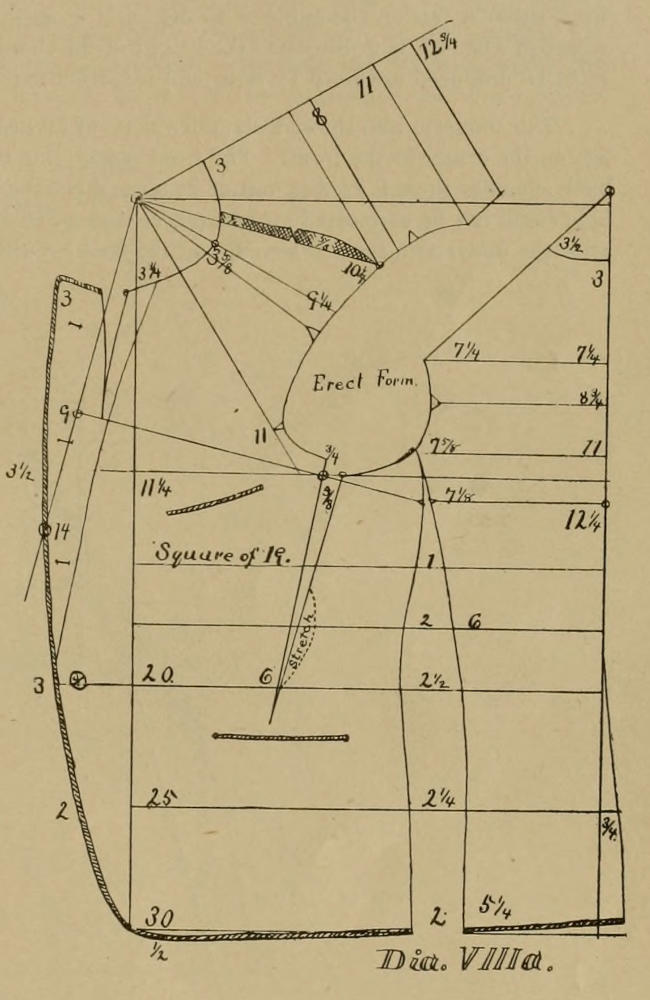
Dia. VIIIa.
DIA. IX.
Dia. IX is made to illustrate the changes of the shoulders from the normal to the long or short neck. For this purpose the shoulders on each back and front are made equally high, and the coat armhole connected evenly all around. This diagram being on the square of 17½ would require a coat to lap 2 seams somewhere. The diagram itself shows a vest on the angle of 15 deg. and in a square of 17½, with a gore under the arm of 3¼. But the main object of Dia. IX is to illustrate the height of the shoulders; and extra length or extra shortness of the shoulder must be produced as shown by dots, and is further explained in the articles on “Long Necks” and “Square Shoulders.”
This diagram also shows a shoulder slope of 30 deg., for the reason that the base is on the front plumb line and not on the center of the front. The front plumb line is 15 deg. back of the center, hence from it each front and back shoulder slope is 7½ deg. out of its normal position. If the diagram were made on the square of 20, the armhole could not be connected all around, as it must be on the body. This diagram represents a complete armhole, after the under arm seam is sewed, and the coat is built around it.
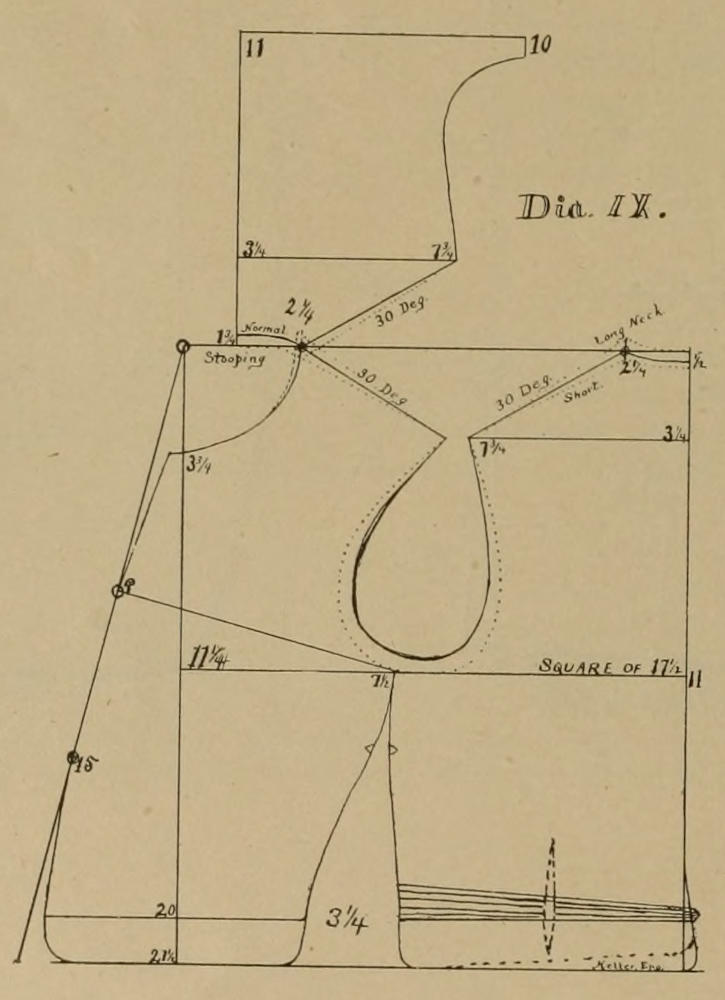
Dia. IX.
DIA. X.
Dia. X is a five-seamer overcoat for the normal, but leaning toward the erect form. The armhole is cut full forward to 45 deg., and the sleeve base moved forward two seams, or ⅜ inches. The sleeve part of this diagram makes a close sleeve head, and a lap at 60 deg. may be made ¼ to ½ more, and at 45 deg. it may be made ¼ more or any amount required to make a nice curve. The bottom of the armhole is plenty low, and the gusset on the top of the under sleeve fits it. The width of the shoulders may be made 9 at 60 deg. A half-inch lap between the armhole and sleeve at the back sleeve center, or at line 8, will make the whole sleeve extra easy, though the back sleeve may hang a trifle loose when the arm hangs down, but this ½ inch extra length must not be accounted for in the sleeve-length.
The square of the coat is 18¾ only, which is ½ less than the regular calculation would bring it. An overcoat must be close-fitting, at and around the arm, though the armhole must be plenty large. Dia. X was made over a 39 pattern and if that same draft is measured and laid out with a scale of 38, the square will be 19¼, which 19¼ numbers correspond to the square of 18 on a three-seamer, taking in consideration the gore and the seams under the arm on a five-seamer. To cut over Dia. X the measure must be taken close over the undercoat, and the measure over the vest will make the fit not too close.
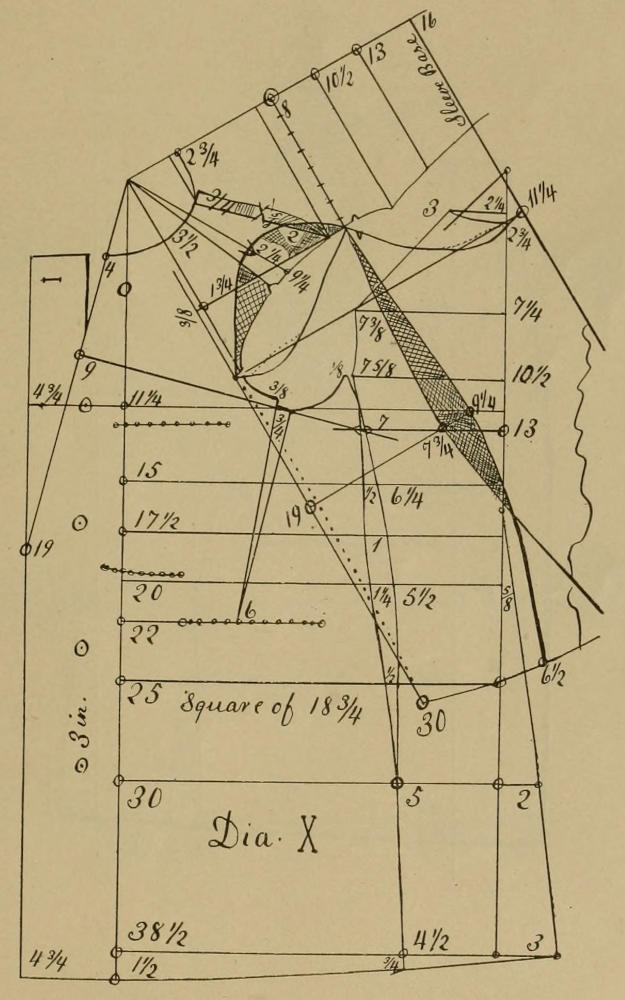
Dia. X.
DIA. Xa.
Is a three-seamed overcoat, and must be reproduced and made as fine work requires it, and the person who wears it must be well built, and with a rather small waist and seat. All clothing worn under the overcoat should be neat and well fitting. Erect persons should have the height of back at 13. The sleeve shown in Dia. X corresponds to Dia. Xa. The collar must be sewed on easy, on and along the sides. The whole front edge may be made ½ inch smaller than Dia. X.
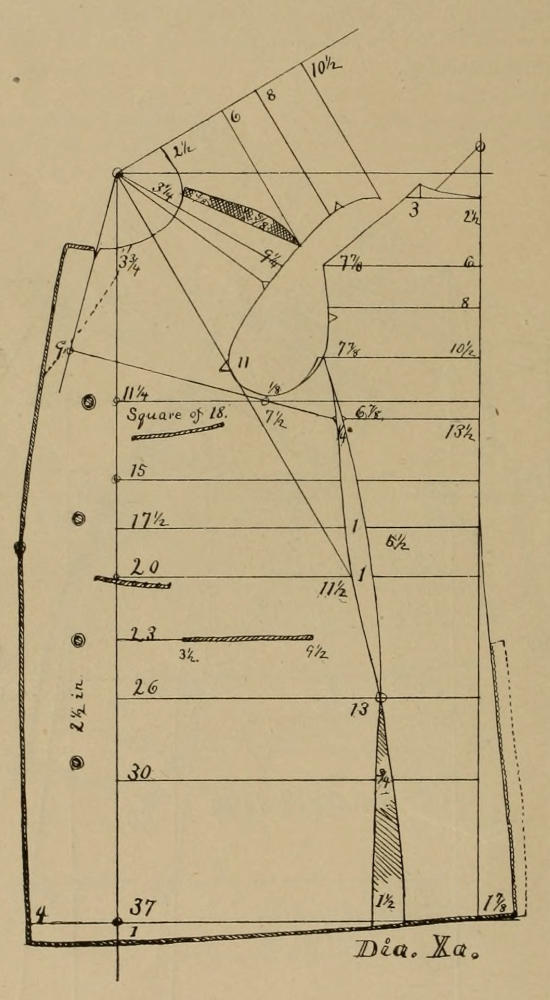
Dia. Xa.
DIA. XI.
Dia. XI represents the garment in a three-fourths circle and on a square of 20. The circle itself would make the vest too short, but it represents the correct run of the bottom.
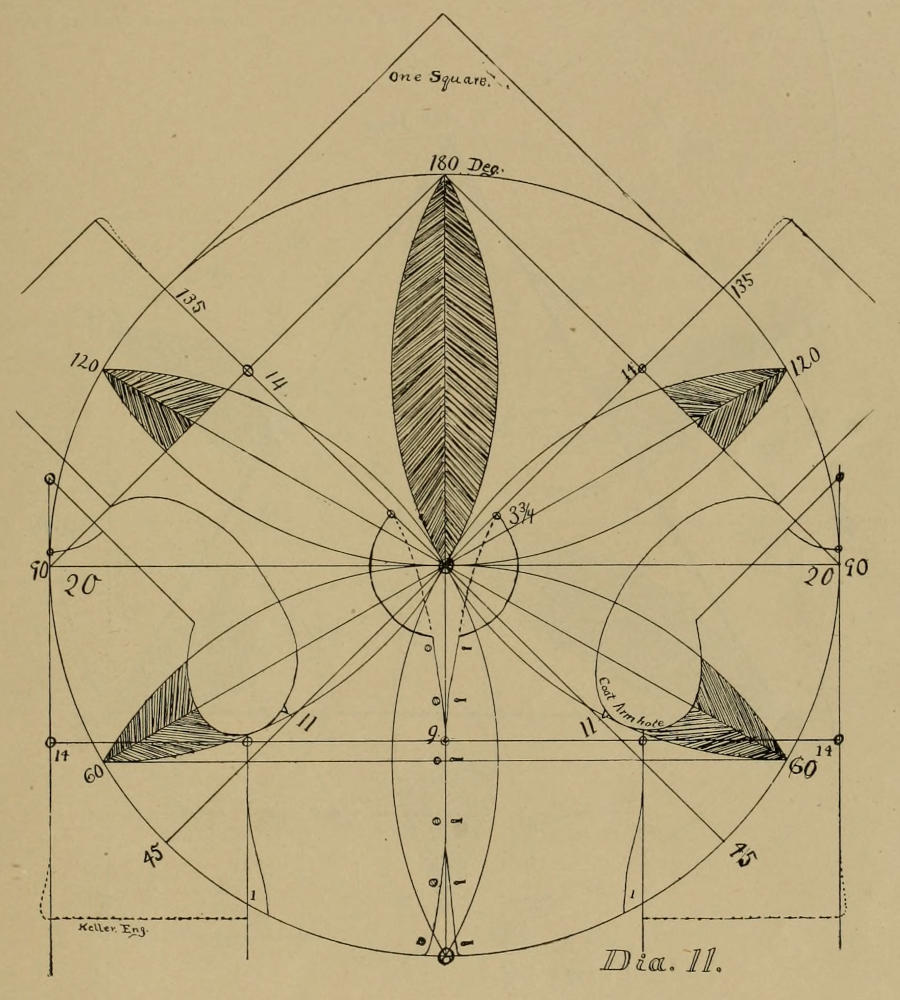
Dia. 11.
DIA. XII.
Dia. XII represents the same as the foregoing in a three-fourths circle, but on a square of 17½, also the equilateral triangle of 35 numbers. Each of the Dia. XI and XII are one square cut from the center of a circle, and in order to make it as simple as possible the vest is again used. The bottom of the forepart is on the circle, but that would make a short vest, and for this reason the back shows 1½ longer.
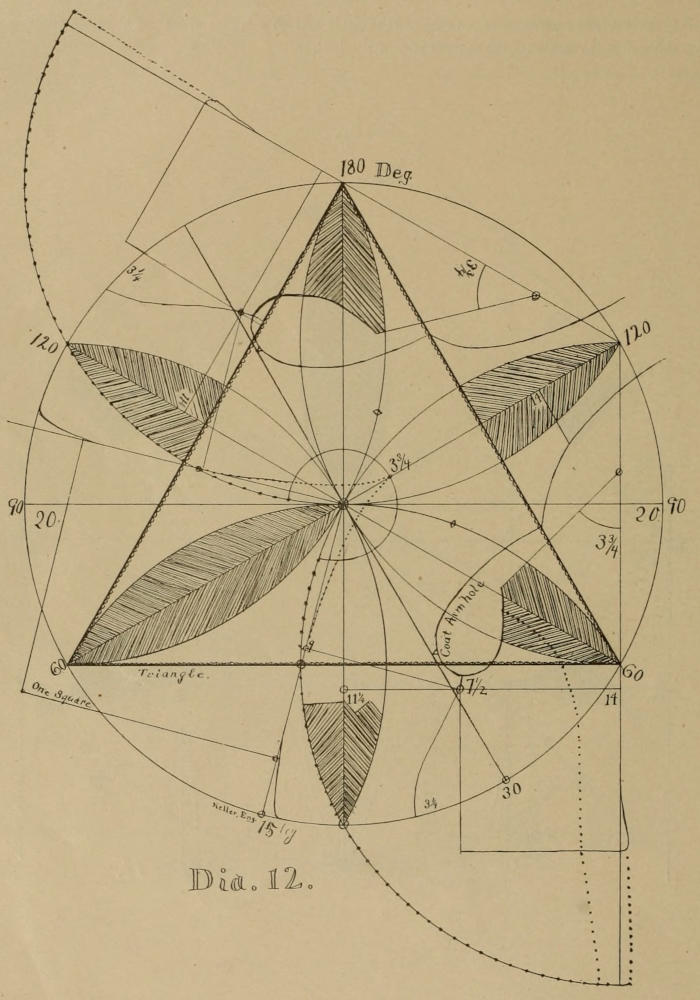
Dia. 12.
DIA. XIIa.
Dia. XIIa is made to illustrate all points obtained from the center of a circle, or from a point of the angle of 135 deg. All it requires is to lengthen the lines, so that they are long enough for the full scale. Any other point in any other garment may be found in the same way.
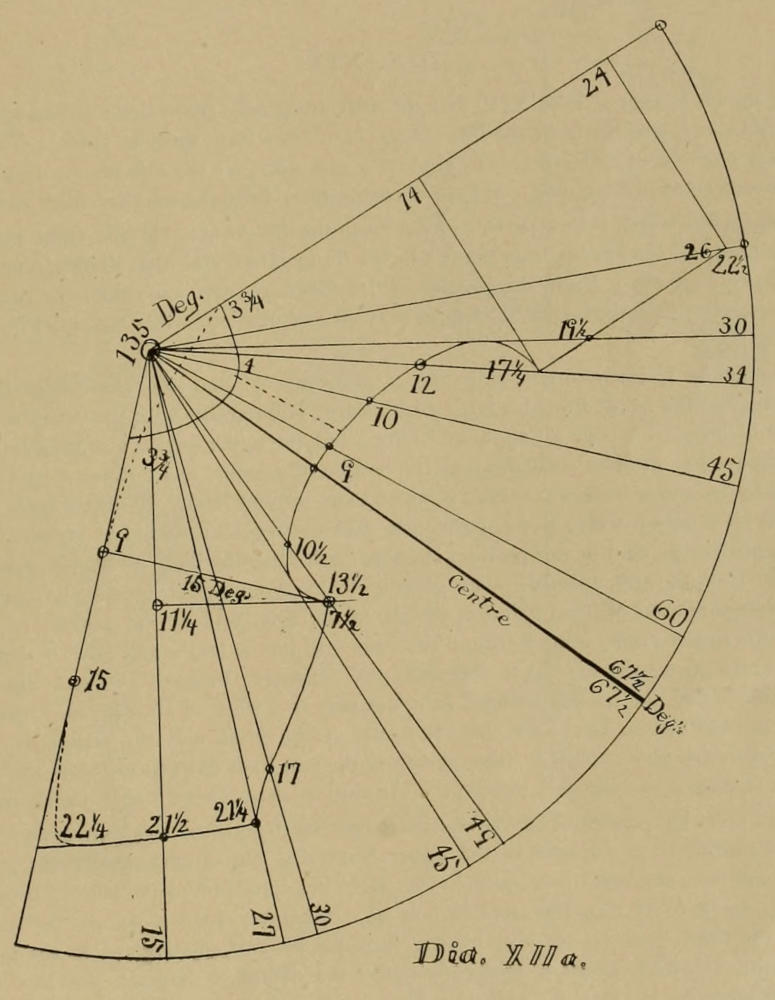
Dia. XIIa.
DIA. XIII.
This diagram I consider very valuable for illustration, because it represents an entire garment from neck to ankle in one continuous form, and on slopes in perfect harmony with the slopes of the body, running to a point at each end, each point at an angle of 15 deg., and both joined at the widest part, representing the largest part of the body, but cut off at the neck and at the feet. The upper part again represents the vest, as the simplest garment worn by man. The starting point for the garment is at a point where the angle of 15 deg. has a width of 17½ numbers. The connecting points of the two angles of 15 deg. are at the front of the waist, or at the pit of the stomach, where the body turns backward, upward and downward, and at the largest part of the seat. The lower point of the angle of 15 deg. is a center for the pants, from which center all connection for the seams may be swept with certainty. And, although this point is not convenient to sweep from for every pants we cut, a cutter must know from what point he can obtain his balance without going to the point—all of which is fully described in the article on “Pants.”
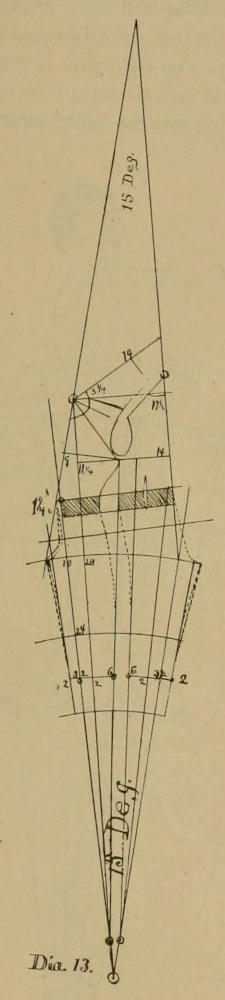
Dia. 13.
DIA. XIV.
This is simply the lower part of Dia. XIII, but the sides are closely connected on the angle of 15 deg., showing the pants in one solid sheet, which will fit the form of the bare body from waist to ankle. This diagram is in such a position that a new beginner may learn how to produce a nice slope for the side seam. But it is intended to serve for other and more important illustrations. It is to illustrate more fully the so-called back slope.
The upper part, or the waist, is in a perfect square from the front base. If the front and the back bases are laid on top of each other, all the sweeps from point 80 will fit together and the whole front and back will lay in position as most all pants are cut. From the position of this diagram, there is no side, nor back slope; it is simply a square block, consequently, the so-called back slope is only an imagination. But the most important point to illustrate is the following:
Considering the ankles 1¼ inches apart, will give to each side ⅝, and the front base line would run down parallel with the center of the front, though slanting backward, and parallel with the front of the leg. Now, it is true, the lower part of Dia. XIV is on an angle of 15 deg., but the upper part is also on a square, and we will now consider the back square line finished clear down to the bottom of a pants, and cut out a square sheet of stiff paper, as long as a pants may be and as wide as the seat requires to go around it, say 40 inches both ways, and place it on and around the body of a person whose front of abdomen does not reach outside of a straight line, running parallel with the front slope of the legs, and in this position the sheet will fit to the body all along down in front, as well as the back of the waist from the seat upward. The center of the front and the center of the back run parallel up and forward and the square sheet will fit it, but at the top of the side, and at the bottom of the side and at the bottom of the back the square sheet, wound around the body will be too large, and must be reduced as follows: On top of side of waist one or two gores are cut to represent the difference between the seat hip and waist measure. The bottom at the side and at the back is reduced from a square to a slope of 15 deg., all of which is taken off from behind. It should be observed on Dia. XIV that the center of the front and the center of the back seams run parallel upward and forward above the seat lines, and from the seat lines downward, both the front and back forks start outward of the square, all of which is to be turned inward to pass forward and backward between the legs.
The square sheet must be considered for the outside cover, as though the legs were grown together. Again, a square sheet must be considered so adjusted to the upper body that the square sheet closes in all around the front from top to bottom, and from the seat to the waist in the back, but stands off at the bottom behind where the square is to be reduced to an angle of 15 deg. from seat to bottom. Whatever such a square, wound around the upper body is too large at the waist, must be reduced by one large or by two small gores at the top of side, and it will be found that the reduction of the angle of 7½ deg. is always the difference between the seat and waist measure, and if the waist is as large as the seat, no reduction is required, and if the waist is larger than the seat, allowance must be made at the side and in front. If that division is not properly made the crotch will show the fault, because the sides will take up their share, whether they have too much or too little cloth.
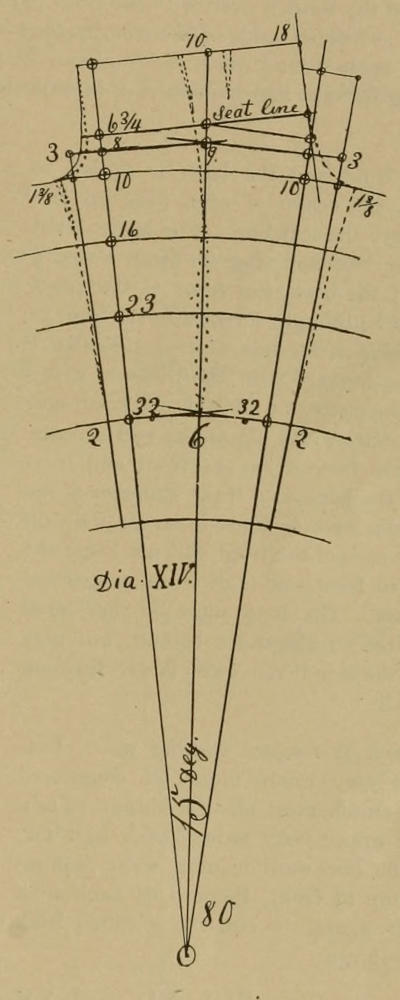
Dia. XIV.
DIA. XV.
The figure on this diagram is poorly drawn, but it serves to illustrate. It gives the side view of the crotch, and illustrates why a larger waist must receive more cloth in front than a normal waist. Fig. I shows the pants from the front or back view, but this gives the side view, the back running backward and the front forward and away from the body. In this position the pants must be considered as in opposite position to Dia. XIV, and connected on the crotch seams. Dia. XV is intended to illustrate the bases for the small waist as well as for the large waist. On the small waist the body of the waist is even with the front pants base, but when the waist becomes larger the base will have to be considered as located inside of the front of the abdomen, as shown on the figure. When the base strikes the front of the body, as on a small waist, the front can be swung sidewise and backward on a straight line, and the back can be swung forward and sidewise, but in order to conform to the seat the back must form the sack for the seat first.
When both the front and the back is settled to the shape of the body, the center of each runs up and down and parallel above the seat line. The larger waist extends outside of the base and after the front is swung sidewise, to the side of the back, the front of the pants must be considered to be brought forward to the front of the body, the hinge being at the side, and when the front of the pants is swung forward with the hinge or swing fastened to the side, the centre of front is too small and must be supplied with extra width. Pants, as well as coats, are fitted from the side forward to the front and from the side backward to the back, and if the diameter of the center of the body from back to front is larger than on the normal form, the ends of the front will not reach the centre of the body in front and more waist proportion must be allowed there. The back must be considered stationary and requires no allowance behind, but may require allowance at the side if the waist is well filled up there. (See Dia. XX.)
In case of a back or forward leaning waist, Dia. XV will show that the crotch must be considered stationary, and the crotch must also be considered as a hinge on which the upper body swings back and forward, and that if the backward leaning waist requires ½ inch less cloth on top of front, the top of back must receive that ½ inch again, or else the so-called back slope will become too large.
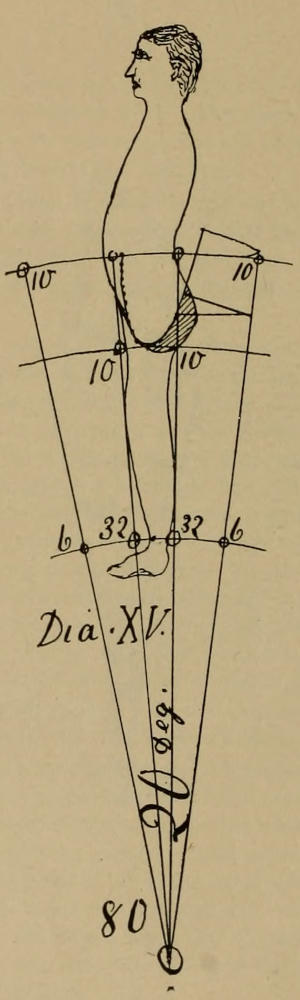
Dia. XV.
The descriptions of Dias. XIII, XIV and XV should be well considered by every cutter. I have figured on them for over twelve years and the result is here given. Others might have done it in less time, but so far as I know, nobody has done it yet.
DIA. XVI.
Dia. XVI shows the front and back of equal width except the tops of each.
DIA. XVII.
This presents the small front and wide back.
DIA. XVIII.
Dia. XVIII illustrates the principle of the fold in the seat, and the back and dress front nearly alike.
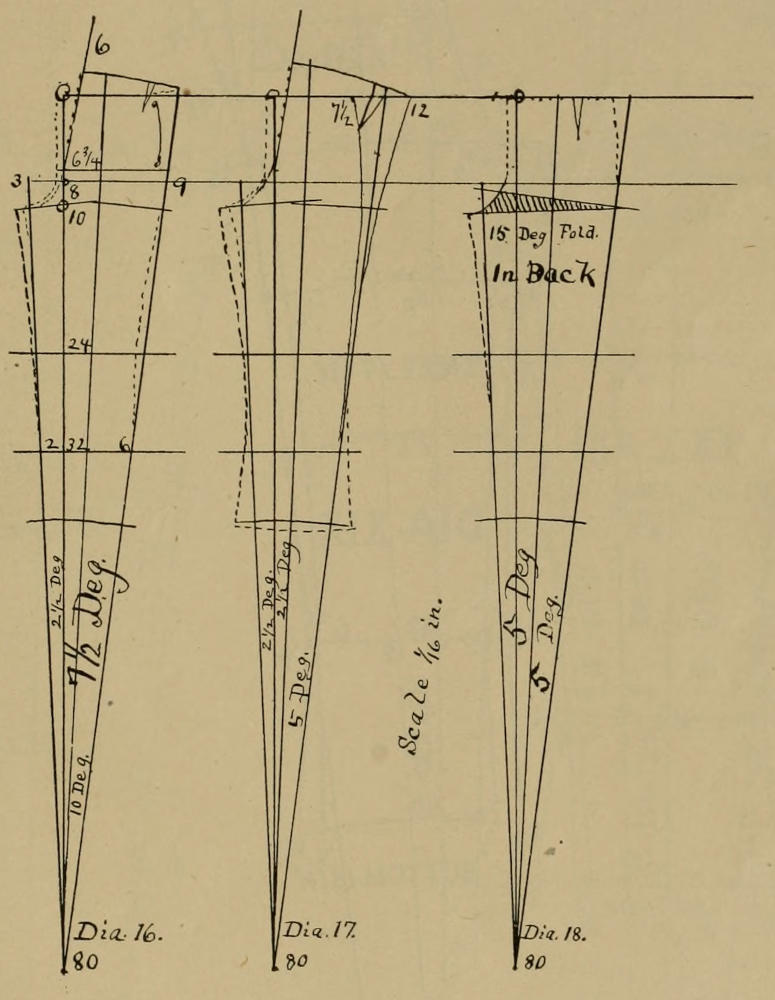
Dia. 16. Dia. 17. Dia. 18.
DIA. XIX.
Represents pants of the present style and fashion. The waist is as short as it ought to be for fine pants. Contrast the length of the waist with Dia, XXI. Dia. XIX is calculated for a size 38 seat with a knee 19 inches wide. If this is laid out with a 35 scale, the knee will become 17½ inches wide, which is a good width for a close fitting pants, which will soon come in style again. When small pants legs come in style again, the crotch of such pants will have to be reduced about one seam, and at the bottom the centre will be the same centre, while at the knee the centre of the angle of 10 deg. is also a guide, but there the outside requires about ½ less than the inside, because the inside of the leg is straight, while the outside is hollow.
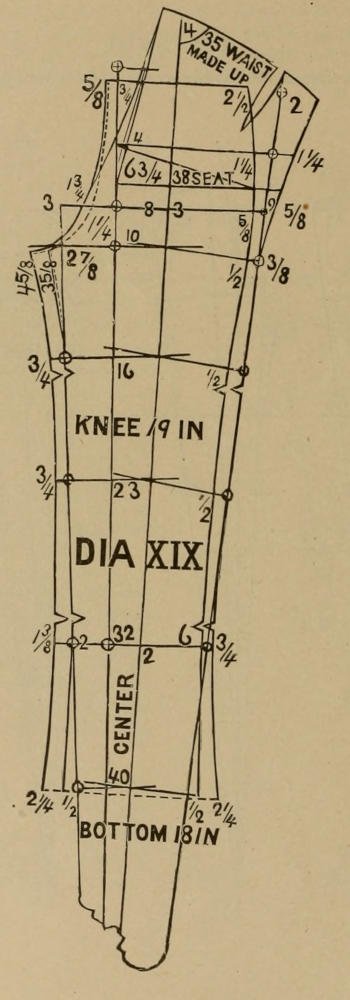
DIA. XIX.
DIA. XX.
This diagram was made over a pants pattern of the following proportion: Seat, 46 in.; Hip, 47; actual waist measure, 46; waist as made up, 49 in.; knee, 22½; and bottom, 20½ in.
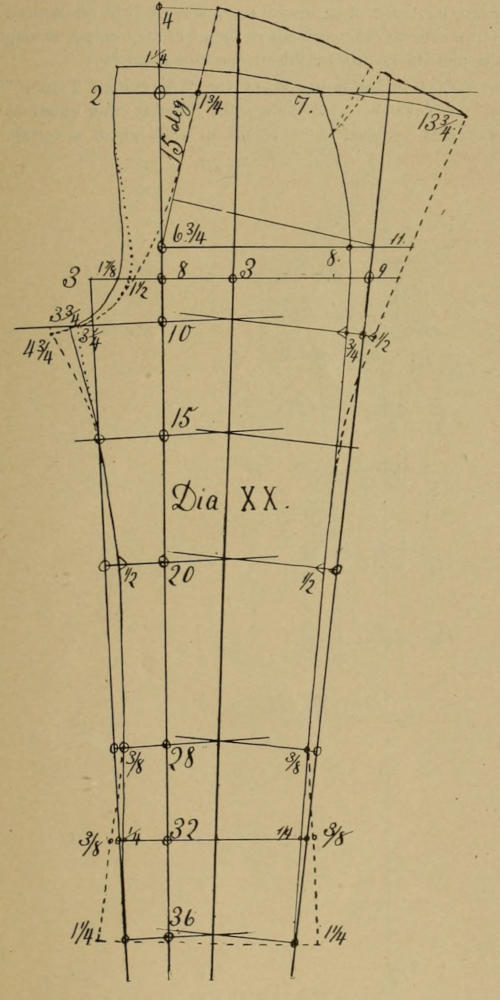
Dia. XX.
DIA. XXI.
This diagram was made for the purpose of illustrating a pants with a high waist, and how it is to be cut on top in order to have such a pants feel good around the short ribs, and still fitting at the hollow of the waist. The more spring such a pants has near the short ribs, the better it will be. But the buckle straps must be set low, or at the hollow of the waist, so they do not draw that width backward. For the sake of making a change, I have thrown the top of front of the dress side out ¾ and the undress side is to be ⅜.
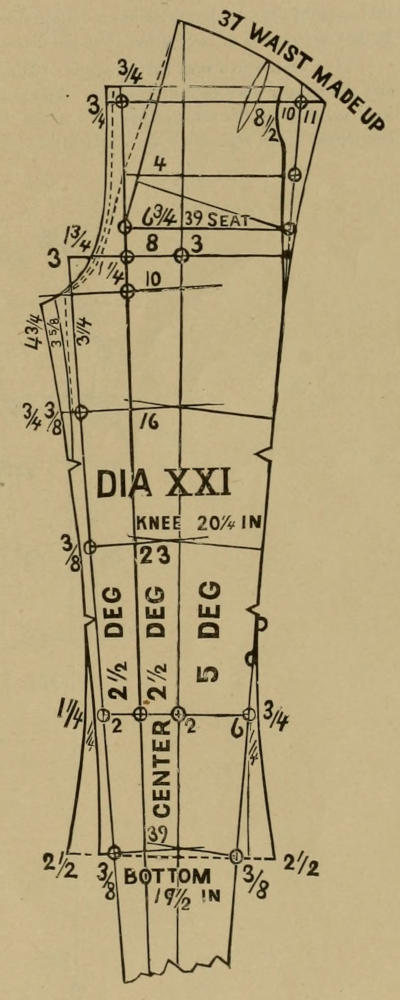
DIA. XXI.
DIA. XXII and XXIII.
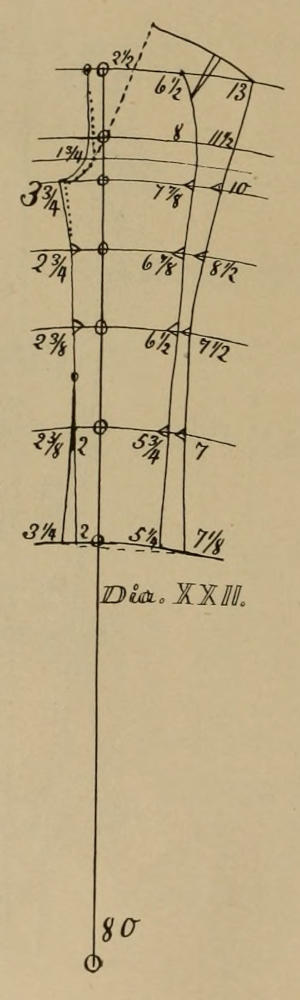
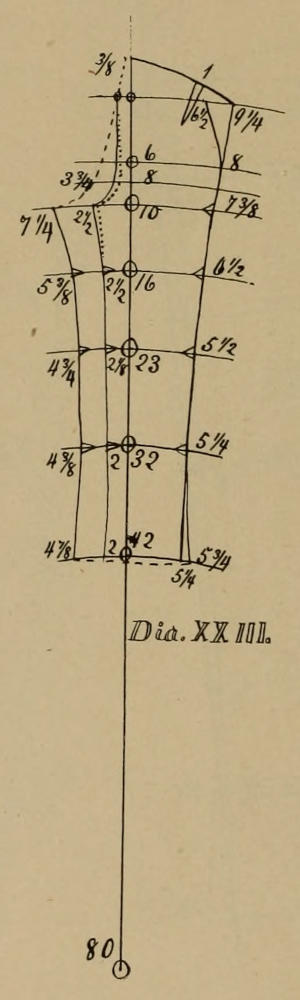
Are the same thing. They are here reproduced to give a correct idea of the so-called “back slope.” Both are turned from point 80, or from the point of the angle of 7½ deg. All connections, or nicks for the seams are on the sweeps from point 80. The leg seams are dislocated, but the balance is the same, and both will fit the same when on the body, and I claim that there never was a truer pants system produced than is represented by these two diagrams.
The complete angles of the different degrees are not made, but the base line, running down to 80, is on the same spot on all foreparts. From point 80 the forepart of Dia. XXII is thrown forward, and in Dia. XXIII it is thrown sidewise, all of which may be imitated on a pants leg, after it is sewed up. Now it will be noticed that each of the two diagrams has a double side, on which it makes no difference where the nicks are located, as long as they are on top of each other, but the disconnected sides must be nicked by the sweeps from point 80.
Five years ago I sent the principle of Dia. XXII and XXIII to the publisher of the “American Tailor,” and the answer may be found in the “American Tailor” of November, 1886, page 98. But as other questions were involved in the same article, and as the “American Tailor” pleased to notice me in 1883 about a certain challenge, I will reproduce the whole of it.
Dia. XXII. Dia. XXIII.
PATRIARCH MILITANT. CLERGYMAN’S COAT.
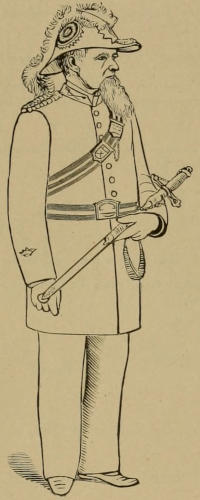
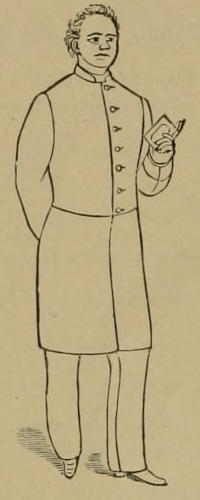
In 1882 I had the following advertisement in the Tiffin papers, of which I sent a copy to the “American Tailor”:
TO THE PUBLIC.
Having spent the best part of the last ten years in working out a scientific calculation of the outlines of the human body, I have, after endless ups and downs, discovered, and worked out, an entirely new and heretofore unthought of
PRINCIPLE OF GARMENT CUTTING.
I am now ready to announce that my customers may rest assured that they will not only get a fashionable and well made suit of clothing, but that they shall also feel at home in it when they have it on.
Lest it be said that this is only a new game of brag, and to show that all present systems which are known are without a reliable base, I make the following
Challenge to any Tailor or Cutter of Gents’ Clothing from Anywhere:
To cut and make a frock coat, a sack coat, a vest, a pair of pantaloons, and a whole garment from neck to ankle without any cross seams, for a person of any shape or form, whom none of us have ever measured or made clothing for, we will decide by lot—
1st. By what system or rule the coat pattern shall be cut;
2d. The number and size of gores—if any—the fore-parts shall have, and how many seams the sack coat shall have—5, 4, 3, 2—or entirely seamless, except shoulder and sleeve seams;
3d. How many seams the pants legs shall have;
4th. All widths and lengths of the several parts of each garment;
5th. All unforeseen questions arising from the above conditions.
Each to pay his own expenses, and all goods to be selected from the same piece and made up in the same style.
No garment is to be tried on the person it is made for until at a public trial, when the judges, selected by lot and who must not know who made them, shall decide, and their decision must be final.
This challenge shall stand good for three months, unless sooner accepted.
G. F. HERTZER.
Tiffin, O., January, 1882.
To which the “American Tailor” replied in the December number of 1883, in the following sarcastic style:
“THE CHAMPION CUTTER OF AMERICA.”
“According to the rules which govern sporting matters, the town of Tiffin, Ohio, has the proud distinction of being the abiding place of the champion cutter of America. Mr. G. F. Hertzer, the gentleman to whom we refer, issued a challenge some two years ago to all the cutters in the town of Tiffin in particular, and those who might be scattered here and there through the rest of the world, in general, to compete with him in a cutting match under certain conditions calculated to insure fairness. As the challenge was not accepted, Mr. Hertzer is, as we understand it, entitled to the proud appellation of champion cutter of America. It is in full accordance with the eternal fitness of things, that the championship should be located in Ohio, and in the liberality of our heart we are perfectly willing that it should remain there. As Mr. Hertzer’s challenge was published in a local paper, it is within the range of possibility that it may not have been seen by several cutters, whose fault or misfortune it may be, to dwell outside of the precincts of the town of Tiffin. But, however, this may be, we are prepared to admit that it is not likely any cutter in this country, outside of New Jersey, would have had the temerity to have accepted it. Mr. Hertzer is, therefore, fully warranted in asserting that, ‘this challenge has not been accepted by any one, and now I claim that there is not a cutter or tailor inside or outside of Tiffin, who can accept and beat me, until he has my book on cutting, which, in due time will be published.’ About the only suggestion that we are able to offer the profession, by way of consolation, is that when Mr. Hertzer’s book shall be published they may be enabled, by purchasing and studying it, to compete with the author with some faint hope of success. Meanwhile, Mr. Hertzer wears, by virtue of the non-acceptance of his challenge, the sonorous title of the champion cutter of Tif—no, of America. We take off our hat.”
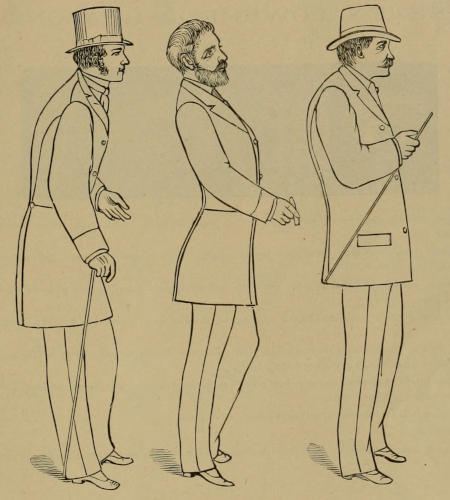
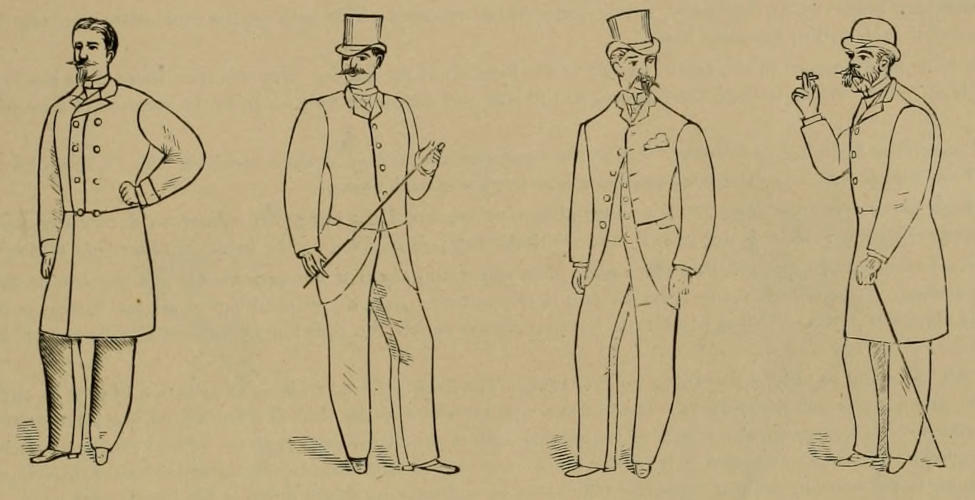
MODELS.
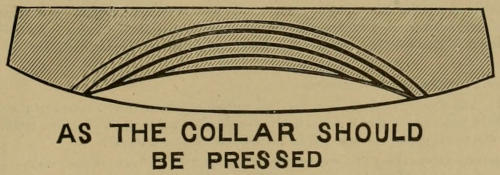
AS THE COLLAR SHOULD BE PRESSED
When I sent the principle of Diagrams XXII and XXIII, I enclosed the following advertisement, and other questions, which are explained in the answer:
“Be Diligent to Gain Knowledge for Knowledge is Power.”
SEVEN POWERFUL REASONS
Why I claim that I cannot be beat
In fitting gents’ and boy’s garments and why I claim that I can beat any cutter in fitting large waisted men or boys, and persons with low shoulders or long necks.
1. I have spent more time, more money and more brains on the science of gents’ and boys’ garment cutting than any other cutter; and I can prove it.
2. I know more about cutting and fitting gents’ and boys’ garments than any other cutter, and I challenge any one to disprove that fact.
3. During the last four years I have challenged any cutter or tailor to go with me in a cutting match and I have had no response.
4. I can alter and refit any misfitting garment which your tailor may have sponged on you as long as there is cloth enough to do it with and the victim is willing to pay for it.
5. I furnish the material for garments cheaper than any other merchant tailor and charge no more for my work than those who cannot make the above claims.
6. Selling from samples, it is my interest to sell first-class material only.
7. I work and sell for cash.
The above reasons should induce everybody to entrust their next order of clothing to your obedient servant,
G. F. HERTZER.
SHOULDERS.
(From a circular of Wanamaker & Brown.)
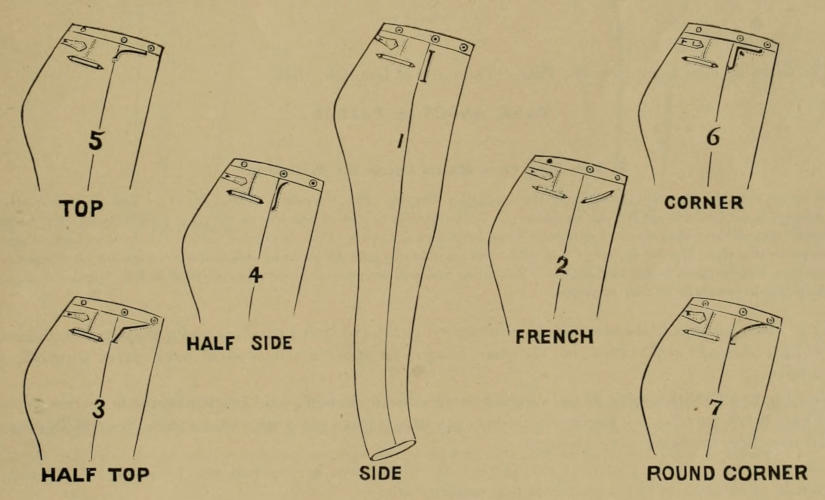
POCKETS.
(From a circular of Wanamaker & Brown.)
The following sledge hammer blows followed:
From the “American Tailor” of Nov. 1886, page 98.
ANSWER TO CORRESPONDENTS.
Mr. G. F. Hertzer, of Tiffin, Ohio, asks us in a recent letter, to give a combination of a frock and sack, having the same shoulders and explain the difference in the seams and account for the stretch, or shrinkage of the frock coat waist seam, which can not be effected on a sack. We are by no means certain that we understand what our correspondent means, but we think, that in the May and June numbers of this Journal for 1884 we gave the desired information. We cannot afford the time to enter into lengthy explanations of a problem unless it is clearly stated, and of general interest. Mr. Hertzer also asks the following questions:
1st. Why we give Fine Trade Designs without sleeves?
2d. What we mean by “half scye.” “I asked,” he writes, “the opinion of several cutters. One said it meant the half measure of the armhole, and another that it meant half the measure around the arm. Is either right? If so, can you find two cutters who would not make one or two inches difference in that measure?”
In reply to the first question we would say that we have but twice given a “Fine Trade Design” without a sleeve draft. In one case we said that the sleeve should be drafted as taught in “Theory and Practice,” but in the other omitted to do so, thinking, perhaps unwisely, that our readers would understand that it should be so drafted.
In reply to the second question, we desire to say that by “half scye” we mean half scye, not half knee, nor half waist, nor half anything else. The armhole of a coat is the scye, but a man’s arm is not, therefore it is absurd to suppose we could mean the measure around the arm.
If, as our correspondent suggests, there is a cutter living who cannot measure the scye twice without a variation of one or two inches, or if there is a cutter who cannot measure it fifty times with less than one-eighth inch difference, that cutter should devote his mind and muscle to hod carrying.
Our correspondent sends us, in his letter, small drafts of two trousers which look unlike each other, and asks us to tell him how they differ, and if each will fit the same man?
There seems to be no difference in the drafts, except in the location of the seams. But whether there is or not is of little consequence. Life is too short for us to draft the patterns to full size and devote an hour or so to the solution of a problem of no importance.
Mr. Hertzer concludes his letter as follows: “Since the foregoing was written, I have received the ‘American Tailor’ for this month and I see that others make the same request about frock and sack coats.
As far as I know the diagram on page 77 may be suitable to others, but I am not smart enough to derive any benefit from it, for it is not complete—frock coat skirt is not in full, nor are the fitting points given on the front shoulder, and minus sleeve.
Should I use my own pattern and fail to make a good sack, you would say that my patterns are not correct, or that I did not follow your instructions. It leaves too many holes for you to slip out of. Now if you would give all the fitting points, then we would have a fair chance to try it. This is plain talk, but you always solicit the opinion of your subscribers, and here is mine without coloring.”
This “plain talk” is about as silly as anything we ever read. The draft referred to is an illustration of how to cut a sack by a frock coat pattern, and does clearly illustrate it. It was not a coat system, and the skirt of a frock coat has no more to do with it, than a box of matches. “If a cutter drafts a sack as we explained by a poor frock coat pattern, he will produce a poor sack, but if he uses a good model, he will make a success of it.” We don’t “slip out” of anything, as our correspondent intimates, and certainly have wisdom enough to prevent our making ourselves ridiculous by endeavoring to get down to his intellectual level.
In an advertisement which was enclosed in the letter under discussion, Mr. Hertzer says: “I have spent more time, more money, and more brains on the science of gents’ and boys’ garment cutting than any other cutter. And I can prove it.”
Possibly if he had spent less brains, he would have on hand a more liberal supply, than he seems to have in stock at present.
So far the columns of the “American Tailor.”
The following local appeared in the Tiffin “Tribune” of Dec. 9th, 1886:
TALK ABOUT A TAILOR.
If You Step on a Man’s Corns He Will Howl.
This seems to be the case with the editor of the American Tailor. The November number, 1886, of that journal contains over a column of red hot shot against our townsman, G. F. Hertzer, for having an opinion of his own, and claiming that he has spent more “brains” over the science of gentlemen’s and boys’ garment cutting than any other cutter. If the American Tailor wants to prove that G. F. Hertzer is “silly” and with “not much brains left,” he ought to come out and accept his challenge for a cutting match, and beat him on his own ground. Ridiculing him will not amount to anything as long as Mr. Hertzer turns out such nice fitting garments as he does at present.
A copy of which was sent to the editor of the American Tailor, and later I have enclosed a clipping of it, in every letter which I have sent to that office, but the editor being so far above my intellectual level, never answered, so far as I know.
Now I have a Christian spirit in me, even if I do not come up to be a good Christian, for it is my misfortune to be always below the level, but having received enough slaps to make one cheek sore, I do now, as a true Christian, offer the other side, by asking more questions.
1st. Why did you use a poor frock coat pattern, for illustration, as you indicate, by saying: “If a cutter drafts a sack as we explained by a poor frock coat pattern,” etc.?
2d. Will not the diagram on page 77 in the October number of 1886, to which I alluded, produce the half sack coat nearly ½ inch larger than the frock, by sewing one seam less on the sack?
3d. Will not the sack coat armhole be nearly ½ inch longer over the back for the same cause?
4th. Will not the whole side of the back of the sack coat be nearly ½ inch longer than the frock for the same reason again?
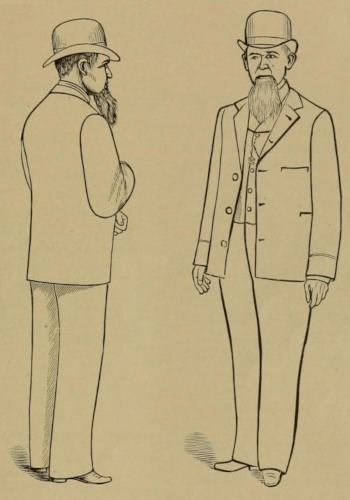
SEAMLESS BODY.
The coat, as represented by the above front and back views, I have on hand and intend to keep it, and anyone can examine it and satisfy himself that it is not misrepresented. My intention of making it, and representing it in this book, was to illustrate what a hot iron and a skilfull workman can do with a straight piece of woolen.
5th. Will not nearly ½ inch more width, and nearly ½ inch more length, in a sack coat back, produce the sack coat too large over the blade?
6th. Will not the extra length of nearly ½ inch in the sack back armhole produce too much under sleeve behind?
7th. Must not all armholes of both frock and sack coats be the same, if one is to fit as good as the other?
8th. When was Miss Scye born? In what dictionary did she live in 1886? Where is her headquarters now? Is she single, or is she married to Mr. Arm?
Note.—Fig. I and Fig. and Dia. XV, and Dia. II, X, XIV, XV, XIX, XX, XXI, XXII, XXIII, were drawn and finished in ink by myself, and they are in my own writing. All others were made by regular artists, as they claimed to be, after my pencil drawings. But the above mentioned had so many mistakes that I had to throw them away and make new drawings. All Dia. in the Supplement are my own drawing. It may be that my lines and figures are not so nicely drawn, but I know that they are correct and that they are plain. It may also be, that in the opinion of some, I have drawn too many lines and put on too many numbers, but this book is not written for professors alone, but for students and new beginners in cutting, as well as for tailors, and can not be made too plain.