Helpful Hints and General Directions
Reading edition
HOW TO DETERMINE SIZE TO MAKE: Directions are based on standard measurements listed below. Allowance has been made to size, stitch, yarn and style of garment for best results. These are general body measurements and may vary with each individual.
SIZE 10 12 14 16
BUST 32½″ 34″ 36″ 38″
WAIST 24″ 25½″ 27″ 29″
HIP 34½″ 36″ 38″ 40″
Consult chart to determine size to make not overlooking the fact that these are body measurements and not measurements of finished garment.
HOOKS, TERMS AND ABBREVIATIONS:
Crochet Hooks are made in steel, plastic and aluminum. Steel crochet hooks range in size from 00 the largest to size 14 the smallest. Aluminum crochet hooks range in size from C through K and plastic crochet hooks come in the following sizes: OD, 1-2E, 3-4F, 5G, 6H, 8I, 9J. The size of needle affects the gauge and therefore the measurements of the finished garment. It also affects the texture of the work. A needle that is too fine for the yarn makes the garment stiff and a needle that is too coarse makes the garment stretchy.
Tapestry Needles are large-eyed blunt pointed needles used for sewing garments tog or embroidery.
An asterisk (*) indicates that instructions immediately following are to be repeated the given number of times, in addition to the original. “Repeat from * 4 times” means 5 times in all.
Even means that a row or rnd is to be worked without increasing or decreasing.
Work means to continue in same stitch you have been working.
Directions in parentheses are repeated as often as specified. “(Ch 3, sc in next sp of petal) 3 times” means whatever is enclosed in parentheses is to be repeated for 3 times in all.
CROCHETING ABBREVIATIONS:
ch—chain, sc—single crochet, dc—double crochet, sdc—short double crochet, hdc—half double crochet, trc—treble crochet, sl st—slip stitch, dec—decrease, inc—increase, st—stitch, tog—together, rnd—round, beg—beginning, sp—space.
TO MAKE DAISIES:
These directions can be used for the HERO Crazy Daisy Winder and for the HERO King Size Crazy Daisy Winder.
A: Hold winder in left hand with flat side in palm of hand. Turn knob to release spokes (see illustration A).
B: Turn winder over with knob underneath and flat side with spokes extended facing you. Hold winder in left hand. With left thumb hold yarn at center leaving end to extend about 1″; with right hand, pass yarn from left to right around spoke No. 1; then across center from right to left around spoke No. 2 directly opposite. Wrap around these 2 spokes once more in the same manner, or as many times as desired (the number of wraps depends upon the thickness of the yarn you will be using). Bring yarn across center and wind from left to right around spoke No. 3; then across center from right to left around spoke No. 4. Wrap around these 2 spokes once more, or as many times as you wrapped around spoke 1 and 2. Bring yarn across center and wind from left to right around spoke No. 5; then across center and from right to left around spoke No. 6. Wrap around these 2 spokes once more or as many times as you wrapped around spoke 1 and 2. Continue in this manner to wrap yarn around 2 spokes directly opposite each other and then passing onto the next 2 spokes until all spokes are wrapped, ending with spoke No. 12. Bring yarn across center and cut leaving 1″ extended beyond center (see illustration B). Do not remove from winder.
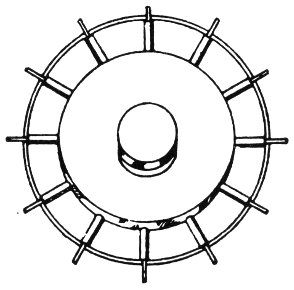
A
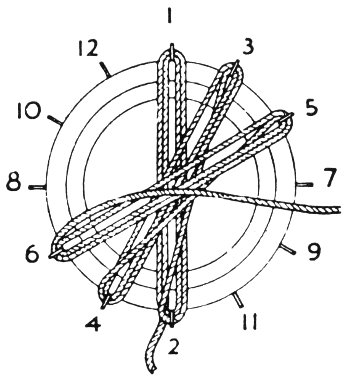
B
C: Center: Thread tapestry needle with yarn. The side facing you will be the wrong side of the daisy. Fasten at center of wrong side as for embroidery. Insert needle under 4 petals and draw yarn through; bring yarn back over last 3 of the 4 petals; insert needle under these 3 petals plus 1 more, making 4 petals in all; draw yarn through. Continue in this manner to bring yarn back 3 petals and then draw it under 4 petals each time until you have made 13 sts. Be sure to have 13 sts or center will be incomplete. As the center sts are worked, weave around the starting end of daisy for a few sts to fasten it securely. Fasten on wrong side. Cut ends (see illustration C). Turn knob to draw in spokes and release daisy.
D. Right side of daisy.
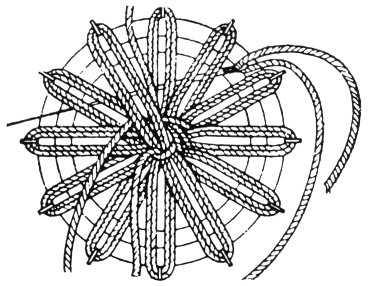
C
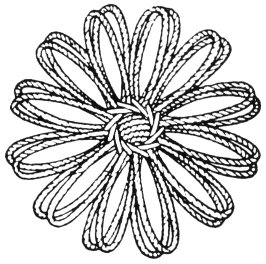
D
JOINING A: Picot Joining of Daisies: These directions can be used for the Crazy Daisy Winder and for the King Size Crazy Daisy Winder. Note: Connections for daisy have been written for a sport yarn or knitting worsted. The number of chains used in connecting the daisies to each other may have to be adjusted if any other type of yarn or cotton is used.
1st BLOCK: Using crochet hook, sc in sp of petal of daisy (make sure to take up as many of the 4 petals as you wrapped around for each petal when winding). * (ch 4, sc in sp of next petal) 3 times, ch 5, sl st in side-top of last sc (picot); repeat from * twice more, ending (ch 4, sc in sp of next petal) twice, ch 4, join with a sl st to first sc, ch 5, sl st in side-top of last st (picot), 4 picots around. Leave a 2″ thread and fasten off securely on back.
2nd BLOCK: Sc in sp of petal of 2nd daisy. (Ch 4, sc in sp of next petal) 3 times, place daisy back to back to first block, ch 2, sl st in sp of picot on first block, ch 2, sl st back into last sc on 2nd block to complete the picot joining. (Ch 2, sl st in next ch-4 sp on 1st block, ch 2, sc back into next petal on 2nd daisy) 3 times. Ch 2, sl st in center of corner picot on first block, ch 2, sl st back into last sc on 2nd block to complete picot joining. (Ch 4, sc in sp of next petal on 2nd daisy) 3 times, ch 5, sl st in side-top of last sc for a picot, (ch 4, sc in sp of next petal), twice, ending ch 4, join with a sl st to first sc, ch 5, sl st back into last st to complete the picot. Leave a 2″ thread and fasten off securely on back.
3rd BLOCK: Join a 3rd block to another side of first block as follows: Sc in sp of petal of 3rd daisy. (Ch 4, sc in sp of next petal) 3 times, hold 3rd daisy back to back to first block, ch 2, sl st in sp of picot on first block, ch 2, sl st back in last sc on 3rd block, (ch 2, sl st in next sp on first block, ch 2, sc back into next petal on 3rd block) 3 times, ch 2, sl st in center st between the 2 picots that join the first and second block, ch 2, sl st in last sc on 3rd block, (ch 4, sc in sp of next petal) 3 times, ch 5, sl st in side-top of last sc (picot), (ch 4, sc in sp of next petal) twice, ch 4, join with a sl st to first sc, ch 5, sl st in last st to form a picot. Leave a 2″ thread and fasten off securely on back.
4th BLOCK: Join to one side of 3rd and one side of 2nd block as follows: Sc in sp of a petal of 4th daisy. (Ch 4, sc in sp of next petal) 3 times. Hold 4th daisy back to back to 3rd block, ch 2, sl st in sp of picot on 3rd block, ch 2, sl st in last sc on 4th block to complete picot joining. (Ch 2, sl st in next sp on 3rd block, ch 2, sc back into next petal on 4th block) 3 times, ch 2, sl st in center of the 3 joined picots that connect blocks 1, 2 and 3, ch 2, sl st back into last sc on 4th block (this completes a 4 picot joining). (Ch 2, sl st in next sp on 2nd block, ch 2, sc back into sp of next petal on 4th block) 3 times, ch 2, sl st in sp of picot on 2nd block, ch 2, sl st back into last sc on 4th block to complete picot joining. (Ch 4, sc in sp of next petal on 4th daisy) twice, ch 4, join with a sl st to first sc, ch 5, sl st back into last st worked to complete picot. Leave a 2″ thread and fasten off securely on back. Continue to make and join daisies for desired shape and size in this manner.
TO JOIN DAISIES WITH PICOT JOINING

Joining A
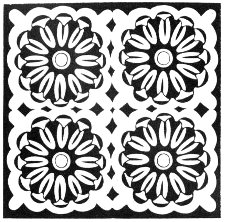
Joining B
JOINING B: 1st BLOCK: Rnd 1: With hook, sc in sp of petal (make sure to take up as many of the petals as you wrapped around for each petal when winding), * ch 4, sc in sp of next petal; repeat from * around, end ch 4, join with a sl st to first sc. Rnd 2: Sc in first sp, * (ch 4, sc in next sp) 3 times, ch 5, sl st back into sc to form a picot; repeat from * around, ending (ch 4, sc in next sp) twice, ch 4, join with a sl st to first sc, ch 5, sl st back into sc to complete picot. Leave a 2″ thread and fasten off securely on back.
2nd BLOCK: Rnd 1: Repeat rnd 1 of first block. Rnd 2: Sc in first sp, (ch 4, sc in next sp) 3 times, place daisy back to back to first block, ch 2, sl st in sp of picot on first block, ch 2, sl st back into last so on 2nd block to complete the picot joining. (Ch 2, sl st in next ch-4 sp on 1st block, ch 2, sc back into next ch-4 sp on 2nd block) 3 times. Ch 2, sl st in center of corner picot on 1st block, ch 2, sl st back into last sc on 2nd block to complete picot joining. (Ch 4, sc in next ch-4 sp on 2nd block) 3 times, ch 5, sl st back into sc to form a picot, (ch 4, sc in next ch-4 sp on 2nd block) twice, ch 4, join with a sl st to first sc, ch 5, sl st back into sc to form a picot. Leave a 2″ thread and fasten off securely on back.
3rd BLOCK: Rnd 1: Repeat rnd 1 of first block. Join 3rd block to another side of first block as follows: Rnd 2: Sc in first sp, (ch 4, sc in next ch-4 sp on 3rd block) 3 times, hold 3rd block back to back to first block, ch 2, sl st in sp of picot of first block, ch 2, sl st back into sc on 3rd block for completion of picot joining. (Ch 2, sl st in next ch-4 sp on first block, ch 2, sc back into next ch-4 sp on 3rd block) 3 times. Ch 2, sl st in center of joined picots of first and second block, ch 2, sl st in sc on 3rd block to complete picot joining. (Ch 4, sc in next sp on 3rd block) 3 times, ch 5, sl st back into sc to form a picot, (ch 4, sc in next sp on 3rd block) twice, ch 4, join with a sl st to first sc, ch 5, sl st in sc to complete picot. Leave a 2″ strand and fasten off securely on back.
4th BLOCK: Rnd 1: Repeat rnd 1 of first block. Join 4th block to one side of 3rd and one side of 2nd block as follows: Rnd 2: Sc in first sp, (ch 4, sc in next sp of 4th block) 3 times, hold 4th block back to back to 3rd block, ch 2, sl st in sp of picot on 3rd block, ch 2, sl st in last sc on 4th block to complete picot joining. (Ch 2, sl st in first ch-4 sp on 3rd block, ch 2, sc in next ch-4 sp on 4th block) 3 times, ch 2, sl st in center of the 3 joined picots that connect block 1, 2 and 3, ch 2, sl st back into last sc on 4th block (this completes a 4 picot joining). (Ch 2, sl st in first ch-4 sp on 2nd block, ch 2, sc in next ch-4 sp on 4th block) 3 times, ch 2, sl st in sp of picot on 2nd block, ch 2, sl st back into last sc on 4th block to complete picot joining. (Ch 4, sc in next ch-4 sp on 4th block) twice, ch 4, join with a sl st to first sc, ch 5, sl st in sc to complete picot. Leave a 2″ thread and fasten off securely on back. Continue to make and join daisies for desired shape and size in this manner.
5