FOREWORD (continued 3)
Reading edition
TO PROCEED WITH A MURAL PANEL a pan of metal two inches larger each way than the panel dimensions should be made from galvanized sheet metal. This is to hold the mural cement slab onto which the subject is to be painted.
THE CEMENT SLAB IS MADE by surrounding an oiled surface (wood or glass) with wooden retaining walls similar to those used in making tiles. These walls should be oiled and otherwise made proof against leakage of water as it is necessary that all water in the cement be retained to perfect the hardening. The mixture of sand and cement (one part cement and two parts sand or gravel) is next poured into this space and permitted to set for several hours. Over this surface a thin layer of neat cement may be spread or dry neat cement sprinkled through a sieve and worked into the moist surface with the flat side of a palette or other knife.
THE COLOR IS THEN APPLIED by mixing up the colors to be used into a paste form and these can be applied with a brush or with a palette knife shaping and forming the subject as if painting in ordinary colors.
If the color sinks in too rapidly and becomes lost, the under surface is too wet and the painting should be delayed for several hours or until the color applied lays upon the surface properly.
THE CEMENT SLAB IS TRANSFERRED TO THE METAL TRAY as soon as it is removable from its surface. In fact, a good way is to move the wood or glass under support with the cement slab upon it and place the whole combination into the tray. If the sides are well set the retaining walls can be removed, and as soon as the whole layer is set enough so as not to be dissolved by water, water is poured in the tray until it comes half-way up the side of the cement slab. This will prevent the whole slab drying prematurely as the water will supply all that is needed. If the water becomes absorbed more should be poured in. After it has remained in the tray for a week, it may be withdrawn and permitted to dry gradually. Wet cloths around it will prevent too rapid drying.
WHEN WORKING UPON THE SURFACE, the surface should be completed as the space is covered, avoiding returning to work upon any part after it has commenced to set. If the surface has formed a shell or thin layer and reworking breaks this shell, the color in that section will not harden properly. It requires direct, confident handling of the subject, and reworking of the surface such as the painter in oils is accustomed to is not possible with color cement.
A WHITE CEMENT SURFACE can be formed over a cement layer and when this is nearly dry thin washes of color cement may be used onto the surface similar to working with water color. The white cement will absorb the color easily and parts of the design may be worked in opaque or solid colors.
A DARK WORKING BACKGROUND may be used by mixing a layer of dark blue, brown or green. A layer of black can also be used. Brilliant colors can be brushed or dripped into this so that they sink and become a part of the dark surface without being in relief. A slight shaking of the surface or the tray will produce this amalgamation of colors.
WATER SHOULD NOT REACH THE COLOR SURFACE until after it is entirely dry. To avoid water splashing onto the surface from the tray it is the best policy not to pour water into the tray before the painting is completed and only when the tray is to be left undisturbed.
TO CONNECT THE COLOR CEMENT MURAL with the building wall, the space to receive it should be well moistened and covered with neat cement which is well worked into the surface. The back of the cement mural is similarly treated and the two cement surfaces are pressed together and held in position by a brace or support until thoroughly dried. The space or border edge around the panel should be filled in with cement at the same time.
Decorations Painted with Color Cement
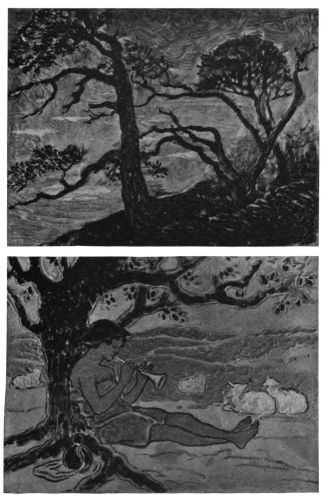
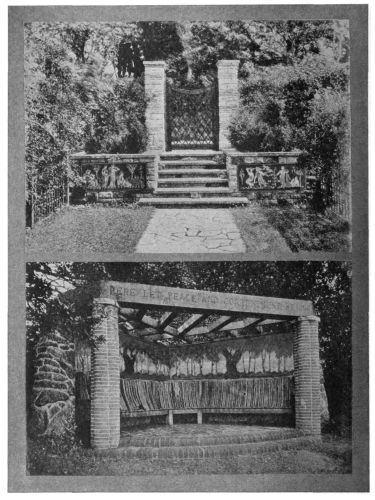
Cement Color Painted Decorations Applied

CHAPTER 18 Tiles and Pottery with Color Magnesite Cement Work

MAGNESITE CEMENT WORK is a mixture medium producing a hard marble-like quality and does not contain any Portland cement, but is given in this book in order to complete the possible plastic mediums for the worker wishing to mold objects with permanent durable mediums.
MAGNESITE CEMENT IS A SUCCESSFUL INDUSTRIAL MATERIAL and is used by builders in interior trimmings for floor tiles, in making of bath-room surfaces and recently used in coating stairways and hallways, producing a pleasing texture and durable surface. The material is fireproof, cleanly and better than marble.
MAGNESITE IS A FORM OF LIMESTONE and is a carbonate of magnesia which is produced by burning until all gases have been eliminated, leaving only the oxide in the form of a pure white powder. It comes from Europe and is found in Maryland, Massachusetts, New York, Vermont, California, and Washington. It has been used extensively in Europe and when better known will be used more generally in America.
MAGNESITE CEMENT AS AN ENAMEL has been used as a hardening surface on concrete and cement surfaces and also on clay brick. The concrete or cement or brick surfaces should be thoroughly moistened before the magnesite mixture is placed upon it to avoid the moisture from the magnesite being absorbed and improperly drying.
THE MATERIALS FOR PRODUCING MAGNESITE are calcined powdered magnesite, chloride of magnesia, sulphate of magnesia, white sand, white talc and fine sawdust.
The magnesite should be kept in a container, proof against exposure to air and dampness, in order to preserve its full setting qualities.
Chloride of magnesia has the appearance of ice or alum and when exposed has the tendency to dissolve but does not deteriorate. It is the chemical which when united with the magnesite produces the binding or cement qualities.
Sulphate of magnesia or epsom salts is an easily secured material and is used in very small quantities in the formulae for producing magnesite cement and which is given later in this chapter.
The white talc or soapstone used for giving a smooth and polished white background is used as a filler.
White sand and the fine sawdust should be absolutely clean and are mixed with the other ingredients to produce the composite mixture to produce Magnesite Cement.
TO COMBINE THE INGREDIENTS proceed as follows:
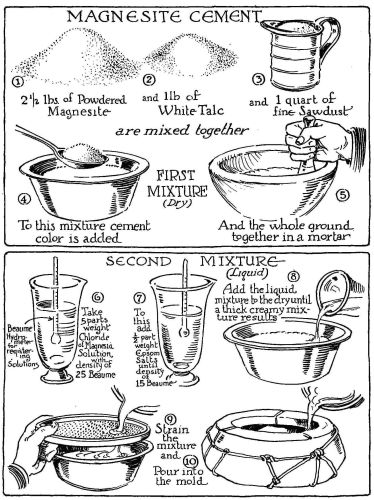
FIRST MIXTURE. Two and one-half pounds of powdered magnesite and one pound of white talc are mixed thoroughly with one quart of fine sawdust. To this mineral, dry color similar to that used and described for color cement should be added if a color tone is desired. About one-half as much color should be used as there is magnesite. In other words, one pound of color should be used with two and a half pounds of powdered magnesite. A stone mortar should be used to grind the entire mixture well together.
This first combination is a dry mixture and is then mixed with the second mixture which is liquid.
SECOND MIXTURE. Take five parts by weight of chloride of magnesia solution with a density of 25 tested with a Baumé hydrometer which is a simple glass tube secured at any druggist for registering solutions. To the chloride of magnesia solution add one-half part by weight of sulphate of magnesia which is epsom salts and test with the hydrometer until it records 15.
TO USE THE HYDROMETER, place water in a container and if the hydrometer is placed in it, it will register “0” and when the chloride is placed in it, and dissolves the hydrometer will commence registering the density of the solution. When it records 25 no more chemical should be added. More water should be added to correct the density if needed. The same procedure is followed for registering the 15 for the epsom salts.
Chloride of magnesia will dissolve more rapidly if it is broken up, and distilled water may be used if the usual available water contains lime, iron or other injurious minerals. Some workers use rain water for many purposes.
THE FINAL MIXTURE, or third step in the mixing, is to take the first dry mixture and add enough of the second liquid combination to produce a thick creamy mixture of the two. Strain this after it has been well mixed.
TO PRODUCE TILES OR OTHER OBJECTS, THE MATERIAL is quickly poured into the molds. A brush may be used for brushing the material well into the edges and corners. A gentle jarring of the mold will remove the air bubbles and the molds with the magnesite is permitted to dry for seven to ten hours before the cast is removed from the mold.
FOR VARIOUS COLORS in the same design, the dry mixture can be mixed with color and the liquid, or second mixture, added to it. This can be applied to the mold in the same way as the color was used with cement, and after it has set, can be backed with a general color of magnesite cement or with plain magnesite mixture.
TO FINISH MAGNESITE let it remain drying for two or three days after which it can be washed with slightly warmed water to remove the thin scum on the surface. A thin coating of beeswax or floor wax well polished will finish the article.
The Making of Magnesite Cement
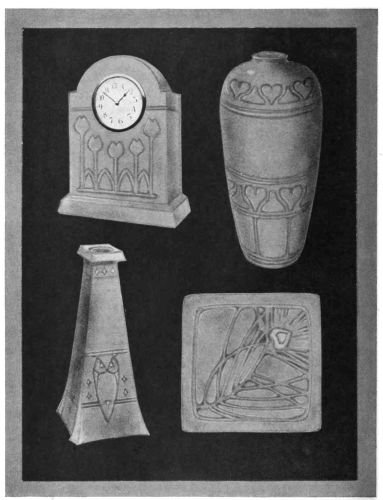
Magnesite Objects Cast from Molds
CHAPTER 19 Color Cement Projects for the Schoolroom

CEMENT TILES simple in form may be made in any grade where tiles are made in clay or the modeling waxes. Many times clay is used in making tiles and the coloring is done with colored chalks or paints. These can be but temporary in effect and are broken easily, being impractical for use. The child’s interest will be much greater where he knows that with cement the results will be durable as well as to know that he is working with the same materials that the “grown-ups” use.
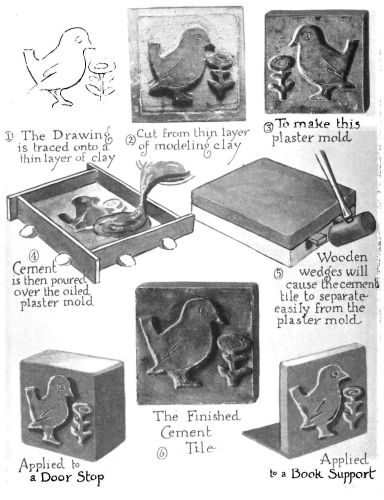
COMMENCING WITH SMALL TILES IS THE BEST PLAN. Have the class plan from nature a rosette design for a two-inch tile. An excellent way to secure interesting patterns is to fold a two-inch square paper into four folds and cut a design in the four folds. Opening out these folds will often reveal a very interesting design. When the student has completed the design, it can be traced with a pencil onto a flat layer of modeling wax, and a pencil, stick or nail used to cut away portions of the design. The pattern designed may be the part taken out or the background may be the part to be removed. In either case the part removed should be scraped out about a quarter of an inch deep and the sides should not slope in but rather outward. If the design is to be simply produced by incised lines only (and charming results can be thus secured), the stick, nail or instrument used should be sharpened so that it scrapes a groove in the clay that remains widest at the surface. The design being completed in the clay or wax, a few strips of thick cardboard or heavy oiled paper is cut so as to project above the clay or wax tile. This projection must equal the thickness of the mold to be made in plaster-of-Paris. These strips may then be placed up against the tile so as to surround it, and are to be retained in position with nails or pins or heavy objects.
When the pupils have all reached this stage of the tile, the teacher then may mix up the plaster and pour it into the molds, illustrating the correct method for the students to afterwards follow.
AFTER THE PLASTER TILE IS RELEASED, it is brushed well with oil and again surrounded with the strips of paper. Cement with any desired color added to it is then poured in and after two or three days the completed tile can be removed.
To secure color effects it is only necessary for the teacher to mix two colors of cement sufficient for the student’s use. The student then places a thin layer of the color on the plaster mold, keeping it within a certain portion of the design. The second color is placed on the spaces left, and after the color has set for a short time it is backed with ordinary neat cement and the whole tile permitted to dry several days.
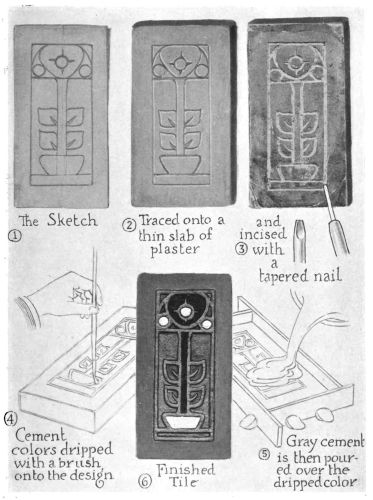
TILES WITH THE DESIGN IN A RELIEF LINE can be made as follows: The teacher should have previously made a number of plaster tiles with a smooth surface. These can be easily made by flowing the plaster onto glass or other hard, smooth surface, the plaster being retained between two strips of wood 4 × 4 inches. Cutting these bars of plaster into squares, one is given to each student. A simple design is made on paper first and traced onto the plaster tile. A nail or hard pencil is then used to incise the design in the plaster, after which it is brushed well with oil and surrounded with cardboard strips and cement poured into it. This will result in a tile with the design in relief. Within these relief lines cement with color added to it may be placed and the tiles placed in a tray of water with the water coming half-way up the side of the tile. The tile will be hard enough to remove in five days.
SIMPLE ROUND PAPER WEIGHTS and tiles that are not square can be made by the same method. A little ingenuity in arranging the retaining cardboard strips around the plaster or wax model will solve the producing of irregular forms.
FLOWER AND PLANT HOLDERS, FISH PONDS, AND BOOK SUPPORTS can be made by using the tiles as the principle part. Take four tiles that have not been permitted to dry and place them face against the inside wall of a rough box form without the bottom, the size of the box to conform to the tiles. Pour about an inch of cement into the bottom of the box to form a bottom. When this has partly set, place strips of wood across the inside covers to hold the cement which is then poured in so as to connect the tiles where the corners meet. The cement should be poured also into the outside corner spaces. After the complete form has dried for a day, pour water inside and let it remain for three days or more. Release and trim corners and inside as desired. A thin mixture of colored cement placed inside and then poured out will give an inside lining, producing a finished effect.
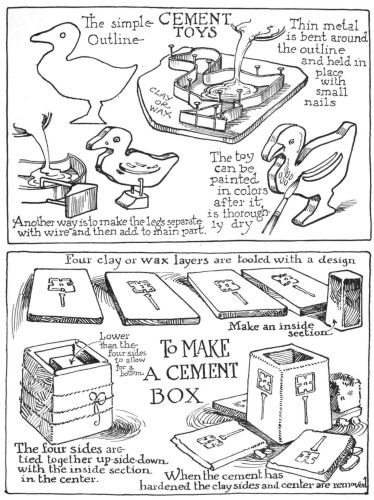
SAND BOX ANIMALS AND TOYS can be made in a very durable form by the use of cement. The method to follow in class should be as follows: Have the pupils outline an animal in simple form on paper. No intricate or small details should be attempted in this outline and the feet or lower portions of the animal must be planned so that it will stand up easily.
After the outline is made then secure thin strips of tin or other sheet metal and have the pupils bend it with their fingers and with the use of a ruler to conform to the outline. The metal should be about two inches wide. The outline need not be made entirely of one piece of metal but perhaps of several. When the outline is completed in metal, it should conform fairly closely to the outline on the paper. This metal rim is then pressed slightly into wax or clay, or it may be placed on glass or on an oiled card. If clay is used, the eyes, wings, or other parts may be incised in the clay within the metal rim. A one-inch layer of cement is then poured in the metal rim, and after several days, the metal rim is removed and the cement around it is evened where necessary and colored if desired. By making the feet of birds or animals first, combining wire legs with them, the body can then be cast, combining the body and the legs through the wire connection.
MOSAIC CEMENT TILES can be easily produced as follows: Secure a number of the small mosaic stone squares used by masons and tile setters for inlaying floors. These come in many colors and different geometric forms. Plan a four-inch tea tile arranging a design with the use of two or three different colors of mosaics. When the arrangement or design is decided upon, the mosaics should be glued face downward to a piece of cardboard or glass. If glass is used, it should be brushed with oil after the mosaics have been glued into position and before the cement is poured. Where glass is used the design arrangement on paper can be slipped underneath the glass to show the location and correct position for gluing the mosaics onto the glass surface. The mosaic pattern is then surrounded with retaining bars or slips of wood or surrounded with metal and the cement poured over the mosaics until the right thickness is secured. It is then left for several days to dry, after which it is removed from the glass or the cardboard is peeled away from the cement surface. The tile is then finished after being placed in water for a week to harden. Glue a piece of soft leather or felt on the bottom when the cement has thoroughly dried.
CEMENT BOXES AND BOOK SUPPORTS can be made by the use of mosaics, gluing them onto sections of boards and then assembling the boards and tying them so that they will hold the cement that is poured in to finish the object. Where cement is removed from the mold before it has thoroughly hardened, it can be shaped with a knife, and mosaic book supports or boxes made in general form can be shaped easily this way.
VASES AND BOWLS as a problem for the schoolroom can be simplified if the teacher produces previously several vase molds so that the pupils can make their casts in individually selected colors, after which they can scrape or slip paint the shapes as they are removed from the molds.
THE POSSIBILITIES OF COLOR CEMENT for schoolroom applied arts are many and the interested teacher can arrange working equipment and methods of presentation according to space and class size. One ingenious teacher placed building paper on the floor of a schoolroom corner section, covered several old tables with oil-cloth and secured excellent results with her class room problems by permitting a small group of students to work at a time on account of the limited equipment.
Another teacher had her students design and make tiles for a new school building and today they are used as part of the enrichment of the school. This correlation of the student’s work with every day utility is one of the attractions of color cement for the school student, and innumerable practical applications can be found for color cement. The various problems for which directions have been given in the chapters of this book can be arranged in more or less simple form for the various school classes; and as a vocational subject it combines design with construction in a sensible proportion.
Schoolroom Projects in Cement
A Tile in Cement Made in the Grammar Grades
A Tile Made in the Intermediate Grades
Color Cement Tiles and Pottery Made by the Students of a High School.
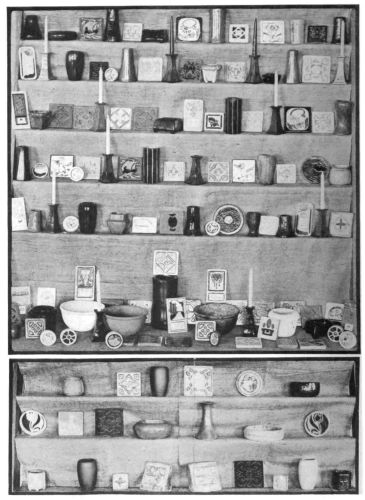
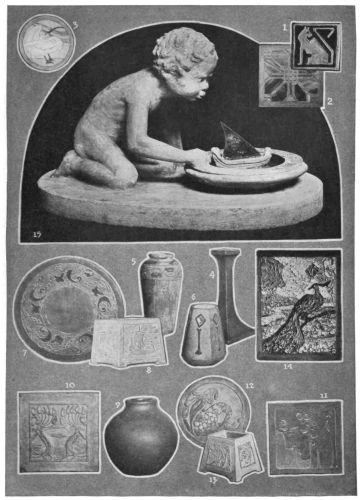
Problems in Cement by Students of an Art School. 1 to 3 are Elementary Problems. 4 to 13 are Secondary Problems. 14 is a Palette Knife Painting in Colored Cement. 15 is a Fish Bowl and Sun-Dial Made in Cement by the Use of a Glue Mold.
CHAPTER 20 Designing for Tiles and Pottery

PRINCIPLES OF PATTERN DESIGN are important for the craftsman to be familiar with, for the reason that it gives points with which to “check up” drawings before they are applied, as well as to permit greater facility in designing.
MANY DESIGN WELL without having learned the theories of design, having a natural sense of good arrangement of details and spaces. However, natural designers, as well as those who do not find it easy, will profit by becoming well grounded in the design principles.
NATURAL FORMS afford excellent examples of principles, giving beauty in line, form and color; and the more the designer refers to nature for these ever occurring lines of grace and beauty, the greater will be his development as a designer.
SUCH STUDY FROM NATURE should be intelligently pursued. To study nature for design motifs does not mean that “photographic” arrangement or life-like sprays should be applied onto surfaces. The most deplorable forms applied to pottery or other handicrafts are those that have been made with no thought of the surface influence upon the pattern designed. The designer should refer to nature only as a reference from which inspiration is received for motifs to be used. In every instance the forms in nature should be interpreted into design and so transposed that they beautify the surface irrespective to resemblance to the natural source. Nature uses patterns in all her kingdoms correctly. The patterns on petals and leaves, the pattern on bird plumage and animal skins, as well as nature’s designs on minerals are all beautifully arranged to conform to the contours of the surface. It would have been just as easy for the Great Creator to produce forget-me-nots and violets in natural splendor upon the leopard, but the ringed spots varying and converging to the lithe, graceful lines of the surface without any appearance of being in relief upon the skin are much more beautiful. Those who state that “Nature cannot be improved upon” as an excuse for natural representation in designing are overlooking nature’s real poetic opportunities to the designer. No true artist or designer ever hopes to actually represent nature. It is impossible. The best that can be done is each individual artist’s interpretation of nature forms founded upon governing principles. These principles have been tested by centuries of scrutiny and all beautiful forms of historic ornament are governed by principles which, as has been stated, originated in nature’s design forms.
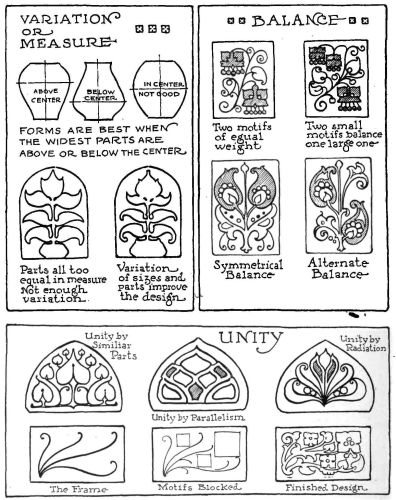
RADIATION, SYMMETRY, UNITY, SUBORDINATION, MEASURE, ETC., are all principles of importance, but the three that are of great value to the craftsman are Measure, Balance and Unity.
THESE THREE PRINCIPLES can be used to test the line, form and color of the design before it is applied.
MEASURE is the principle that requires a consistent varying of areas, line directions or colors. Measure creates interest. It does not mean that large and small parts are to be designed without any further consideration. There must be a right proportion of one to the other and balanced as regards their location. Measure will control the contours or forms of vases and motifs for if the widest part of the form comes above or below center of the axis, it will be more interesting than if located in the center. The working plate illustrates this.
BALANCE is the principle which creates harmony by contrasting measures. If we have a heavy spot on one side of a design, the eye requires satisfaction by seeing another spot or several parts equal in weight to the large spot on the opposite side of the design. Balance is also secured by locating a unit or design spot in the proper location of a space, without necessarily having a second opposite spot. Nevertheless, it is balance in relation to its background. Balance may be secured by Symmetry, making parts like-sided or balance may be secured by equal amounts of form on two sides of an axis, even though not symmetrically placed. (See working plate.)
Balance in color requires that if a color is used in a single spot that its location be pleasingly balanced within the space decorated. Where a color is to be used in several places in the design, these different spots should balance each other.
UNITY is the principle which brings harmony into design by similarity of parts, by keeping lines of a design parallel to the space outline within which they are designed. Again the main lines of a design if radiating from a point or axis within or without the design space produces unity. Unity is produced by harmonious values and by harmonious color.
A DESIGN WITHOUT UNITY may be one where the parts are too varied in form, where they do not pertain or group with each other, but appear “explosive.” Different finishes to the motifs in a design destroy unity. Avoid mixing naturalistic or conventional and geometrical motifs in the same design, and using lines or forms which are not pleasing in direction, or harmonious with the space in which they are placed.
UNITY requires that all parts of a design be of similar expression. To have one part of a design based upon a poppy or bird with a section drawn naturalistic and another part conventionalized and possibly a third section in geometric arrangement is to produce disorder or dissimilarity, and yet such fault is apparent in a large proportion of designs.
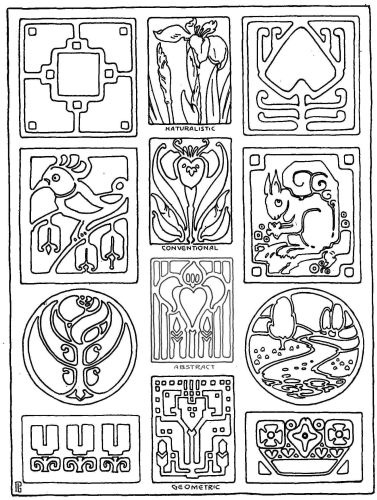
ALL DESIGN FORMS CAN BE DIVIDED INTO FOUR DIVISIONS and these divisions can be defined as Naturalistic, Conventional, Geometric, and Abstract. If any design motif for a tile or any application is started in a Naturalistic manner, then all parts should be expressed in the same manner.
THE NATURALISTIC DIVISION OF DESIGN is where natural forms and growth arrangements are planned or designed within a given or arbitrary space. The decorative arrangement comes from carefully planning the subject so that it composes in a pleasing way within the space. The Japanese designs are good examples of this kind of decoration. It will be found that careful attention is given to the background spaces as well as to the parts of the subject being drawn. Strong outlines, double outlines and individual techniques or renderings further increase the decorative quality of a naturalistic design.
THE CONVENTIONAL DIVISION OF DESIGN is where a typical form from a nature growth is taken and repeated in regular repetition, or a general shape formed from a plant form and used to interpret the subject. For instance, a flower with several petals will have each petal different in contour, but in conventional design, one shape is chosen and this shape is repeated. While no two leaves are alike on the plant, one or two conventionalized shapes are determined and these shapes are then used throughout the design. The veins and stems of the flowers may be elaborated or the leaves may have their centers designed or “inhabited” so that added interest may be created in the subject.
THE GEOMETRICAL DIVISION OF DESIGN is when the subject is designed entirely with triangular, rectangular, square, oval, elliptical, or circular shapes, or where the outlines follow straight lines which may go at right angles to each other or in oblique directions. Such straight line designs are technically required for rug or textile designs and due to the ruggedness and strength or interest achieved through a straight line rendering are often adapted for decorating many other forms of applied art.
THE ABSTRACT DIVISION OF DESIGN is represented by that form of design which may have little direct representation of the natural forms, but has been developed from it. We find that the wave border of the Egyptians and the Greek fret are abstract designs of the water. The Peruvian Inca, the Aztec and North American Indian used abstract designs of the bird and other nature forms in their textiles and pottery. The abstract design requires a careful arrangement of line and form spaces, depending as it does on good design for interest rather than its identity to nature forms.
LINE UNITY is that principle which appeals to the eye by the relation of lines in the design to the space decorated. Curved lines for curved forms and straight lines in the designs decorating straight lined forms will do much toward making all parts consistent. A line not too curved and with a blending of straight lines with the curved direction produces a line of character and strength for design rendering.
A TEST OF GOOD DESIGN is to see if the main lines or “frame lines” are pleasing in direction, decorating the space, whether any more details are added or not. No amount of filling in and adding of motifs will perfect an imperfect beginning.
BLOCKING IN of general forms is considered essential in freehand drawing and it cannot be discarded in designing. First plan the main lines of growth of the design. Then block in the masses or motifs to be used. The details and connections as well as the technique of the design will then be a simple matter to solve.
THE GREATEST ENJOYMENT to the craftsman in any line of endeavor lies only through working out of Good Design.
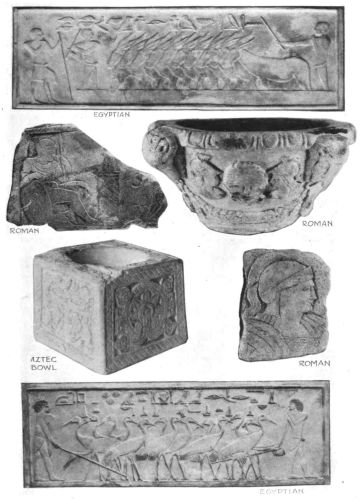
WHEN MODELING FOR COLOR CEMENT HANDICRAFT or for any applied art it will be found that three forms that are least modeled will be most pleasing in the years of usage. High relief is not refined or deservable in applied modeling. Sculptors everywhere are studying and returning to the chaste, quiet forms of flat bas-reliefs of which we find excellent examples among the early work of the Egyptians, Byzantines, the early Indian and Chinese carvings, as well as the work of the Aztecs and Maya Indians of early America. A few examples of these types are shown and workers in color cement will find ultimately that they have chosen a good influence if they will work their projects in color cement handicraft in this manner.
High projecting parts and naturalistic representation of flower or foliage masses are neither pleasing nor artistic and a visit by anyone to the good museums will fail to find any such productions from the art ages of the past recorded as good examples of the era.
Keep all parts applied to the curved or flat surface of the bowl, vase, box or tile so that it appears to have been always a part of it rather than an afterthought and detachable in relation.
Helpful Design Principles for Color Cement Work
Outline Patterns for Color Cement Handicraft
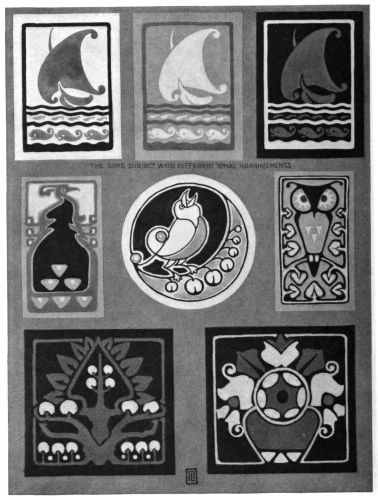
Tone Patterns for Color Cement Handicraft
Egyptian, Roman and Aztec Relief Decorations
Typographical errors corrected by the etext transcriber:
tested with a Beaume=> tested with a Baumé {pg 175}
40 degrees Baume=> 40 degrees Baumé {pg 153}